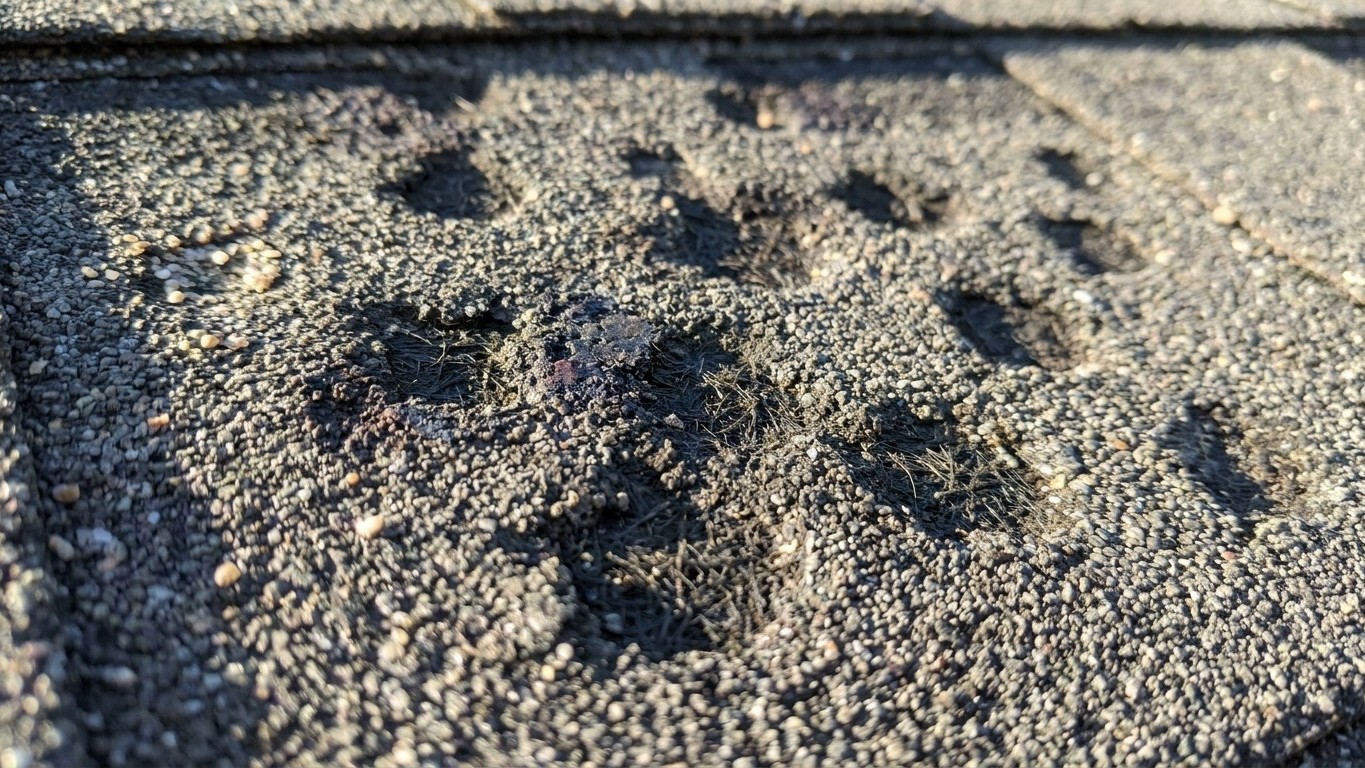

Hail damage rarely looks dramatic. On asphalt shingles it shows up as small dark circles, dents, or bare patches where granules have been knocked loose. On metal it’s a scatter of shallow dimples. On tile, it can be a hairline crack you’d miss unless the light hits it just right. None of that means the roof is failing today. It means water now has an easier path in, and that path gets worse with every rain that follows.
What is actually happening

A hailstone doesn’t need to break a roofing material to damage it. It needs to compress it. That impact point is what roofers call a bruise: a soft spot where the layer beneath the visible surface has been crushed or displaced, even though the top surface still looks whole. A bruise doesn’t leak the day it happens. That’s exactly what makes it easy to ignore and exactly why it matters.
On an asphalt shingle, the surface layer is a mat coated with granules, and those granules do one job: block ultraviolet light from breaking down the material underneath. A hail strike knocks granules loose or drives them into the mat, exposing the underlying layer in a spot the size of a coin. That spot ages differently from the rest of the roof from that point on, faster, and unevenly, which is part of why hail damage shows up later as a cluster of failures rather than one dramatic hole.
Metal behaves differently. The strike leaves a dent, and the metal around that dent has been work-hardened, meaning it’s now more brittle at that exact point than the metal around it. It won’t leak from the dent itself in most cases. The risk is at the fastener points and seams nearby, where the panel has shifted slightly and a gap that wasn’t there before now exists.
Tile takes the impact differently again. Clay and concrete tile are rigid, so instead of denting, they crack, and the crack doesn’t always go all the way through on day one. Repeated freeze-thaw cycles, foot traffic, or the next hailstorm can finish the job a crack started.
| Material | Immediate visible sign | Hidden bruise risk |
|---|---|---|
| Asphalt shingle | Dark circular spot, granule loss | Exposed mat ages faster in that spot |
| Metal panel | Shallow dimple or dent | Brittle zone around dent, seam movement |
| Clay or concrete tile | Hairline crack, chipped edge | Crack can propagate with weather cycling |
What ties all three together is this: the damage that matters most is the kind you can’t confirm just by looking at the surface. That’s what an inspection is for, and it’s why “the roof looks fine” and “the roof is fine” aren’t the same statement after a hailstorm.
What you can see without climbing
You don’t need a ladder to get a useful first read on hail damage. Most of what’s visible can be checked from the ground and from inside the attic, in that order.
-
From the ground. Use binoculars, or zoom in with a phone camera and look at the photos afterward where you can actually see detail. Work your way across the roof plane by plane, in good daylight, ideally not right after rain when wet shingles reflect light and hide marks.
- Dark, roughly circular spots scattered across a slope, not just one or two isolated marks
- Granules collected in gutters or at the base of downspouts, especially after the first rain following a hailstorm
- Dented or creased metal flashing around chimneys, vents, and roof edges, since flashing dents more visibly than shingles do
- Cracked or chipped tile edges, visible as small pale lines against darker tile
- Dents on any metal roof vents, gutters, or the metal caps on a chimney, which are a good proxy for what happened on the roof surface itself
-
From the attic. Bring a flashlight and go up during daylight hours, then turn the flashlight off for a moment before you start.
- Pinpricks of daylight showing through the roof deck, which means a gap exists somewhere above, even a small one
- Water stains on the rafters or the underside of the decking, old or new, since new stains often appear as a lighter ring around a darker center
- Damp or compressed insulation directly beneath a stain, which confirms water has actually been moving through rather than just condensing
- Any smell of mildew concentrated in one area rather than spread evenly through the attic
If either check turns up something, that’s enough information to justify a professional look. It’s not enough, on its own, to tell you how serious it is or what it will cost to fix, and that distinction matters when you’re deciding what happens next.
What it costs to leave it
Nothing happens instantly. That’s the problem, not the reassurance. A bruised shingle or a cracked tile doesn’t flood the attic on day one, so the damage sits there quietly while the roof keeps doing its job, mostly, until it doesn’t.
What happens first is usually small: a little moisture reaches the decking during a hard rain, dries out between storms, and leaves no obvious sign except a faint stain that’s easy to mistake for old discoloration. That cycle, wet then dry, repeats every time it rains, and each cycle works on the wood a little more. Plywood or OSB decking that stays damp longer than it stays dry starts to soften, and once it softens, fasteners no longer hold as tightly, which lets more water in, which softens more wood. It’s a loop that feeds itself once it starts.
Insulation is usually next. Wet insulation loses much of its ability to do its job, and it stays wet longer than the wood around it because it holds moisture instead of shedding it. That’s also where mold gets its foothold, quietly, in a part of the attic most people check twice a year at most.
The visible failure, the one that finally gets noticed, is often a ceiling stain or a soft spot in the ceiling drywall. By the time that shows up, the water has already been moving through the roof system for a while, and the fix is no longer just the original hail damage. It’s the hail damage, plus the decking it soaked, plus the insulation it ruined, plus the ceiling finish it stained. That’s the real cost of leaving hail damage unaddressed: not that it gets dramatically worse overnight, but that it converts a contained, surface-level problem into a layered one involving several different systems inside the house.
Documentation matters here, and not just for repair planning. Homeowner’s policies handle hail and wind claims differently depending on the policy and the state, and most have windows for reporting damage after a storm. The policy governs what’s covered and by when, so photographing what you find, noting the date of the storm, and keeping a record of the ground and attic checks puts you in a stronger position regardless of how the claim itself plays out.
What is not a householder job
Ground checks and attic checks are genuinely useful, and they’re also the limit. Getting on the roof itself to confirm or fix hail damage is a different category of task, and it’s worth being blunt about why.
Anything above a single story is not a reasonable DIY climb. The height that makes a fall survivable on a one-story home doesn’t apply on a second story or higher, and hail damage inspections often happen in the days right after a storm, when the roof surface is still wet, which is exactly when it’s most likely to be slick underfoot. Add moss, a steep pitch, or morning frost, and the risk isn’t theoretical anymore. Falls from roofs are a leading cause of serious injury in home maintenance, and they happen most often to people who felt confident right up until the moment they weren’t.
There’s also the matter of what the job actually requires once you’re up there. Confirming a bruise, checking flashing seams, or pulling a section of shingle to look underneath means having both hands free while standing on a slope, not holding a phone in one hand and a flashlight in the other. That’s a different physical task than looking through binoculars from the driveway, and it’s the reason roofing crews use harnesses, roof jacks, and footwear built for the surface, not because they’re being cautious, but because the job genuinely requires it.
The useful next step, once ground and attic checks raise a question, is a professional inspection rather than a personal climb. A trained inspector brings the equipment and the experience to tell a cosmetic mark from a structural one, and they can do it without turning a hailstorm into a fall injury. If you’re not sure what a full inspection involves or what it should turn up, a roof inspection guide walks through what to expect. And if the damage turns out to be real, the next question is who does the repair, which is exactly what a guide on hiring a roofer is built to answer.
Common questions
Does hail damage always mean a leak is coming?
Not immediately, and not always. A bruise or a dent can sit stable for a while. But it changes how fast that spot ages compared to the rest of the roof, which is why it’s worth having it checked rather than assumed harmless.
Can I tell how old hail damage is just by looking at it?
Not reliably. Fresh granule loss can look similar to older weathering, and a stain in the attic can be from last week’s storm or from a leak that started months earlier. That’s part of why documentation right after a known storm is useful, it ties the mark to a date.
What if I don’t see anything from the ground or attic?
That’s a reasonable sign things may be fine, but it’s not a guarantee, especially on a roof plane you can’t see clearly from ground level, like one that faces away from the street. A professional inspection is the only way to close that gap with confidence.
Should I file an insurance claim before or after an inspection?
That depends on your policy and your state, and there’s no single rule that applies everywhere. What helps regardless is having photos, the storm date, and notes from your ground and attic checks ready before you make that call.