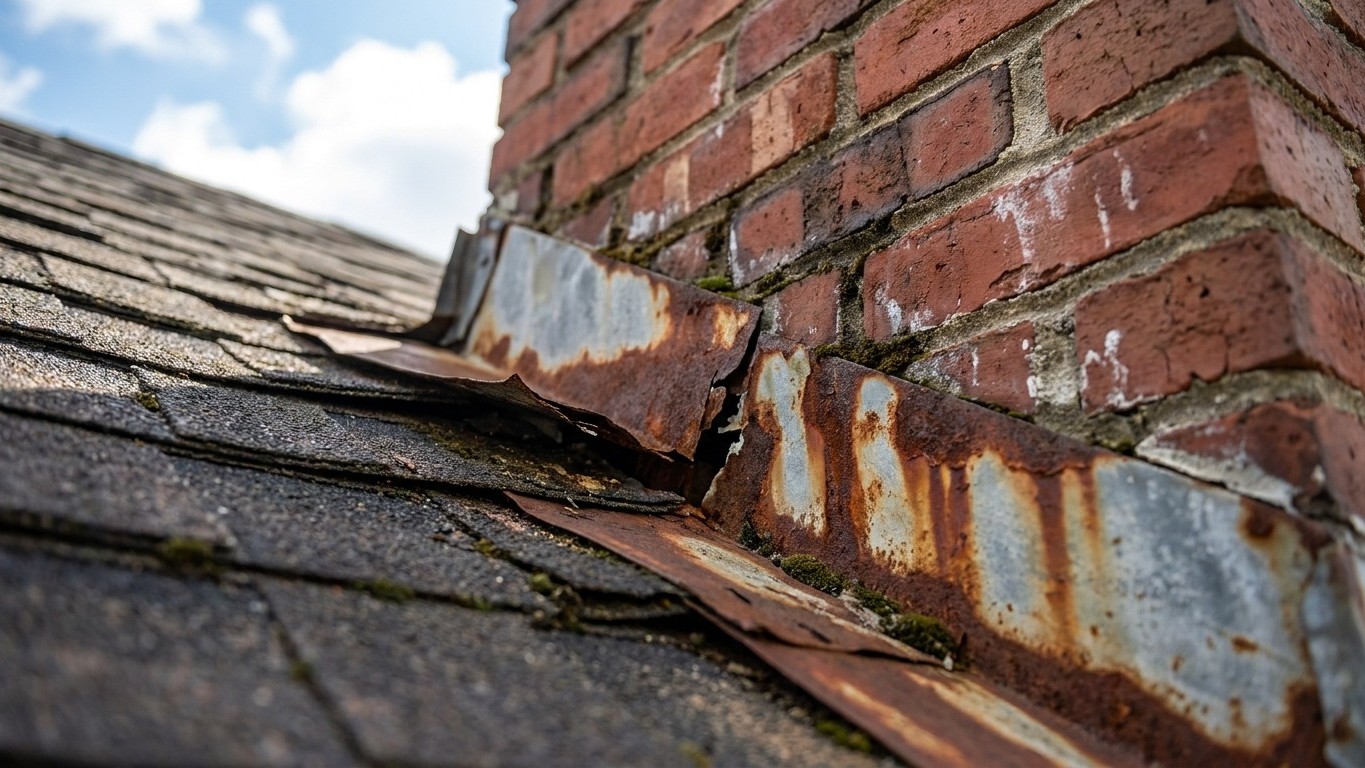

Flashing is the metal (sometimes rubber or plastic) installed at every place your roof stops being one continuous surface: where it meets a wall, wraps a chimney, rings a vent pipe, or tucks against a skylight. It fails at those seams and fastener points long before the shingles or panels around it wear out. That mismatch is why a leak almost never shows up where the water actually got in.
What is actually happening
A roof is not one uninterrupted skin. Every place it changes direction or meets another surface creates a seam, and seams are where water finds a way in. Flashing exists to cover those seams and give water a path back off the roof instead of into it. Shingles and panels are built to shed water when they’re unbroken and overlapped correctly. At a wall, a chimney, a dormer, a vent stack, or a skylight, that overlap pattern breaks down, and something else has to take over the job.
That something else is a formed piece of metal, tucked under the roofing above and lapped over it below, so water always runs across the top of the flashing and never behind it. Step flashing at a sidewall is a stack of small L-shaped pieces, one per shingle course, each one overlapping the next. Counter-flashing at a chimney is a separate piece set into the masonry that covers the top edge of the base flashing beneath it. A pipe boot is a rubber collar with a metal or plastic base plate that seals around a vent while still shedding water down the slope.
Sealant is not flashing
This is the part most homeowners get backward. Caulk and roofing cement are meant to be a secondary seal, filling small gaps at the edges of properly lapped metal. They are not a substitute for the metal itself. Sealant hardens, shrinks, and cracks as it ages and as the roof moves underneath it with temperature swings. Metal flashing works because of physics: gravity and overlap, not adhesion. A roof patched with a thick bead of caulk where flashing should be is a roof waiting for that caulk to fail, and caulk fails quietly, with no warning before the leak starts.
Fastener movement adds to the problem. Nails and screws holding flashing in place go through metal that expands and contracts with heat and cold. Over repeated cycles, the metal works around the fastener shank, and the hole gets slightly larger each cycle. Wind uplift makes this worse by flexing the edges of the flashing where it’s least supported. None of this shows up as a dramatic tear. It shows up as a hairline gap that only leaks during wind-driven rain, which is exactly the kind of leak that’s hardest to trace and easiest to ignore.
What you can see without climbing
Most flashing problems can be spotted from solid ground, and that should be the first move every time, not the ladder.
- Start from the ground with binoculars or a phone camera zoomed all the way in. Walk the perimeter of the house and look at every place the roofline meets something vertical: chimneys, dormer walls, the side of an attached garage, skylight frames. Look for metal that’s visibly lifted at an edge, rust streaks running down brick or siding below a joint, dark staining on shingles right at a transition, or a strip of exposed nail heads where flashing should be tucked under the roofing material instead of sitting on top of it.
- Check vent pipes and stack boots the same way. A cracked or curled rubber collar around a plumbing vent is one of the most common failure points on any roof, and it’s usually visible with a good zoom from the yard. Look for a collar that’s split, sun-bleached and brittle-looking, or pulled away from the pipe on one side.
- Move to the attic with a flashlight, ideally on a bright day with the attic lights off. Any pinprick of daylight coming through the roof deck near a chimney chase, plumbing vent, or wall intersection means water has a path too. Daylight is easier to catch than an active leak, because it doesn’t need rain to show itself.
- Run the light along the rafters and the underside of the decking near those same junctions. Look for dark staining, streaking, or a discoloration ring, which usually marks where water has been running and drying repeatedly over time.
- Press gently on Insulation near suspect areas. Damp or compacted insulation right under a wall or chimney flashing line is often the clearest sign available, and it shows up long before a stain appears on a ceiling below.
None of this requires getting on the roof itself. A slow walk around the house plus one attic visit with a flashlight covers the junctions where flashing almost always fails first.
What it costs to leave it
A flashing leak rarely announces itself. Water finds the gap, follows the underside of the decking or a rafter, and travels sideways before it drips anywhere visible, which is why the wet spot on a ceiling is often several feet from the actual failure point above it.
The first material to suffer is usually the roof decking itself, the plywood or OSB sheathing the shingles are nailed to. Repeated wetting softens the wood fibers, and a deck that’s been damp on and off starts to feel spongy underfoot long before it visibly sags. Rafters and the top plates of walls come next, since framing lumber that stays damp is exactly the environment wood-decay fungi need to establish themselves. Once that starts, the wood loses structural strength quietly, from the inside, without much external sign until the damage is well along.
Insulation is often the first casualty and the easiest to check. Wet fiberglass or cellulose loses most of its ability to resist heat flow, and it stays compacted and ineffective even after it eventually dries, which means a flashing leak can quietly raise heating and cooling costs well before it causes any visible ceiling stain. Mold follows wherever moisture sits against wood or paper-faced insulation for a stretch of time, and it doesn’t need a dramatic leak to get established, just persistent dampness in a dark, poorly ventilated space, which an attic usually is.
Metal fasteners and any exposed nail heads corrode faster once they’re wet on a regular cycle, and that corrosion loosens their grip on the surrounding wood, which is part of why flashing failures tend to accelerate once they start rather than staying stable. A small gap that lets in wind-driven rain during storms becomes a slightly bigger gap the following season, because the wood around the fastener has already started to soften. None of this needs a timeline attached to be worth acting on. A soft spot in the decking, a musty smell in the attic, or damp insulation are all signs that something at a junction has already let go, whether or not a ceiling stain has appeared yet.
What is not a householder job
Ground and attic checks are genuinely useful and genuinely safe. Fixing what those checks find is a different matter, and drawing that line clearly matters more here than in most home maintenance jobs.
Anything above a single story is outside the range of a homeowner with a household ladder, full stop. The higher the roof, the more a fall costs, and flashing problems are disproportionately common at multi-story chimneys and dormers precisely because those are harder to build and maintain correctly in the first place. A roof surface that’s wet, mossy, steep, or frosted removes the footing a person needs to work safely, and moss in particular holds moisture that makes granular shingle surfaces far more slippery than they look from the ground. Any repair that needs both hands free while standing on a slope, which describes almost all flashing work since it involves prying up shingles, repositioning metal, and driving fasteners, is a job that needs proper fall protection and roofing experience, not enthusiasm.
There’s also a documentation piece worth knowing about before any repair happens. If flashing damage followed a hailstorm or high wind event, an insurance claim may be part of the picture, and coverage details, deadlines, and documentation requirements vary by policy and by state. The homeowner’s own insurance policy governs what’s covered and by when, so that policy is the first thing to check, and photos from the ground and attic taken before any repair work starts can matter later in that process.
A full walkthrough of what to look for and how to prioritize it is covered on the roof inspection page. When a professional is the right call, which for flashing work is most of the time, the guide to hiring a roofer covers what to ask and how to compare estimates.
Common questions
Can I just add more caulk to a leaking flashing joint?
Caulk can buy limited time as a stopgap, but it’s not a fix. It’s meant to seal small gaps at the edge of properly overlapped metal, not to replace metal that’s lifted, cracked, or missing. A joint that keeps needing caulk is telling you the flashing itself has already failed.
Why does the leak show up on my ceiling in a different spot than the roof problem?
Water follows the underside of the deck and the rafters, running along the lowest available path before it drips through drywall or insulation. A stain in a bedroom ceiling can trace back to a chimney or wall flashing several feet away, which is why an attic check with a flashlight is more reliable than staring at the ceiling itself.
Is rust on flashing always a sign of failure?
Surface rust on exposed nail heads or an aging metal edge is common and doesn’t automatically mean an active leak. But rust streaking down a wall or chimney below a joint, or rust that’s eaten through the metal in spots, is a sign the flashing has been compromised and needs a proper look, ideally from a roofer rather than a guess from the ground.
Does moss growth near a chimney or vent mean the flashing is failing?
Moss needs sustained moisture to establish itself, so a patch of moss right around a flashing junction is often a sign that water is sitting there longer than it should. It’s worth flagging for a closer inspection, even if there’s no visible leak yet, since moss also makes that section of roof more slippery and more dangerous to walk near.