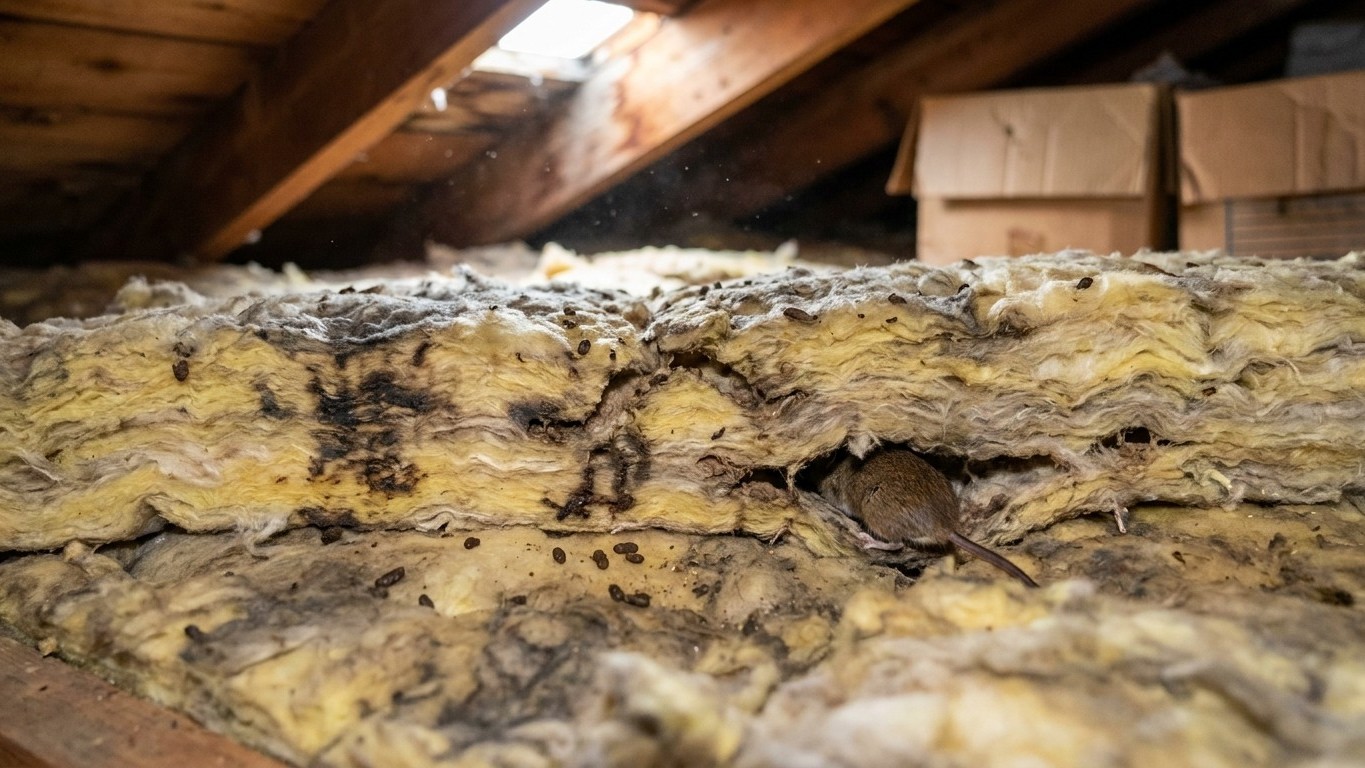

Mice, rats, squirrels, and sometimes roaches or carpenter ants treat insulation as prime real estate: it’s warm, undisturbed, and soft enough to tunnel through. Once they move in, the material gets compressed, soiled, or shredded into nesting fluff, and its ability to hold heat drops fast. The signs are usually audible or visible before they’re obvious to the eye, scratching in the walls, a musty or ammonia-like smell, or dark smudges along ceiling lines. The fix is never to add more insulation on top; it’s to find out what’s living there first.
What is actually going on
Insulation batts and loose-fill share three qualities that make them irresistible to a nesting animal: they’re warm, they’re still, and nobody checks on them for years at a stretch. An attic or a wall cavity packed with fiberglass or cellulose is, from a mouse’s perspective, a ready-made den with built-in bedding. The thing to understand here is that the damage that actually kills performance is rarely the chewing itself. It’s the compression and the contamination, and both end the R-value.
Compression happens because a rodent doesn’t nest on top of loose-fill insulation, it burrows into it, packing fibers down along runways it uses over and over. A path that was six inches deep might get flattened to an inch in a season, and an inch of packed material insulates like an inch, not like the six it used to be. Contamination is the other half of the problem: urine, droppings, and shed fur soak into fibrous insulation and don’t wash out. Even if the animals leave, the material keeps that odor and that biological load, and cleaning it in place generally isn’t realistic, it has to come out.
Different insulation types respond differently. Cellulose is treated with a borate compound that discourages insects and some fungal growth, but it does nothing to stop a mouse from tunneling through it for warmth. Fiberglass batts and loose-fill offer no chemical deterrent at all, though their texture is less appealing for insects to chew through than paper-faced products. Spray foam is the outlier: once cured, it doesn’t compress the way loose-fill does, and it gives rodents far less to burrow into, though gaps around penetrations can still be gnawed.
There’s also a fire-safety wrinkle that has nothing to do with pests directly but shows up in the same inspection: rodents chew wire insulation as readily as they chew building insulation, and exposed or nicked wiring in an attic full of nesting material is a real ignition risk. If you find chew marks on cable jacketing anywhere near a nest, that’s worth a call to an electrician, not just a pest control appointment.
One more caution belongs here. If the loose material you’re looking at is pale gray-brown, pebble-like, and shiny rather than fibrous, stop and don’t disturb it. That appearance is consistent with vermiculite insulation, some of which contains asbestos, and it should be sampled and tested by a professional before anyone pokes around in it, pest problem or not.
Where it belongs, and where it does not
Most of what you can learn about a pest problem in insulation, you can learn without touching anything, just by looking up from below with a flashlight. Reading the pattern of tunnels, staining, and flattening tells you roughly what’s going on and how far it’s spread before you decide whether this is a five-minute cleanup or a job that needs a professional first.
| What you see | What it usually means | What it means for R-value |
|---|---|---|
| Visible tunnels or worn paths through loose-fill | Active rodent runways, used repeatedly | Compressed fibers along the entire path; a measurable gap in coverage |
| Dark, greasy smudges along ceiling joists or wall studs | Rodent “rub marks” from repeated travel along the same route | Insulation directly beneath is almost always flattened |
| Matted, nest-like clumps in one area | An active or former nesting site, sometimes reached through a soffit or roof gap | Localized loss and contamination; the rest of the field may be untouched |
| Fine, sawdust-like frass and sagging paper facing | Insect activity in the framing itself, often carpenter ants, not the insulation | Insulation may be intact; the structural framing is the real concern |
| Insulation that looks undisturbed but smells strongly of ammonia | Urine saturation with no visible nest | Reduced R-value plus an air-quality issue that adding insulation won’t solve |
Whatever pattern you find, the same rule applies: insulation is not a pest deterrent, and treating it like one is where the wrong-place mistakes happen. Piling more material on top of a contaminated area doesn’t fix anything, it just buries the problem under a fresh layer that will eventually show the same staining. If the cavity in question is behind finished drywall with no attic or crawlspace access, or if the affected area is spread across more than a small section, pest removal has to happen before any insulation decision gets made, not alongside it or after.
An attached garage ceiling is a special case worth flagging. That ceiling assembly usually also serves as the fire separation between the garage and the living space above it, so it shouldn’t be opened up or left incomplete for the sake of chasing a pest problem without restoring that separation afterward.
If you’re doing this inspection yourself from an attic hatch, step only on the joists, never on the ceiling drywall between them. It won’t hold your weight, and pest damage is exactly the kind of thing that tempts people to lean out further than the joists allow.
The moisture side of the decision
Every insulation decision is also a moisture decision, whether pests are involved or not, and it’s where a reasonable-looking fix turns into an expensive one. Contaminated insulation is often damp insulation too, either from urine saturation or because a nesting animal chewed a path that let outside moisture in alongside it. Wet insulation doesn’t just lose R-value, it can hold that moisture against framing long enough to start rot or mold, which is a separate problem from the pests entirely.
The principle that matters here is drying direction. Every wall or roof assembly needs to be able to dry toward at least one side, either inward or outward, and a vapor retarder placed on the wrong face of that assembly can trap moisture inside it instead of letting it escape. Which face is the “wrong” one depends entirely on climate, and that’s not something a national page can answer for a specific house. The International Residential Code doesn’t even require an interior vapor retarder in the three warmest climate zones, so a rule that makes sense in a cold northern state can be the wrong call in a hot, humid one.
This is also the point where it’s worth separating two things that get lumped together. A vapor retarder controls how water vapor diffuses through a material over time. An air barrier stops bulk air, and the moisture it carries, from moving through gaps and cracks. They do different jobs, and a wall can have excellent air sealing with the wrong vapor retarder, or vice versa. Sealing the gaps that let air (and often pests) into a cavity doesn’t automatically solve a vapor problem, and adding a vapor retarder doesn’t stop the drafts that let a mouse in to begin with.
Because the right answer depends on climate zone and on which side of the assembly you’re working from, this page isn’t going to assign one. Check a vapor barrier guide for how the layering works in general, and check your own state’s building guidance for what’s expected where you live, before you close up any wall or attic assembly you’ve had to open for a pest issue.
What to settle before you buy anything
Before any new insulation goes in, three things need answering, and in this order: are the entry points sealed, how much insulation is already there, and is the cavity even reachable. ENERGY STAR treats air sealing and insulation as two steps of a single project, and sealing comes first for a good reason: the same gaps that let conditioned air leak out are frequently the same gaps a mouse, ant colony, or squirrel used to get in. Insulating over unsealed gaps leaves both problems in place.
According to ENERGY STAR, “EPA estimates that homeowners can save an average of 15% on heating and cooling costs (or an average of 11% on total energy costs) by air sealing their homes and adding insulation in attics, floors over crawl spaces, and accessible basement rim joists.” That figure is an average from modeling a typical existing home, not a guarantee, and it applies specifically to those three areas, not to walls, windows, or doors.
Knowing how much insulation is already in place matters because the recommended target depends on what’s there now, not just on the climate. ENERGY STAR’s retrofit guidance, based on the 2021 International Energy Conservation Code, breaks it out by climate zone:
| Climate zone | Attic if currently uninsulated | Attic if you already have 3-4 inches | Floor |
|---|---|---|---|
| Zone 1 | R30 | R25 | R13 |
| Zone 2 | R49 | R38 | R13 |
| Zone 3 | R49 | R38 | R19 |
| Zones 4A and 4B | R60 | R49 | R19 |
| Zones 6, 5, and 4C | R60 | R49 | R30 |
| Zones 7 and 8 | R60 | R49 | R38 |
Figuring out which zone applies to your home isn’t something this page can do for you; ENERGY STAR publishes that as a map, and it’s worth checking directly rather than guessing from a state name alone, since zones can split within a state.
Accessibility is the last piece. If there’s a chimney, flue, or certain recessed light fixtures in the area, the clearance required around them is set by the fixture itself, not by the insulation, and has to be respected regardless of pest history. And if a combustion appliance, a water heater or furnace, sits in a space you’re planning to air seal, its combustion air supply needs a professional evaluation before that space gets closed up tighter than it was. The 25C federal tax credit for this kind of work closed at the end of 2025, but state and utility rebate programs are still active in many places; your state energy office is the place to check what applies now.
Common questions
Can insulation be cleaned instead of replaced after a pest problem?
Fibrous insulation like fiberglass or cellulose generally can’t be cleaned of urine or droppings in a way that removes the odor and biological contamination completely. Once it’s saturated, removal and replacement is the realistic option, though the extent depends on how localized the damage is.
Does adding insulation stop pests from getting in?
No. Insulation isn’t a barrier to entry, it’s just comfortable material once something is already inside. Sealing the actual entry points, gaps around pipes, wiring, foundation cracks, roof and soffit vents, is the step that keeps animals out, and it should happen before or alongside any insulation work.
How do I know if it’s worth calling a pest control professional versus handling it myself?
A single small nest found early, with no chewed wiring and no widespread staining, is sometimes manageable on your own. Active tunneling across a large area, chewed electrical wiring, or evidence in an inaccessible finished wall are all signs to bring in a professional before doing anything else.
Is spray foam insulation resistant to pests?
Cured spray foam is far less compressible than loose-fill or batts, which makes it a poor nesting material, but it isn’t pest-proof. Rodents and insects can still exploit gaps around penetrations or areas where the foam didn’t fully seal, so it reduces the problem more than it eliminates it.