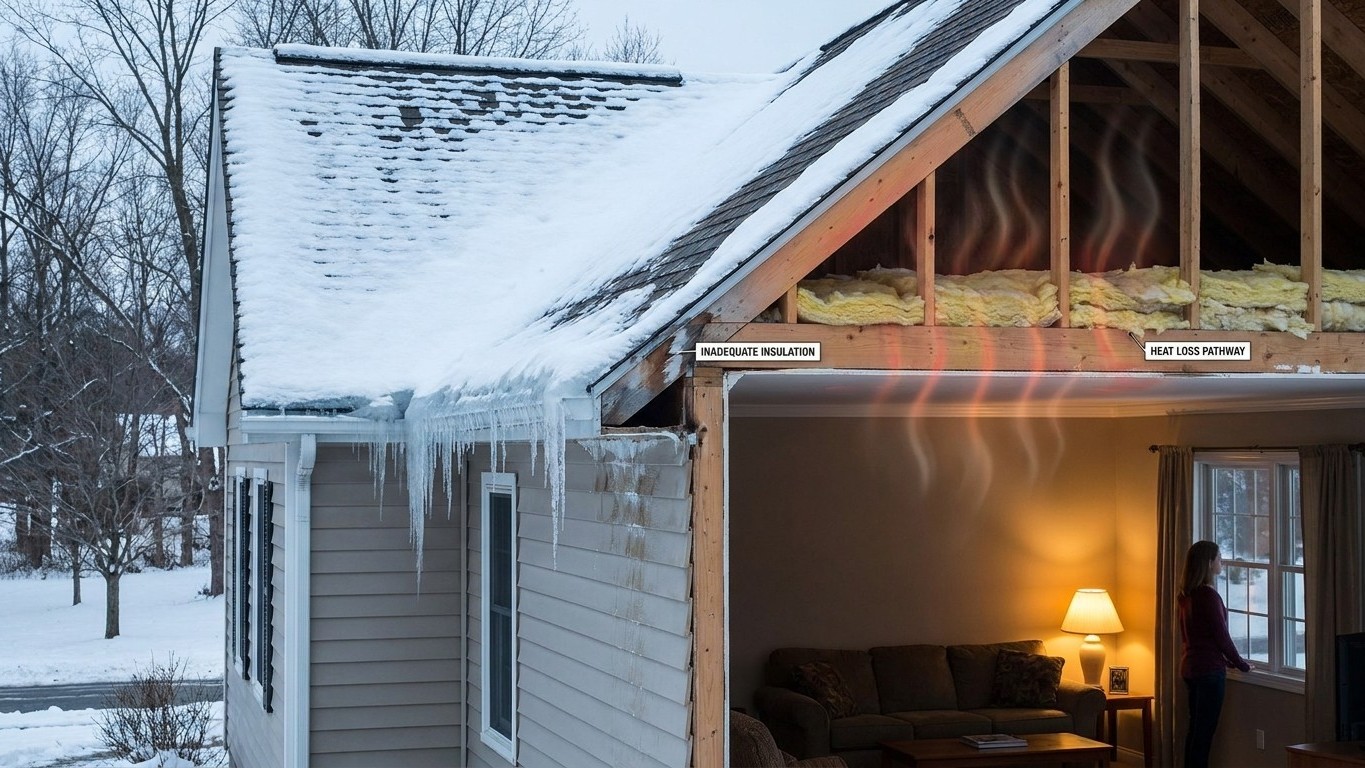

Ice dams form because heat leaking from living space into the attic warms the roof deck unevenly, melting snow that refreezes at the cold eaves. The dam itself is a symptom; the cause sits in the ceiling below the attic floor, not the gutters or the roof edge. Fixing it means stopping heat loss and keeping the attic cold and ventilated, not attacking the ice once it’s already there.
Heat from the house melts the snow

Here is the whole mechanism in four sentences. Heat escaping from the rooms below rises into the attic and warms the underside of the roof deck. The snow sitting on that warm section of roof melts, even while the air outside stays well below freezing. That meltwater runs down the slope until it reaches the overhang, the part of the roof that extends past the exterior wall and has no heated living space beneath it. With nothing warming it from below, the overhang stays at outdoor temperature, and the water refreezes right there.
Each cycle adds a little more ice to that ridge at the eave. As the ridge grows, it starts damming the meltwater still flowing down from above, which now has nowhere to go but sideways and backward, under the shingles, into the roof deck, and eventually into the attic Insulation or the ceiling below. This is how a roof that was never touched by a leak in July suddenly develops a wet stain on the ceiling in February.
The location of the ice tells you where the heat is coming from, but not in the way most homeowners assume. The ice forms at the eaves because that’s the cold zone, not because something is wrong with the eaves themselves. The actual problem, the reason the rest of the roof is warm enough to melt snow in the first place, is heat loss from the house into the attic. That heat loss traces back to gaps and thin spots at the ceiling: places where warm air and heat move up from the living space instead of staying below, and where insulation isn’t doing its job of slowing that transfer. A roof deck sitting a few degrees above outdoor temperature across most of its surface, with a sharp drop right at the overhang, is a ceiling problem wearing a roof problem’s clothes.
What does not fix it
A lot of the standard advice for ice dams treats the ice as the problem, which means it treats the symptom and leaves the cause untouched. Some of these steps have a place as damage control during a bad winter, but none of them stops the ice from coming back next year, because none of them changes what’s happening at the ceiling.
| Approach | What it actually does | Does it address the cause? |
|---|---|---|
| Chipping ice off the roof | Removes ice already formed, temporarily reducing water backup | No. Heat loss continues, and the dam rebuilds |
| Heating cables along the eaves | Melts a channel through the ice so water can drain past the dam | No. It manages the symptom every winter it’s plugged in |
| Replacing the gutters | Fixes damaged or sagging gutters, may look neater | No. Gutters don’t cause ice dams and new ones won’t stop them |
| Raking snow off the roof after a storm | Reduces the total snow available to melt and refreeze | No, but it can genuinely limit damage in a heavy-snow winter |
Roof raking deserves a fair word here. Pulling snow off the lower few feet of roof after a big storm, done from the ground with a long-handled roof rake, reduces the meltwater supply feeding the dam and can buy real protection during an unusually snowy stretch. Heating cables serve a similar purpose: they don’t stop heat loss, but they keep a drainage path open so water doesn’t back up under the shingles while the underlying problem gets addressed on a slower timeline. Both are reasonable stopgaps. Neither is a repair.
Chipping or hacking ice off a roof is a different matter, and it’s worth being blunt about it. That ice is bonded to the shingles, and prying it loose routinely tears off granules, cracks shingle tabs, and rips flashing loose, turning a water-intrusion risk into an active leak. It’s also genuinely dangerous work: a person standing on a snow- and ice-covered roof, often on a ladder to get up there, is one slip away from a serious fall. This is one job where the safest and most effective move is to leave the ice alone and fix the attic instead.
Replacing gutters because of ice dam damage is understandable, since dams do sit right where gutters live and can bend or tear them loose under the weight of the ice. But new gutters change nothing about why the ice formed. They’ll fail the same way again unless the heat loss driving the melt-refreeze cycle gets solved first.
What does
The fix follows a specific order, and the order matters more than most homeowners expect. U.S. ENERGY STAR presents air sealing and insulation as two steps of one project, with attic air sealing listed before attic insulation, and that sequence isn’t arbitrary. Insulation laid on top of unsealed gaps, can lights, plumbing chases, or wiring penetrations doesn’t stop the air moving through them. It just buries them, so the leak keeps feeding warm, moist air into the attic invisibly, under a blanket that looks like a finished job.
- Air-seal the ceiling first. Every gap where warm air can rise from the living space into the attic, around light fixtures, plumbing stacks, wiring holes, the attic hatch, the top of interior walls, needs to be closed before insulation goes down. This is what actually stops heat from arriving in the attic in the first place.
- Insulate to the level for your climate zone. Once the air leaks are closed, insulation slows whatever heat transfer remains. How much you need depends on where you live and how much is already up there.
- Keep the eaves ventilated. Airflow from the soffit vents at the eave up to the ridge keeps the roof deck close to outdoor temperature even on the parts covered by fresh insulation, which is the whole point: a cold, uniform roof deck doesn’t melt snow unevenly.
ENERGY STAR publishes recommended insulation levels for retrofitting existing wood-framed homes by climate zone. The table has a merged header: for each zone, the first two figures are both attic values (one for an uninsulated attic, one for an attic that already has 3 to 4 inches in place), and the third figure is for the floor, not a third attic number.
| Zone | Attic if uninsulated | Attic if you already have 3-4 inches | Floor |
|---|---|---|---|
| Zone 1 | R30 | R25 | R13 |
| Zone 2 | R49 | R38 | R13 |
| Zone 3 | R49 | R38 | R19 |
| Zones 4A and 4B | R60 | R49 | R19 |
| Zones 6, 5 and 4C | R60 | R49 | R30 |
| Zones 7 and 8 | R60 | R49 | R38 |
These zones come from an ENERGY STAR climate zone map, not from any state or county line, so a zip code alone doesn’t determine which row applies. Check the map before buying material, since the same state can span more than one zone.
One detail trips up a lot of otherwise careful insulation jobs: insulation pushed all the way into the eave, right where the roof meets the exterior wall, blocks the soffit vents and kills the airflow the whole system depends on. That’s exactly what baffles are for. These are rigid channels installed against the roof deck at the eave before insulation goes in, holding a clear air path open from the soffit vent up past the insulation, so the attic gets both full coverage and functioning ventilation instead of one at the expense of the other.
The heat sources people forget
Ice dams don’t always trace back to a generally under-insulated attic. Sometimes the roof deck is cold everywhere except one localized hot spot, and that one spot melts a channel of snow that refreezes lower down, right on schedule with the rest of the ice dam pattern. Four sources cause more of these localized hot spots than people expect.
Recessed light fixtures set into the ceiling are a common one, especially older fittings not rated for direct contact with insulation, which need clearance around them and can radiate real heat into the attic just above. An uninsulated duct running through the attic, whether it’s supply air for a room below or return air pulling from the house, loses heat along its whole length and warms the surrounding attic air. A chimney chase, the framed enclosure around a chimney or flue running up through the attic, often has gaps at the top and bottom where it passes through the ceiling and roof, and those gaps leak conditioned air right alongside a source of radiant heat.
The fourth one deserves its own mention because it’s both a heat problem and a moisture problem: a bathroom exhaust fan that vents into the attic instead of all the way outside through the roof or a wall. It’s a surprisingly common installation shortcut, and it doesn’t just add warm air to the attic. Every shower sends humid air straight into the attic space, where it can condense on cold surfaces and soak insulation from above, on top of feeding the localized melting that produces its own small ice dam right below that section of roof.
Any of these four is worth checking before assuming the whole attic needs a blanket redo. Recessed lights, ductwork, chimney chases, and bath fan terminations are covered in more detail in the attic air sealing guide on this site, including how each one gets sealed without creating a fire or moisture problem in the process.
Common questions
Do ice dams always mean a roof leak?
Not immediately, but a dam that’s backed up water under the shingles for weeks often does eventually let water through. A stain on an upstairs ceiling in winter, especially near an exterior wall, is a common sign that a dam has already gotten past the shingle layer.
Can new shingles or an ice and water shield prevent ice dams?
An ice and water membrane installed under the shingles at the eaves can protect the roof deck from water that backs up, which limits damage. It doesn’t stop the ice dam from forming, because it doesn’t change the heat loss that’s melting the snow above it.
Is it safe to go up and clear snow off the roof myself?
Raking snow from the ground with a long-handled rake, working on the lower edge only, is the safer version of this task. Climbing onto a snow- or ice-covered roof to shovel or chip is genuinely risky and is where most roof-related winter injuries happen.
How do I know how much insulation my attic actually needs?
Check the ENERGY STAR climate zone map to find your zone, then match it to the table above, factoring in whether you already have some insulation up there or none at all. The recommended level differs depending on which of those two starting points describes your attic.