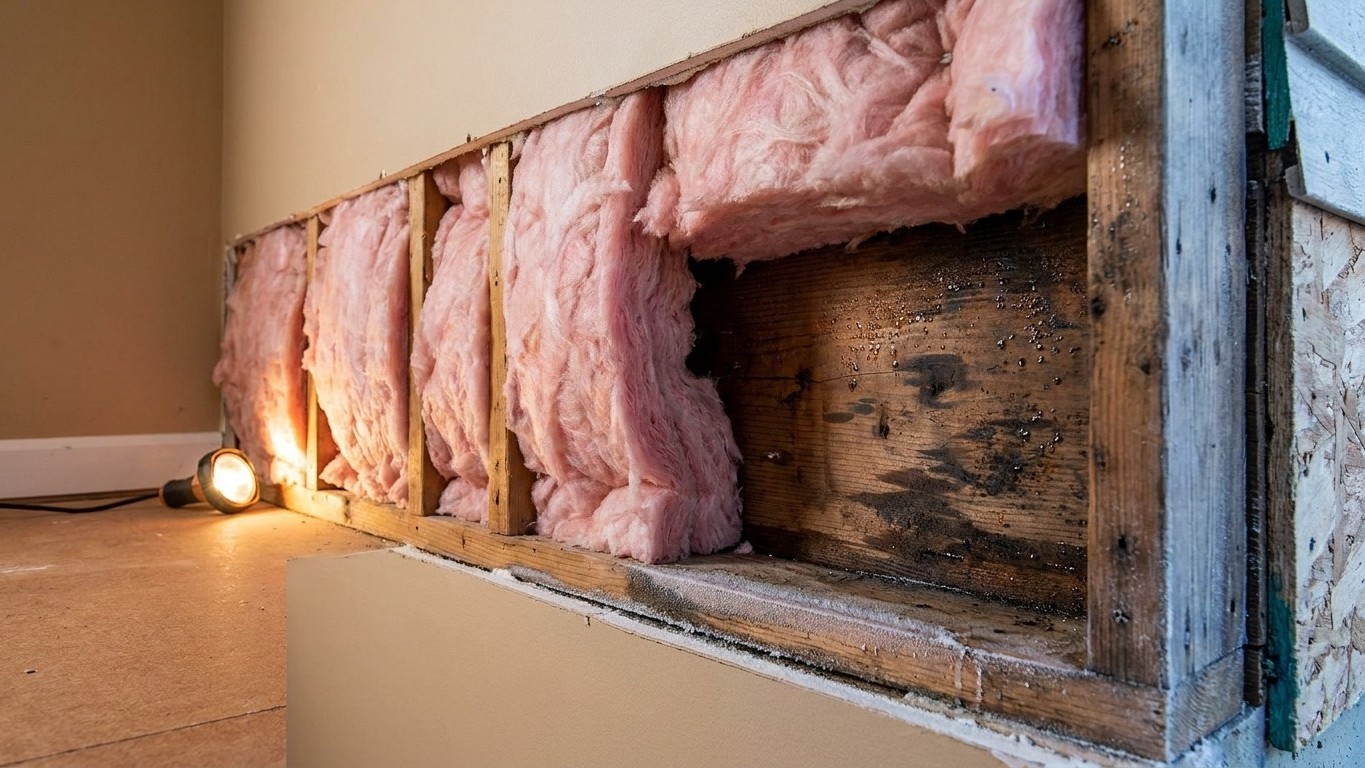

Insulation gets blamed for damp basements, moldy attics, and musty crawlspaces more often than it deserves. The material itself does not create moisture. What changes when insulation goes in is the location of the cold surface inside the assembly. Put insulation in the wrong plane, or leave gaps that let warm, moist indoor air reach a cold surface behind it, and the same insulation that was supposed to fix a damp problem ends up feeding one. The fix is almost never removal. It’s finding where the air is moving and sealing that path before anything gets covered up.
Insulation moves the cold surface

Every wall, ceiling, and floor has a point where warm indoor air meets cold outdoor conditions. Before insulation goes in, that meeting point sits somewhere obvious, usually right at the surface of the wall or roof deck. Add insulation, and that cold point shifts. Done correctly, it shifts toward the outside of the building, away from anywhere warm, moist indoor air can reach it. Done poorly, it shifts to a spot that’s still exposed to that air, and now condensation has a hidden place to happen instead of an open one.
A Fiberglass batt stuffed into a rim joist cavity is the clearest version of this. The batt itself doesn’t get anyone wet. But if it’s cut loosely and pushed in without sealing the edges, warm house air drifts through the fibers all winter and hits the cold band joist behind it. That wood is now the cold surface. Moisture condenses right there, soaks the back of the insulation nobody ever looks at, and by the time a musty smell shows up, the wood has been damp for months.
A cathedral ceiling insulated without a ventilation channel works the same way. Insulation gets pressed right up against the underside of the roof deck, with no cold, vented gap left between them. The roof deck becomes the cold surface, moist air reaches it directly through the insulation, and condensation forms on the wood side where nobody sees it until a stain telegraphs through the drywall weeks later.
This is why a badly insulated assembly can end up damper than one with no insulation at all. An uninsulated wall or ceiling often has enough uncontrolled airflow to dry itself out between events. Add insulation without controlling where the air goes, and that same assembly loses its ability to dry while gaining a colder, wetter spot for condensation to collect. The insulation isn’t the flaw. The gap between where the insulation sits and where the air actually moves is the flaw, and it’s almost always fixable without tearing anything back out.
Where it shows up
The same mechanism (a cold surface still reachable by moist air) shows up in a short list of predictable spots in most houses. Recognizing the pattern in your own house usually starts with a smell, a stain, or a cold spot before it ever becomes visible mold.
| Attic / roof assemblies | Floor / foundation assemblies | |
|---|---|---|
| Location | Sign to notice | Sign to notice |
| Rim joist stuffed with fiberglass | Musty smell near the mudsill, frost or dark staining on the band joist in cold weather | |
| Cathedral ceiling, no ventilation path | A ceiling stain that follows the roof slope, or dripping along the ridge after a thaw | |
| Knee wall with an open attic face | Insulation sagging or slumped where it meets the attic floor, a cold spot on the wall near the floor | |
| Crawlspace insulated over a damp floor | Dark staining on the underside of floor joists, standing water or a wet vapor barrier on the ground | |
| Cold corner where a wall meets an uninsulated slab | Peeling paint, efflorescence, or a persistently cold floor at the base of an exterior wall | |
The knee wall case deserves a second look because it’s the one people miss most. The attic-side face of a knee wall is often left completely open, so even a well-installed batt is only Insulating on one plane while the top and bottom of that triangular attic space stay exposed to outdoor humidity swings. Air finds its way around the insulation instead of through it, which produces the same condensation risk as no insulation at all, just hidden behind drywall on the room side.
The cold-corner case is also where getting the vapor retarder facing backward does real damage. If a wall assembly has a facing meant to slow vapor movement, and it ends up on the wrong side of that specific wall, moisture gets trapped inside the cavity instead of being allowed to dry toward one side. There’s no universal rule for which side that facing belongs on; it depends on the climate, the wall assembly, and what’s on the other side of it, which is exactly why guessing is worse than asking someone who can look at the whole assembly before deciding.
Air first, again
Most of the moisture that ends up trapped behind insulation didn’t diffuse slowly through wall materials. It rode in on moving air. A small gap around a plumbing penetration, an unsealed top plate, or a loose batt edge moves far more water vapor in a single winter than diffusion through solid materials ever will. That’s why sealing the air path does more for a damp problem than any amount of extra insulation laid on top of it.
This is also why U.S. ENERGY STAR presents air sealing and insulation as two steps of one project rather than two separate jobs, and why its own project guidance puts attic air sealing before attic insulation in the sequence. Insulation laid over penetrations that were never sealed doesn’t stop air from moving through them. It just hides them, so nobody notices the moisture problem building underneath until it’s already caused damage.
The practical order holds for almost every case described above:
- Find the water source or the air path first, before touching the insulation.
- Fix that source or seal that path.
- Let the assembly dry out completely.
- Only then insulate.
Skipping straight to step four is the single most common mistake in this whole subject. Never insulate over active damp. Wet insulation loses most of its performance anyway, and covering an active leak or an unsealed air path with new material just delays discovery while the underlying wood, drywall, or subfloor keeps absorbing moisture out of sight. If there’s any question about whether a spot is actually dry, that question needs an answer before any new material goes in, not after.
What decides how much effort a given case takes isn’t the size of the insulation job, it’s how many trades the diagnosis touches. A rim joist that just needs air sealing and a fresh batt is a different scope than a crawlspace where the ground itself is holding water. What decides the material is the assembly it’s going into, not a general preference, since a cathedral ceiling with no vent path needs a different approach than a rim joist or a knee wall even though all three involve the same underlying physics.
When this is not a DIY subject
Some of what shows up in these assemblies is fine to handle without calling anyone. Some of it isn’t, and the line isn’t about how the mold looks, it’s about whether the situation is fully understood before work starts.
Visible mold covering an area beyond what a reader is set up to clean and contain safely is one line. Older insulation or building material that might contain asbestos or vermiculite is another; these materials should not be disturbed, moved, or vacuumed based on a guess about what they are. A persistent musty smell with no visible source anywhere is a third signal that the moisture is somewhere in the assembly that hasn’t been found yet, and opening the wrong section of drywall or subfloor without a plan can spread contamination instead of solving anything. Damp that comes back after being fixed once means the original diagnosis missed something, and repeating the same fix a second time rarely produces a different result.
A few safety points apply across all of these situations. Walking in an attic means walking on joists, not on the insulation covering them. Combustion appliances (a furnace, water heater, or fireplace) sitting in a space that’s about to be air sealed need to be evaluated as part of that work, since tightening a space changes how it draws air. A garage ceiling that separates living space above from a garage below is a fire separation, not just a place to add batts. Clearance requirements around flues and certain recessed light fixtures are set by the fixture manufacturer, not by a general rule of thumb, so those need to be checked before insulation goes anywhere near them.
Before disturbing anything found during an inspection, photograph it. A clear photo of a stain, a suspect material, or a wet spot gives a contractor something to look at before a first visit and gives a homeowner a record of what the area looked like before repairs started. When getting a written quote for remediation or insulation work, look for one that states the diagnosis in plain terms, names the specific scope of the fix, specifies the materials going in, and describes how the work will be verified once it’s done, not just a total figure at the bottom of the page.
Common questions
Does wet insulation always need to be replaced?
Not automatically, but it needs to be fully dry before anyone can tell. Insulation that’s been saturated and then dries can lose some of its performance depending on the material, and the surface it was touching (wood framing, subfloor, drywall) needs its own inspection regardless of what happens to the insulation.
Will adding a vapor barrier stop mold from forming in my insulation?
Not on its own, and putting one on the wrong side of an assembly can make things worse by trapping moisture that would otherwise have dried out. The facing decision depends on the specific wall or ceiling assembly, which is exactly the kind of judgment call worth getting from someone who can look at the whole picture.
Is spray foam immune to this problem?
No insulation type is immune to being installed in the wrong location relative to the cold surface. Any material placed where moist air can still reach a cold plane behind it carries the same condensation risk, regardless of what the material itself is made of.
How do I tell if a musty smell is coming from insulation versus something else?
Start by checking the locations in the table above, since they cover the recurring spots this shows up. If the smell is strongest near a rim joist, a knee wall, or a crawlspace access, and there’s no obvious plumbing leak nearby, insulation trapped against a cold surface is a reasonable place to start looking before assuming it’s something else entirely.