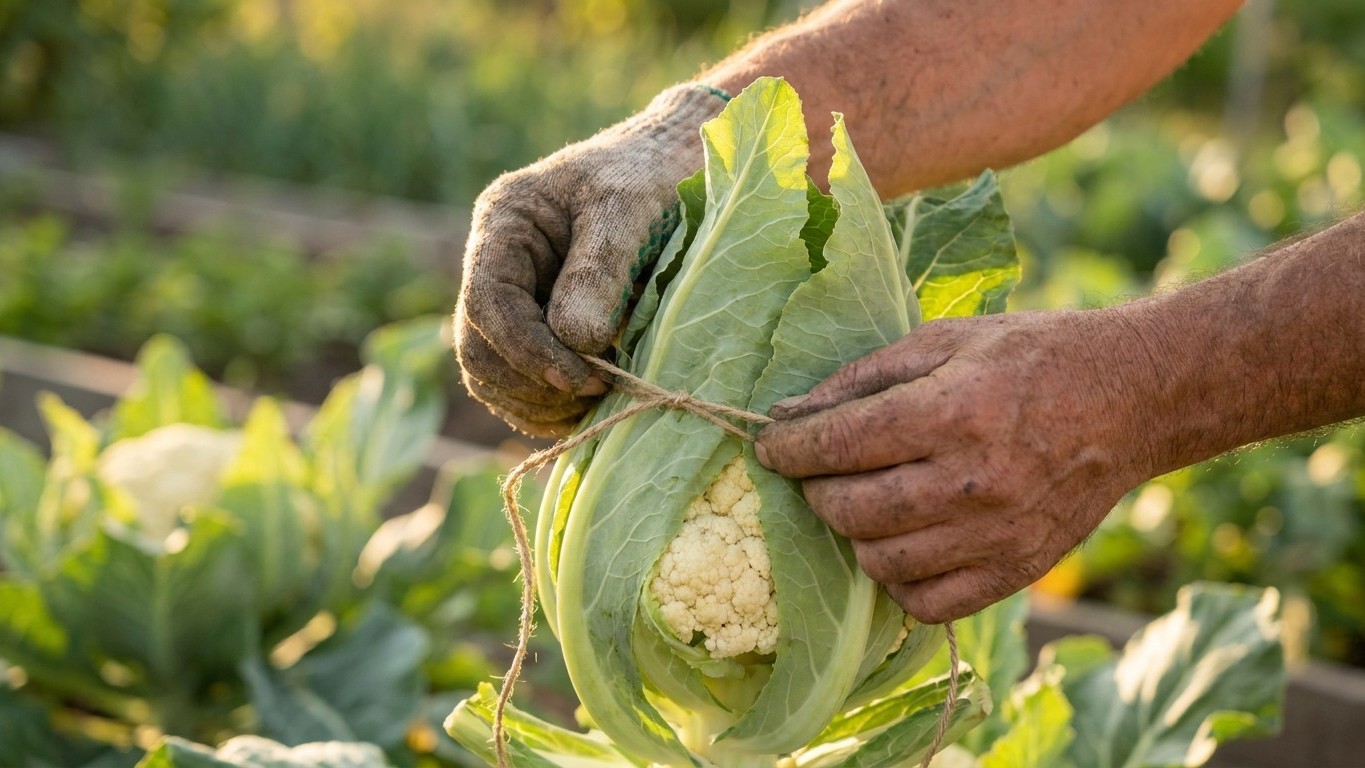

Cauliflower’s white head doesn’t happen by accident. Left in the open, it turns yellow and picks up a bitter edge. The fix takes seconds: once the head reaches the size of a silver dollar, gather the outer leaves over it and tie them shut. That single act of blocking light, called blanching, is what turns a pale curd into the tight white head sold in stores. Skip it, and the plant can do everything else right and still disappoint at harvest.
The short answer
Utah State University Extension is direct about this: as the head enlarges, it will discolor and develop bitter flavors if exposed to the sun, so growers are told to blanch the head by tying the leaves together with strong twine or rubber bands when the heads reach the size of silver dollars. That size, not a date on the calendar, is the trigger. Too early and there’s nothing to cover. Too late and the sun has already started working on the curd.
The tie job itself is simple. Pull two or three of the plant’s own outer leaves up and over the developing head, then secure them with twine or a rubber band so they stay put in wind and rain. That’s the entire mechanism behind the white color everyone associates with cauliflower. Nothing about the plant’s genetics makes the head white on its own; the whiteness is manufactured by the grower’s hands at one specific moment in the plant’s life.
From there, patience does the rest of the work. Utah State University Extension advises harvesting the heads when they are fully developed, in the range of 6 to 12 inches in diameter, compact, and blanched white. A head that’s still loose or discolored at that size isn’t ready, no matter how big it’s gotten. Diameter and color both have to line up.
Once cut, cauliflower doesn’t hold indefinitely on the counter. Utah State University Extension puts cold storage life at 3 weeks at 32 F, which is a narrow window compared to root vegetables that keep for months. Plan the harvest with that shelf life in mind, especially if you’re growing enough for both fresh eating and putting some away, which the same source pegs at 3 to 5 plants per person for fresh use plus another 5 to 8 plants per person if you want a stockpile.
What actually decides it
Blanching: the white is made, not grown
It’s worth separating what the plant does on its own from what the grower does to it. Cauliflower grows a curd that is naturally exposed to light as it swells, and left alone that curd yellows and turns bitter. The white color prized in the kitchen is the product of deliberately excluding light at the silver-dollar stage, nothing more. This is different from, say, ripening a tomato, which changes color through a process built into the fruit itself. Here, the color change you’re trying to prevent is natural; the color you want is the one you have to force by hand.
Two temperature limits, both named
Unlike some of its brassica cousins, cauliflower’s temperature tolerance is spelled out on both ends. Utah State University Extension states that cauliflower grows best when temperatures do not exceed 75 F, and that low temperatures of 32 F or high temperatures greater than 80 F decrease plant growth, lower yields, and decrease head quality. That’s a narrower comfort zone than cabbage or broccoli get in the same guide, and it explains why cauliflower has a reputation for being fussier: both cold snaps and heat waves show up directly in the size and quality of the head.
Buttoning: four separate triggers, one bad outcome
Premature small heads, known as buttoning, aren’t caused by one thing. Utah State University Extension lists dry soils, low temperatures, low nitrogen, and other shocks at planting as separate triggers, and adds that larger, more mature transplants are more prone to button as well. These are four distinct stresses that happen to produce the same visible failure, which matters because the fix for a dry-soil problem isn’t the fix for a cold-weather problem. Treat the actual cause, not just the symptom.
Boron and molybdenum: opposite deficiencies
Two nutrient deficiencies get named individually in Utah State University Extension’s guidance, and they don’t look anything alike. Boron deficiency shows up as brown spotting on the head and a hollow, discolored stem below it, often in high pH soils or on water-stressed plants, and the remedy is to avoid excess fertilizer. Molybdenum deficiency does the opposite: it stunts the whole plant and produces narrow, incompletely developed leaves, and the fix is a complete fertilizer with a trace element mix applied to transplants. Mixing these two up wastes a season chasing the wrong nutrient.
How to do it
- Start seeds indoors 6-7 weeks before the date you intend to set transplants in the garden, per Utah State University Extension’s timing guidance for cauliflower transplants.
- Set transplants outside 1-2 weeks before your area’s last frost-free date. That’s one week later than cabbage and broccoli get in the same guide, which go out 2-3 weeks before the last frost. Seeded cauliflower can go into the ground at that same window.
- Before transplanting, check that seedlings have 4-6 mature leaves and a well-developed root system. Transplants that are too large are more prone to buttoning later, so don’t hold them past this stage.
- Space plants 12-18 inches apart within the row, with rows set 2-3 feet apart.
- Feed with nitrogen about 4 weeks after transplanting or thinning, at a rate of 1/2 cup per 10 feet of row of 21-0-0. This drives the leaf growth the plant needs to fuel a large head.
- Water deeply and infrequently, aiming for 1-2 inches per week, with drip irrigation if it’s an option. Keep watering consistent through the heading period, since dry spells at that stage lower head quality.
- Apply organic mulch once temperatures climb above 80 F to protect roots and conserve soil moisture.
- Watch the developing heads closely. The moment a head reaches the size of a silver dollar, gather the outer leaves over it and tie them with strong twine or a rubber band to block sunlight.
- For a fall crop, plant 50-75 days before the anticipated maturity date, timing it so maturity lands 1-2 weeks after the first fall frost.
- Harvest once heads measure 6-12 inches in diameter, feel compact, and look blanched white. Move harvested heads to storage at 32 F, where they hold for 3 weeks.
What goes wrong
- Buttoning (small, premature heads): caused by dry soil, cold weather, low nitrogen, or transplant shock, worsened by using oversized transplants. This is a record of stress that already happened; once a plant buttons, that head won’t recover. Prevent it by transplanting young seedlings gently, keeping soil consistently moist, and feeding nitrogen on schedule.
- Yellow, bitter heads: sun exposure discolors and flavors the curd once it’s past the silver-dollar stage. Tying leaves over the head at the right size prevents this; a head already yellowed from sun exposure can’t be turned white again.
- Loose, open heads in hot weather: during hot conditions, plants that don’t get enough water produce poorer-quality, more open heads. Keep plants well-watered through the heading period and mulch once temperatures pass 80 F.
- Leaf growth pushing through the curd: water stress combined with high temperatures can trigger leaf growth inside the head itself. This is a sign of past water stress rather than a variety flaw, and it won’t undo itself once it appears; consistent watering is the prevention.
- Brown spotting on the head with a hollow stem: boron deficiency, often tied to high pH soils or water-stressed plants. Avoid over-fertilizing.
- Stunted plant with narrow, malformed leaves: molybdenum deficiency. Use a complete fertilizer for transplants and apply a trace element mix, since this is a different problem from boron shortage and needs a different fix.
- Concentric, sooty-black spots on leaves: Alternaria leaf spot. Avoid overhead irrigation and rotate crops to reduce recurrence.
- Pest damage: cabbage worms and loopers hide directly inside developing heads, flea beetles can kill young seedlings outright, and aphids crinkle leaves. Each requires monitoring from the seedling stage through heading, since damage at any point affects the final head.
Common questions
Do I need to tie every head, or only some varieties?
Blanching applies to standard white cauliflower heads generally; Utah State University Extension’s tying instructions aren’t limited to one cultivar. Some newer types are bred to self-wrap their own leaves over the head, but the guidance here covers the manual tie method that works across the crop.
What if I miss the silver-dollar stage?
Tie the leaves as soon as you notice the head is exposed and starting to color, but understand that any yellowing or bitterness that’s already developed won’t reverse. Prevention timed to the silver-dollar size is easier than correcting it after the fact.
How is cauliflower’s transplant timing different from broccoli or cabbage?
Cauliflower goes into the ground 1-2 weeks before the last frost-free date, while cabbage and broccoli go out 2-3 weeks before that date, according to Utah State University Extension. Same garden, same season, one week later for cauliflower.
Which cauliflower varieties are named with specific days to maturity?
Utah State University Extension lists Snow Crown at 50 days, Self Blanche at 60 days, Amazing at 65 days, White Contessa at 65 days and noted for heat tolerance, and Denali at 80 days for summer planting toward a fall harvest. No other days-to-maturity figures are attributed to a variety name in that guidance.