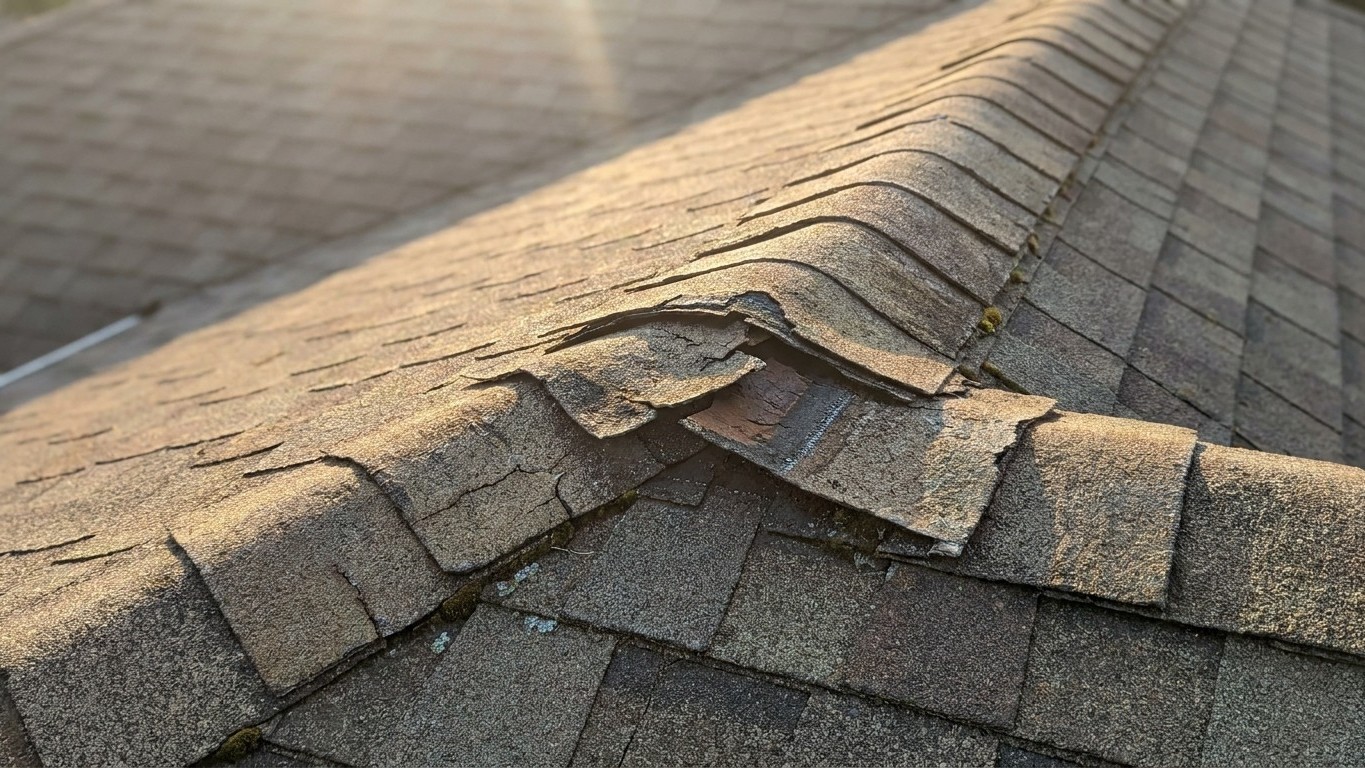

The ridge is the peak where two roof slopes meet, and the ridge cap is the row of shortened, purpose-cut pieces that straddle that peak to shed water on both sides at once. It sits higher than any other part of the roof, catches more wind and sun than any other part, and gets looked at less often than almost anything else on the house. When it fails, there’s usually no dramatic sign. No shingle flapping loose in a storm. Just a slow leak that surfaces somewhere else entirely, weeks after the damage started.
What is actually happening
Field shingles on the main slopes only ever face one direction. Ridge cap pieces don’t get that luxury. They’re bent (or, on some products, pre-formed) over the peak so that one half faces one slope and the other half faces the opposite slope at the same time. That single design choice explains almost everything about why this line ages differently from the rest of the roof.
Cut down, not built up
Ridge caps are typically made from full shingles that have been trimmed down to size, or from a separate cap product cut specifically for that purpose. Either way, the piece covering the ridge is smaller and thinner at the fold than the shingles around it, and it’s asked to bend around a hard angle rather than lie flat. A material that’s been cut and folded has less of itself left to resist sun, rain, and repeated flexing than a flat shingle sitting untouched in the middle of a slope.
Wind’s favorite spot: the peak line
Wind doesn’t move evenly across a roof. As air travels up one slope and over the ridge, it accelerates right at that peak, the same way air speeds up over the top of a wing. That acceleration creates a pull, an uplift force, exactly along the ridge line, right where the cap material is already thinner and more worked than the rest of the roof. It’s a coincidence of geometry that the weakest material sits under the strongest wind load, but it’s a coincidence that shows up on almost every roof, in every climate.
Add a ridge vent underneath, which many homes have, and there’s now a continuous slot cut into the deck along that same line, with the cap acting as the only cover over an opening built for airflow. More seams, more edges, more places for water driven sideways by wind to find a way under the material instead of over it. None of this means the ridge is doomed to fail. It means it’s the part of the roof with the least margin for error, which is exactly why it deserves more attention than it usually gets.
What you can see without climbing
Almost everything useful about ridge condition can be checked from two places: standing on the ground, and standing in the attic. Neither requires a ladder against the house or a foot on the slope.
From the ground
- Stand back far enough to see the whole ridge line at once, then use binoculars or a phone camera zoomed all the way in to scan it slowly from one end to the other.
- Look for a wavy or uneven line where the cap should run straight. A ripple in an otherwise flat line often means a piece has lifted or shifted underneath.
- Look for color differences along the ridge compared to the rest of the roof. Patches that look lighter, darker, or shinier than their neighbors can mean granule loss or exposed material.
- Check for any gap where daylight shows through between cap pieces, or where a piece looks like it’s sitting at a different angle than the ones beside it.
- Do this scan after any significant wind event, not just once a year. Wind is the mechanism most likely to move something at the ridge, so it’s the trigger worth checking after.
From the attic
- Bring a flashlight or headlamp and turn off any attic lighting first, so small points of daylight are easier to spot.
- Look straight up at the peak of the roof deck, where the two slopes meet on the inside. Any pinprick of daylight coming through means water has a path too.
- Run the light slowly along the rafters and the ridge board. Dark streaking, discoloration, or a slightly swollen look to the wood are all signs moisture has been passing through, even if no active drip is visible that day.
- Press gently on any Insulation near the ridge that looks flattened, darker than the surrounding material, or damp to the touch. Wet insulation loses its ability to insulate and is one of the earliest, most reliable signs of a ridge problem.
- Check this after the same wind events that prompted the ground scan, and again after any period of sustained heavy rain.
Together, these two checks cover both sides of the problem: what the wind and sun have done to the outside, and what water has already managed to do on the inside. A homeowner who does both regularly rarely gets surprised by a ridge failure. They usually catch it while it’s still just a cosmetic issue on the outside and a faint stain on the inside, not a soaked ceiling.
What it costs to leave it
A ridge cap that’s lifted, cracked, or gapped doesn’t usually let water pour in right away. What happens first is smaller and slower, which is exactly why it goes unnoticed.
Where the water goes
Water that gets past a compromised ridge cap doesn’t fall straight down in a neat line. It runs along the underside of the deck, following the slope, sometimes traveling several feet before it drips onto anything visible. That’s why a stain on a ceiling or a rafter is often located well away from the actual point of entry at the ridge. Chasing the stain back to its source is part of why this kind of leak is so often misdiagnosed, or blamed on the wrong part of the roof entirely.
What rot looks like before it’s obvious
Wood that stays damp without ever fully drying starts to soften before it starts to visibly rot. The ridge board and the rafters nearest it are usually the first affected, because they’re closest to the entry point. Insulation packed against a damp rafter loses loft and stops trapping air effectively, which quietly increases heating and cooling costs long before anyone notices a leak. Left long enough, damp wood becomes an environment where mold takes hold, and mold spreads along framing far faster than most people expect, following moisture rather than staying put near the original entry point.
None of this happens on a fixed schedule. A roof in a windy coastal area accumulates this kind of damage on a different pattern than one in a dry inland climate, and a lightly shaded roof behaves differently than one under heavy tree cover. What stays consistent is the order of events: first a small entry point at the ridge, then a slow spread of moisture along the deck and framing, then softened wood and compressed insulation, then, eventually, a visible stain or a soft spot underfoot in the attic. Catching it at the first stage, the one this article’s ground and attic checks are built around, is what keeps a ridge problem a minor repair instead of a framing replacement.
What is not a householder job
Everything described above is observation. Actually working on the ridge is a different category of task, and it’s worth being blunt about where that line sits.
Where the boundary is
Anything above a single story is not a reasonable DIY project for most homeowners, regardless of how simple the fix looks from the ground. A wet, mossy, steep, or frosted roof surface changes the footing entirely, and a slope that’s manageable dry can be genuinely dangerous when any of those conditions are present. Any repair that requires both hands occupied on a sloped surface, holding material in one hand and a tool in the other while standing on an incline, removes the option of a free hand to catch a fall. These aren’t arbitrary cautions. Falls from roofs are a leading cause of serious injury and death in home maintenance work, and the ridge, being the highest and most exposed line on the roof, is the worst possible place to take a chance.
If the ground and attic checks described earlier turn up a wavy line, a gap, a stain, or damp insulation, the next reasonable step is a professional inspection, not a personal climb to confirm what’s already visible from safer vantage points. A detailed walk-through of how that inspection typically works, and what a roofer looks for once they’re up there, is covered on our roof inspection guide. If the findings point to an actual repair, the process of finding, vetting, and hiring someone qualified for the work is covered separately on our page on hiring a roofer. Between the two, a homeowner can go from noticing a problem to getting it properly fixed without ever needing to set foot on the slope.
Common questions
Can a ridge cap be repaired without replacing the whole roof?
Often, yes. Ridge cap damage is frequently limited to that line itself, and a roofer can typically assess and repair just the affected section after an inspection, rather than treating it as a sign the whole roof needs replacing.
Does a ridge vent make the ridge more likely to leak?
A ridge vent adds a cut opening and additional seams along the peak, which means there are more edges where installation quality matters. A properly installed vent and cap system is designed to handle this, but it does make careful installation and periodic checking more important than on a solid ridge without a vent.
What should I photograph if I plan to file an insurance claim for ridge damage?
Photograph the ridge line from the ground at the zoom level that shows the issue clearly, along with any interior staining or damp insulation from the attic, and keep the date noted. Insurance policies differ on documentation requirements and deadlines by state and by carrier, so the specific policy in hand governs what’s needed, not a general rule.
How often should the ground and attic checks be repeated?
At minimum after any significant wind event and after any period of sustained heavy rain, since those are the conditions most likely to move or expose ridge material. A routine seasonal check on top of that catches anything gradual that wind and rain checks might miss.