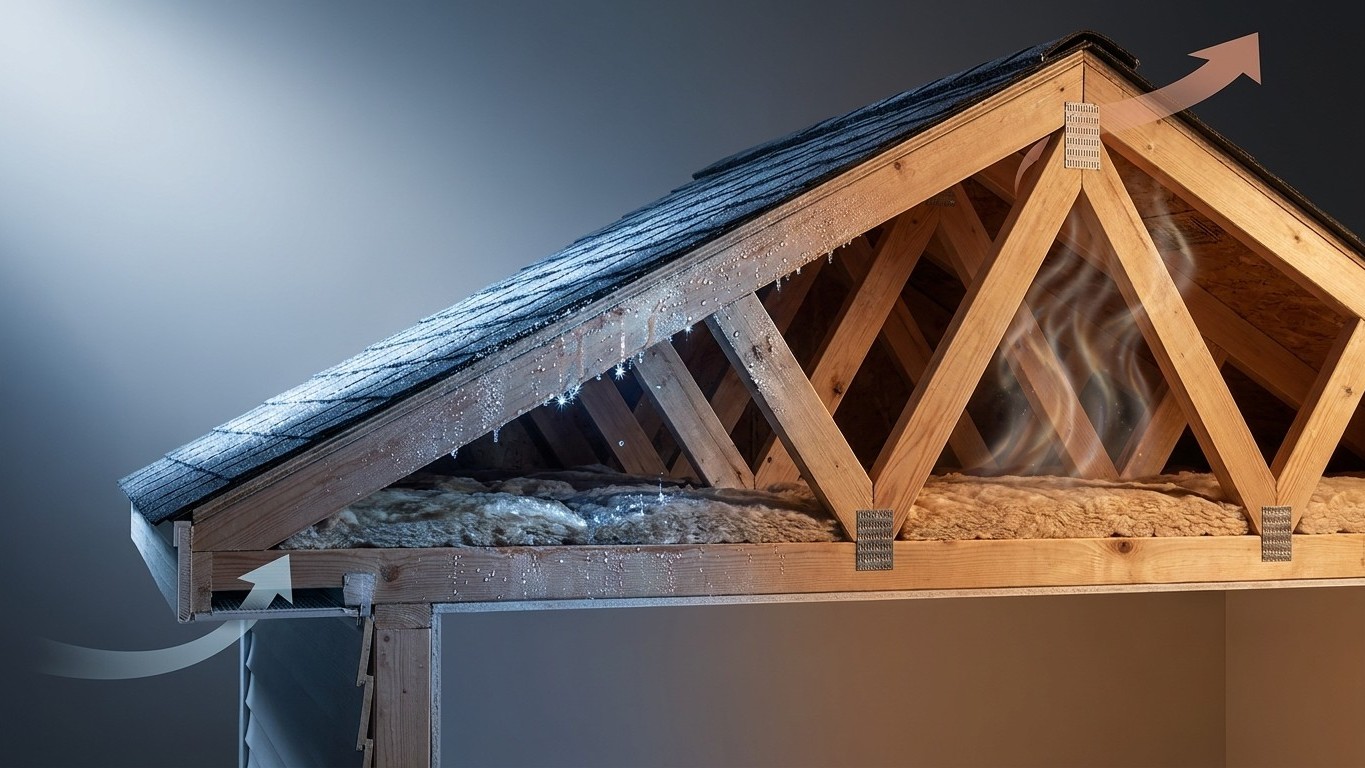

A roof that can’t breathe traps heat and moisture right where they do the most damage: against the underside of the shingles and on top of the Insulation. Ventilation is a controlled path for air to move through the attic, pulling in cooler air low and pushing out hot, humid air high. Without that path, the roof cooks itself from below in summer and sweats from the inside in winter, long before anyone up top notices a problem.
What is actually happening
The system only works as a pair. Cooler air has to enter somewhere low, usually through vents built into the eaves or soffits, and warmer air has to exit somewhere high, typically along the ridge or through vents near the peak. Intake without exhaust just pressurizes the attic. Exhaust without intake pulls air from wherever it can find a gap, often dragging conditioned indoor air, and its moisture, straight into the attic. Neither half does much on its own.
In summer, an attic without airflow turns into a heat trap. The sun bakes the shingles, that heat radiates into the attic space, and with nowhere to go it accumulates. The underside of the roof deck stays hot for hours after sunset, and that sustained heat stresses shingles and the adhesive layers beneath them from below, not just from above where the sun hits.
Winter creates the opposite problem, driven by the same missing airflow. Warm, moist air from the living space rises and finds its way into the attic through light fixtures, bathroom fans, attic hatches, and gaps around plumbing stacks. If that air can’t move out through the roof, it hits the cold underside of the deck and condenses, soaking into the wood, dripping onto insulation, and pooling in low spots. It’s the same mechanism that fogs a bathroom mirror, just happening slowly, invisibly, above the ceiling.
This is why the intake-and-exhaust pairing matters more than the size or number of any single vent. A house can have vents cut into the ridge and still have a stagnant attic if the soffit vents are blocked by insulation stuffed too far into the eaves, a mistake that happens often during insulation upgrades. Airflow is a circuit. Block one end and the other becomes decorative.
Ventilation also interacts with insulation in a way that’s easy to miss. Insulation stops heat transfer between the attic and the living space; ventilation manages the air in the attic itself. They’re not competing systems, but they do need to coexist without insulation choking off the intake path at the eaves. That’s the detail that gets overlooked most often, and the one a homeowner can actually check without special tools.
What you can see without climbing
Most ventilation problems leave visible clues, and almost all of them can be spotted without ever setting foot on the roof itself.
- Start from the ground. Walk the perimeter of the house and look up at the roofline with binoculars or a zoomed-in phone camera. Check the soffits for vent openings, and look for any that appear painted over, clogged with debris, or covered by insect nests. Scan the ridge line for a continuous vent strip or individual vent caps, and note whether any look damaged, crushed, or missing.
- Look at the shingles from a distance. Uneven discoloration, patches that look duller or more worn than the rest of the roof, or shingles that appear curled or lifting can point to trapped heat cooking one section more than another. This is easiest to spot on a sunny afternoon when the light rakes across the surface.
- Move to the attic. Bring a flashlight and go up during daylight hours. Turn off the flashlight near the roof deck. Any pinpricks or streaks of daylight coming through the deck boards mean there’s a gap somewhere, and it’s worth noting exactly where.
- Check the rafters and sheathing with the light on. Look for dark staining, streaking, or a slightly warped, wavy look to the wood. Stains that follow the line of a rafter or run down from the ridge suggest moisture has been condensing and dripping for a while.
- Press or look closely at the insulation below the roof deck. Insulation that looks matted, discolored, or damp has likely been absorbing condensation. Batts stuffed tightly against the eaves, blocking the soffit vents from the inside, are one of the most common and most fixable issues found this way.
- Smell the air. A musty, damp odor in the attic, especially one stronger near the roof deck than the attic floor, usually means moisture has been sitting in that space for some time.
This routine takes maybe twenty minutes and answers most of the important questions. If nothing looks wrong in either check, that’s a genuinely useful data point, not just an absence of information.
What it costs to leave it
The damage from poor ventilation builds in a fairly predictable sequence, though the pace varies a lot depending on climate, attic design, and how much moisture the household generates day to day.
The first thing affected is usually the wood itself, specifically the roof deck and rafters. Repeated condensation cycles, wet in the morning, drying during the day, wet again the next cold night, slowly break down wood fibers. Left alone, this shows up as soft spots in the deck, sagging between rafters, or a spongy feel underfoot. Wood that’s been through enough of these cycles can also start to support mold growth, which spreads across surfaces rather than staying contained.
Insulation is next in line, and it’s the more immediate financial concern because insulation loses most of its effectiveness once wet. Damp fiberglass or cellulose compresses, mats down, and stops trapping air as designed. That means the attic is not only holding moisture, it’s also doing a worse job regulating temperature, which increases heating and cooling costs in a household that may not connect the two problems at all.
From there, moisture can migrate downward. Stains on ceiling drywall, especially near the edges of a room or around light fixtures, often trace back to attic condensation that has soaked through insulation and started affecting the ceiling material itself. Once drywall is involved, the fix moves from “attic project” to “interior repair,” a meaningfully bigger job.
Metal components suffer too. Nails, flashing, and metal vent components exposed to repeated condensation can corrode faster than in a dry attic. Corroded fasteners lose their grip, which can loosen shingles or flashing seals, creating new entry points for water from the outside as well.
None of this happens on a fixed schedule, but the order is consistent: wood and insulation first, interior finishes second, structural fasteners and connections following behind. Catching it at the wood-and-insulation stage, during a routine visual check, is a much smaller job than catching it once ceiling stains have appeared.
What is not a householder job
Everything described above is something to look for, not something to fix from a ladder. Roof ventilation problems are diagnosed visually and then handed off, and that handoff point matters as much as the diagnosis itself.
Anything above a single story is outside the scope of a homeowner check. The visual routines described here work from the ground with optical zoom and from inside the attic. They don’t require getting onto the roof surface. If a closer look at a vent, a shingle, or a section of flashing is needed, that’s a job for someone with the right harness, ladder setup, and training, not a step stool and a good afternoon.
Any roof surface that’s wet, mossy, steep, or frosted is off-limits regardless of story height. Moss and algae growth is a strong sign of a damp, poorly ventilated roof section, which makes it exactly the kind of area someone might be tempted to inspect up close, and also the kind of surface where a foot slips without warning. The same goes for anything requiring both hands to manage while standing on a sloped surface, whether that’s clearing debris from a ridge vent or repositioning a loose vent cap. If both hands are needed for the task, neither hand is free to hold on.
Falls from roofs are a leading cause of serious home-maintenance injuries, and they happen most often during exactly the kind of quick, one-off tasks that feel low-risk in the moment: clearing a vent, checking a stain, grabbing a tool that rolled toward the edge. Treating the ground-and-attic checklist as the full extent of a DIY inspection, and anything beyond that as a call to a professional, is the safer line to draw.
A full roof inspection covers the parts of this system that can’t be assessed safely from the ground or the attic, including a close look at vent placement, flashing condition, and the ridge line itself. When a ventilation issue is confirmed, the next step is usually hiring a roofer who can correct airflow at both the intake and exhaust points rather than patching one symptom at a time.
Common questions
Can a roof have too much ventilation?
Ventilation is meant to be balanced between intake and exhaust rather than maximized on either end. A mismatch, especially heavy exhaust with little intake, can pull conditioned air from the house into the attic instead of managing outside air properly. A roofer’s inspection is the way to assess whether the balance on a specific attic is appropriate.
Does a new roof automatically fix ventilation problems?
Not on its own. Replacing shingles addresses the surface, but the intake and exhaust vents underneath are a separate system that needs its own check during that project. It’s worth asking directly whether ventilation was inspected and adjusted as part of a reroofing job, since it isn’t always included by default.
Is attic ventilation linked to ice buildup at the roof edge?
Uneven attic temperatures, often caused by poor airflow, are commonly involved in that pattern, since warm spots can cause melting higher on the roof that refreezes lower down. It’s a separate issue from ventilation alone, but the two are frequently connected in colder climates and worth mentioning during an inspection.
Does storm or hail damage affect roof ventilation components?
Vent caps, ridge vents, and soffit vents can all be damaged by wind or hail, and that damage may not be obvious from the ground. If a claim is being considered, the homeowner’s insurance policy governs what’s covered and what documentation is required, and that documentation should be gathered as soon as damage is suspected rather than left until later.