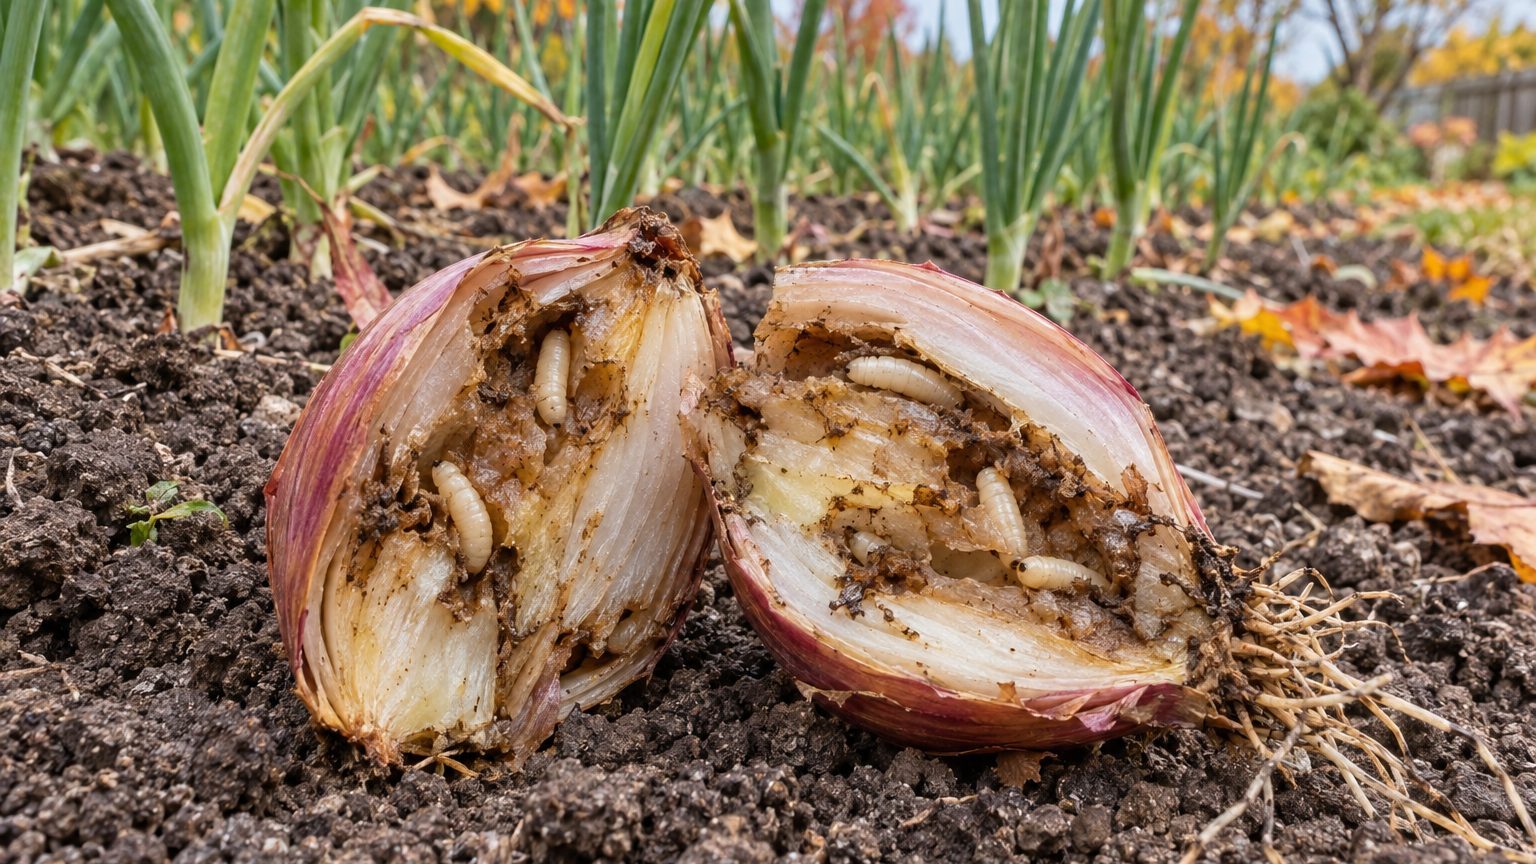

The legless, creamy-white maggots tunneling through your shallots are almost certainly onion maggots, the larvae of the onion fly (Delia antiqua). They hatch from eggs laid in the soil beside the plant, burrow into the base, and eat their way up through the bulb and roots. The adult flies show up in spring, so the damage usually starts weeks before you would think to look. The most reliable defense is keeping the flies from laying eggs in the first place, which means a physical barrier put down at planting time.
Is it really onion fly? What to look for
The first sign is rarely a maggot. It is a shallot that looks thirsty even though the soil is damp. The leaf tips yellow, a few stems flop over, and the whole clump tugs out of the ground with almost no resistance because the roots and basal plate have been chewed away. Cut open the bulb and you will find the answer: tunnels, brown mush, and white larvae.
Onion maggots are about 1/3 inch long when full grown, tapered to a point at the head end and blunt at the tail. They have no legs and no visible head capsule. Several of them can share a single bulb, and a young plant can be finished off by just a few.
Maggots in a bulb are not always onion maggots, though. Other pests and diseases can look similar at first glance:
- Seedcorn maggot looks nearly identical and is attracted to the same decaying plant matter. It often strikes young plants in cold, wet springs.
- Bulb flies (lesser bulb fly and similar species) tend to move into bulbs that are already soft or rotting, so their larvae are a symptom more than the original cause.
- Stem and bulb nematodes leave swollen, twisted, distorted shoots and soft, spongy bulbs, but no maggots.
- Bacterial soft rot turns bulbs slimy and foul-smelling and can bring in scavenging larvae after the fact.
The fix for all of these overlaps in a few places, such as rotation and sanitation, but timing and barriers matter most for the onion maggot. If you are not sure what you have, bring a sample to your county Cooperative Extension office. They can identify it quickly, and many publish local fly-emergence timing.
The life cycle that explains the damage
Onion flies spend the winter as pupae in the soil, in brown, seed-shaped cases about the size of a grain of rice. When spring warms the ground, adults emerge. They look like slim, gray, bristly houseflies, a bit smaller than the ones that bother your picnic. Emergence is driven by accumulated heat rather than the calendar, so it comes earlier in Georgia than in Minnesota, and earlier in a warm year than a cold one. State extension services publish degree-day models and local alerts for commercial onion growers, and home gardeners can use the same information.
A female lays her eggs in the soil near the base of an allium plant, or on the plant itself, attracted by the smell of onions and especially by damaged or decaying tissue. A single female can lay a couple hundred eggs over her lifetime. The eggs hatch within a few days, and the larvae feed for roughly two to three weeks before dropping back into the soil to pupate. Then the cycle starts over.
How many generations you get depends on where you garden. Cooler northern regions, including Michigan, New York, Wisconsin, and the Pacific Northwest, tend to see the worst problems, usually with two or three generations a year. The spring generation is usually the most damaging, because small seedlings and young shallots have almost no reserves to lose. A mature bulb can shrug off a nibbled outer layer. A plant with a few leaves cannot.
Hot, dry weather works in your favor. Onion maggot populations drop in midsummer heat, as pupae go dormant until conditions cool down. This is also why late-season damage tends to be milder in the South and lower Midwest. In a cool, damp year, though, expect a rougher time.
Keeping the flies off in the first place
Prevention beats rescue here, because once the larvae are inside the bulb nothing you spray or pour on the soil will fix it. Here is what works, in rough order of impact.
Cover the bed at planting
Lightweight floating row cover or fine insect netting is the single most effective home-garden tool. The idea is simple: if the fly cannot reach the soil near the plants, it cannot lay eggs. Lay the fabric over the bed immediately after planting, leave some slack so the shallots can grow, and bury or pin every edge firmly against the soil. A gap of an inch or two is an open door. Shallots do not need insect pollination to form bulbs, so you can leave the cover on through the egg-laying flight, which in many northern states runs from mid-spring into early summer. Check with your local extension office for the timing in your area, and watch for heat buildup on very warm days.
One caution: if flies emerged from last year’s pupae sitting in that very bed, the cover traps them in with your plants. That is why rotation matters.
Rotate and clean up
Move your shallots (and onions, garlic, and leeks) to a part of the garden where alliums have not grown for at least three years, and put as much distance as you can between this year’s bed and last year’s. Flies can travel, so rotation alone will not eliminate the problem, but it prevents the worst scenario of newly emerged adults hatching right beside their next meal.
Sanitation counts just as much. Pull and discard any culls, volunteer onions, and rotting alliums at the end of the season. Infested bulbs belong in the trash or a sealed bag rather than the compost pile, where they can carry the next generation through the winter. Tilling or turning the bed in fall also exposes pupae to birds and cold, though the effect is partial.
Mind the soil and your own hands
Flies are drawn to decay. Fresh manure, half-rotted cover crops, and lumps of undecomposed plant matter all make the bed more attractive to egg-laying females. Use finished compost and give any green material time to break down before planting. The same goes for how the bed is built: the soil shallots want is loose, well-drained, and rich in fully decomposed organic matter, which is also the kind of soil that is least attractive to these pests.
Be careful when you weed and thin. Bruised or cut allium tissue releases the scent that draws females in. If you are harvesting green shallots early, pull gently and fill the hole back in, so you are not leaving open wounds and exposed roots. Avoid hilling soil up around the bulbs, which creates the damp, sheltered base the flies prefer.
Time the planting
Planting date can help, though it works differently by region. In areas with mild enough winters, fall-planted shallots put on root growth before cold weather and are bigger and tougher by the time spring flies emerge. In colder regions, spring planting should happen as early as the soil can be worked, so plants are established before the main egg-laying period. A bigger plant can take a hit; a seedling cannot.
What to do when maggots are already in your shallots
Act fast, but be realistic about what can be saved. A plant that is wilting, yellow, and pulls out with a hollow base is done. Dig it up, along with a few inches of the surrounding soil if you can, and seal it in a bag for the trash. Leaving it in the ground gives the larvae a chance to pupate and add to next year’s population. Check neighboring plants gently, because larvae move along a row from bulb to bulb.
For plants that look healthy, add row cover right away over the whole bed. That will not kill larvae already in the soil, but it does stop new egg-laying while the current generation finishes.
If you are early in the season, say within a few weeks of planting, replanting the gaps with fresh sets under a properly sealed cover is a reasonable gamble. Later in the season, it is usually too late for shallots to make a decent bulb, so focus on cleaning up and planning for next year.
Bulbs with only light damage on the outer scales can be trimmed and used quickly in the kitchen. Do not put them in storage. Wounded bulbs are an easy entry for soft rot and other decay, and one bad shallot in a mesh bag can spoil its neighbors over a few weeks. Cure and store only firm, undamaged bulbs, and keep a close eye on them.
Chemical options for home gardeners are limited, and products registered for onion maggot vary by state. Many are made for commercial growers and applied as seed treatments or at planting, which is out of reach for a backyard bed. If you want to consider a pesticide, check your state extension’s current recommendations and read the label for what is allowed on edible alliums. Beneficial nematodes and similar biological products get mentioned as options, but results in garden settings are inconsistent, so treat them as a supplement to barriers and rotation rather than a replacement.
Containers and small beds
Growing in pots does not make shallots immune, but it gives you a few advantages. Fresh potting mix has no overwintering pupae in it, and a pot is easy to cover with fine mesh secured around the rim. If you are going this route, shallots in a container covers sizing, drainage, and mix in more detail. The same logic applies: seal the top, avoid fresh manure in the mix, and keep pots away from last year’s allium bed.
For a broader look at planting, spacing, and harvest, the main guide, Growing Shallots: One Bulb In, a Handful Out, covers the full season, and most of its advice (good drainage, clean beds, careful curing) doubles as maggot prevention.
One last detail worth knowing: the onion fly is not the only insect that treats your garden’s allium bed as a nursery. Because the adults find plants by smell, a bed of leeks, garlic, and shallots side by side can send a stronger signal than a single row. If you grow several alliums, put the cover over all of them, not just the shallots.