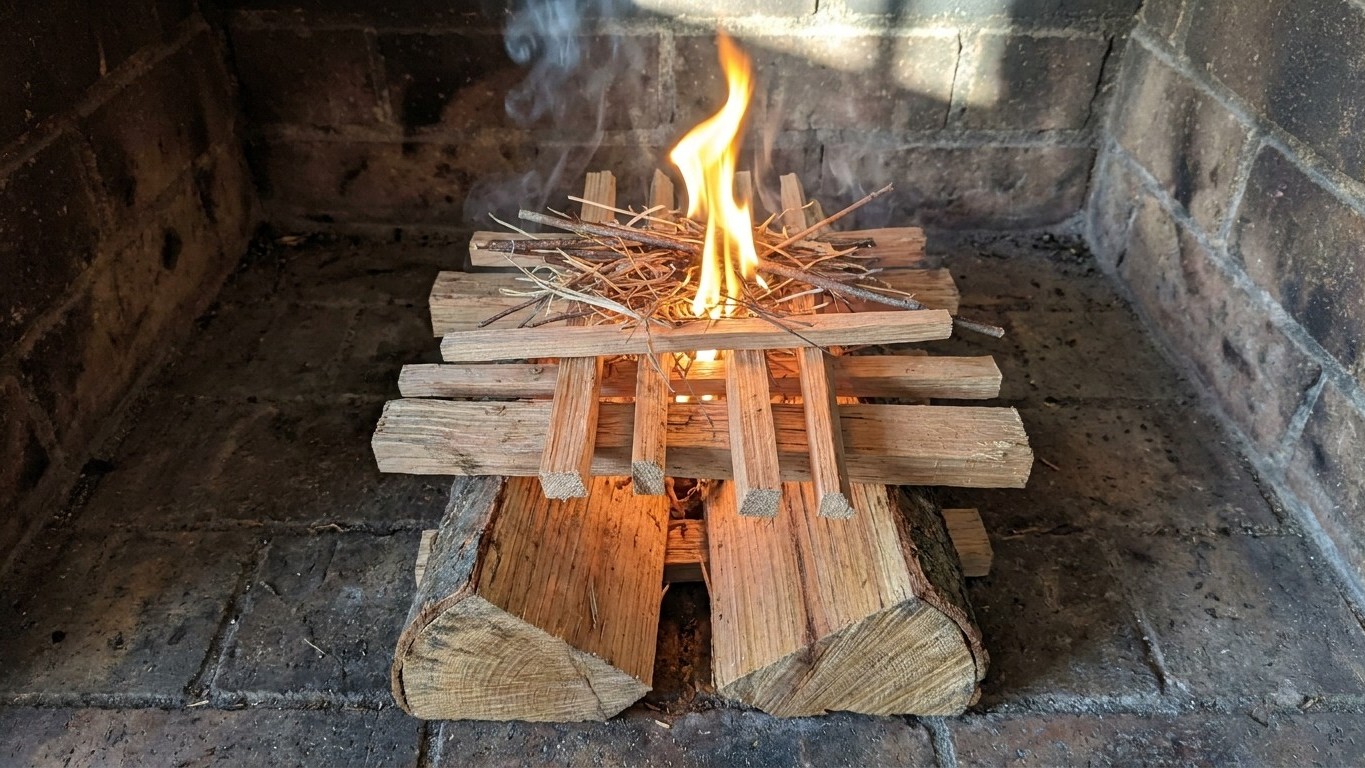

A fire that keeps burning comes down to three things arriving in the right order: dry fuel, enough air, and a heat source small enough for the wood to actually catch. Skip a step or smother the air supply, and you’ll be relighting that pile of kindling for the third time in twenty minutes.
How to Light a Fire That Stays Lit

Most fires die for one reason people don’t expect. It isn’t damp wood, and it isn’t a bad match. It’s air. A firebox packed tight with logs looks generous, but it strangles itself, because flame needs oxygen moving through the gaps between pieces of wood, not just around the outside of a solid stack. When beginners complain that their fire “just won’t take,” the fix nine times out of ten is fewer logs, more space, and the air control wide open.
The second piece people miss is the chimney itself. A cold flue is essentially a plug of dense, heavy air sitting in the pipe, resisting the warm smoke trying to rise through it. The first real job of any fire isn’t to heat the living room. It’s to warm that column of air so it starts moving upward and creates draw. Until that happens, smoke rolls back into the room instead of climbing out, no matter how enthusiastically the kindling is burning.
Why the Top-Down Method Works
This is where the building method matters more than the fuel. A top-down fire, big splits on the bottom, kindling stacked above them, and fine tinder on top, burns downward through the stack instead of upward. That sounds backward until you see what it does to the chimney: the flame and heat reach the flue almost immediately, because they start at the top of the pile, close to the throat of the fireplace or stove. That early heat is what warms the cold air plug and gets the draw established before the big splits have even caught. Traditional bottom-up building, tinder under logs, forces you to wait for heat to climb through a dense stack of wood before it ever reaches the chimney, which is exactly the delay that lets a fire smoke, stall, or go out.
Kindling quality decides whether any of this works at all. Wood that’s dry on the surface but damp at the core will hiss, char, and refuse to flame, even sitting directly on top of a healthy bed of tinder. Splitting a piece open and checking the inside, not just knocking on the bark, is the only real test.
How to do it
- Clear the firebox down to bare grate or hearth. Leftover ash and half-burned chunks block airflow from below, which is often the first mistake before a single match is struck.
- Set two or three larger splits at the bottom, leaving gaps between them. These are the fuel that will keep the fire going once it’s established, and they need space around them for air to move.
- Stack progressively smaller kindling in a loose crisscross above the splits. Loose is the operative word. A tight, tidy stack looks better but burns worse.
- Place dry tinder, tightly curled bark, dry small twigs, or a commercial firestarter, on top of the kindling. This is the layer that will catch first and burn down into everything below it.
- Open the air control fully before lighting anything. This is not optional. A restricted air setting at the start starves a cold fire before it has any momentum.
- Light the tinder at the top of the stack. Watch it establish flame on its own for a minute before doing anything else.
- Let the fire burn down into the kindling, then into the splits, without closing the air control. This period, usually five to fifteen minutes, is when the chimney is warming and draw is being established.
- Check that smoke is exiting cleanly, not curling back into the room. That’s your signal the flue has warmed and draw is active.
- Add fuel only once the fire has a solid coal base. Adding wood too early just piles cold mass on a fragile flame.
- Close the air control gradually, once the fire is established. Closing it too soon reverses everything the top-down method just accomplished.
What goes wrong
-
The fire lights, then dies within minutes
This almost always means the air control got closed too early, or the firebox was loaded too tight from the start. Open the air control fully, and if the fire has coals left, gently separate the wood pieces to expose gaps between them. A dying fire usually isn’t dead, it’s suffocating, and it can often be revived without starting over.
-
The room fills with smoke instead of the chimney
This is a cold-flue problem, not a fuel problem. The air in the pipe hasn’t warmed enough to rise, so smoke has nowhere to go but back into the room. If it happens, hold a lit sheet of newspaper or a long match up near the flue opening for a few seconds to pre-warm that column of air before the main fire builds up heat on its own. This is far easier to prevent than to fix mid-smoke, which is exactly why the top-down method exists: it gets heat to the flue early.
-
The kindling chars but won’t flame
Surface-dry, core-damp wood is almost always the cause. Split a piece open; if the interior looks darker or feels cool and slightly damp compared to the outside, that’s your answer. Swap it for kindling that’s dry all the way through, even if it means breaking into a different batch or splitting larger dry wood down into smaller pieces on the spot.
-
The fire burns hot for a while, then collapses into weak coals
This usually means the fuel added after establishment was too large too soon, smothering the coal bed the same way an overloaded firebox smothers a new flame. Rake the coals into a loose pile, open the air control back up, and add one smaller piece before returning to full-size splits.