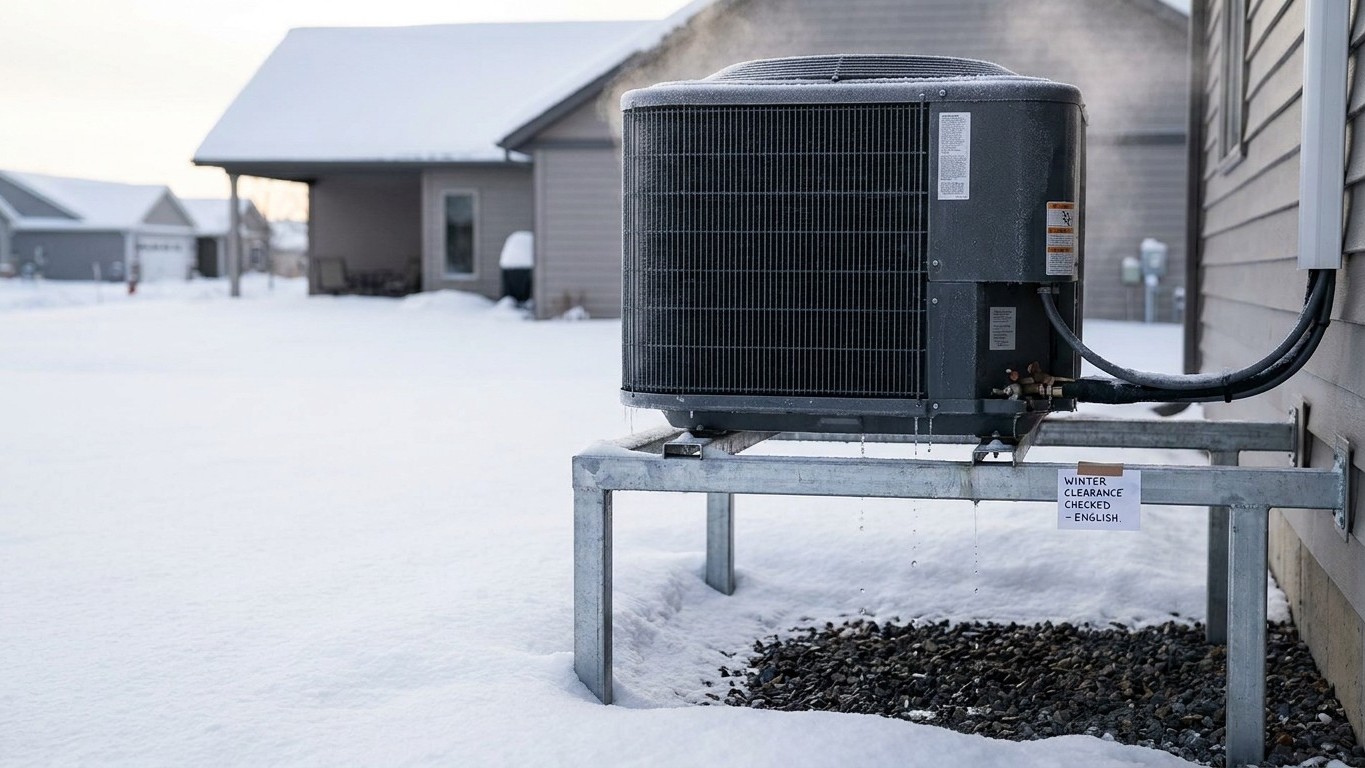

The short answer: raised above the snow line you actually get each winter, positioned where its own meltwater can run off and away, and set clear of anything that sheds snow or ice from the roof above. The exact height and the clearance on each side aren’t universal numbers. They’re on the equipment’s own installation label, and that label is what should settle the question, not a guess based on what looks reasonable in a garage on a mild fall afternoon.
This unit works when the weather is worst

A central air conditioner’s outdoor unit sits idle from October to April. Nothing runs, nothing melts, nothing needs to drain. A heat pump’s outdoor unit does the opposite: it’s busiest exactly when the yard is covered in snow, because that’s when the house needs heat and the unit is out there pulling it from the outdoor air.
That single difference changes every siting decision that follows. A running compressor generates warmth around the coil. Snow landing on a cold, idle AC condenser just sits there until spring. Snow landing on a working heat pump unit melts, at least partly, then refreezes as the temperature drops overnight or as the defrost cycle finishes. The unit is manufacturing its own meltwater all winter long, and where that water goes determines whether the unit keeps breathing or starts choking on ice.
This is also why the frost you’ll see coating the cabinet on a cold morning, or the puff of vapor rising off the top during a defrost cycle, is normal operation and not a fault. The concern isn’t frost on the unit. It’s what happens when meltwater has nowhere to go and the unit sits low enough, or in a spot collecting enough drift, that the base itself becomes packed in ice.
Why the same corner that’s fine for cooling isn’t fine here
Installers sizing a purely cooling system often tuck the condenser into a low, sheltered corner: against the foundation, below a roofline, out of the way of foot traffic. For cooling-only equipment that’s a reasonable, low-risk spot. For a heat pump, that same corner is often the one place snow drifts deepest, the one place a roof edge dumps its load, and the one place meltwater pools instead of draining.
A unit that’s buried, iced, or standing in slush isn’t just working harder. Its airflow is restricted, its coil can’t shed the frost it builds during normal operation, and the defrost cycle that’s supposed to clear that frost has to fight snowmelt refreezing as fast as it clears. None of that is a defect in the equipment. It’s a siting problem, and it’s fixable before the first snowfall rather than after.
Height, and where the water goes
Two things have to be true of the spot a heat pump’s outdoor unit sits in, regardless of how much snow a given winter brings. Neither one comes with a single number that applies everywhere, because both depend on local snowfall patterns and on what the manufacturer specifies for that particular unit.
The first is clearance above drifting snow. A unit installed flush with grade, or on a slab barely above it, will have its base surrounded and its lower coil blocked the first time snow piles up against the side of the house. Wind-driven drifts don’t distribute evenly. They pile against obstacles, and an outdoor unit is exactly the kind of obstacle that collects a drift taller than the open ground around it. The unit needs to sit high enough, on whatever base or stand the manufacturer specifies, that the snowpack a normal winter produces in that yard doesn’t reach the intake or the fan.
The second is height above the ice the unit makes itself. This is separate from drifting snow and often overlooked. Meltwater running off the coil during a defrost cycle has to go somewhere, and if the base sits low with poor runoff, that water refreezes around the unit’s own feet, building a shelf of ice through the winter that eventually reaches the cabinet regardless of how deep the snow around it actually is.
Because neither figure is universal, the practical approach is a short set of checks rather than a rule of thumb:
- Find the mounting height and pad specifications in the manufacturer’s installation manual, not in general advice, since they’re written for that specific unit’s clearances.
- Walk the site after the heaviest snow of a typical local winter and note where drifts actually pile up against the house, not just how deep snow sits on open ground.
- Check that the base drains toward open ground or a drainage path, not toward a tray, a low spot, or a section of paving that holds water.
- Confirm the pad or stand itself won’t heave, tilt, or sink as frozen ground thaws and refreezes through the season.
A pad that freezes water in place rather than letting it run off defeats the purpose of raising the unit in the first place. Height without drainage just relocates the ice problem a few inches up.
What is above it matters as much as what is under it
Homeowners focused on how high the unit sits above the ground often miss the bigger hazard sitting directly overhead. A roof edge, a valley where two roof planes meet, or a gutter that drips through the winter can dump far more snow and ice onto an outdoor unit than the ground ever will.
A steep roof without a snow guard sheds its load in sudden slides rather than a gradual melt. A unit installed beneath that kind of roof section can be buried under a slab of snow and ice in a single event, sometimes heavy enough to bend fins or block the fan outright. A valley where two rooflines converge concentrates runoff into a narrow stream that, in freezing weather, becomes an ice dam directly above whatever sits below it. A gutter that’s clogged, undersized, or simply positioned wrong will drip meltwater straight onto the coil through repeated freeze-thaw cycles all winter.
None of these are things the unit’s own design can compensate for. They’re building and roof conditions, and they call for building-side remedies rather than equipment-side ones.
The fixes, and the one thing they must not do
Relocating the unit is the cleanest fix when it’s practical: moving it away from the roof edge or out from under a valley solves the problem permanently. Where relocation isn’t an option, a snow guard installed on the roof above the unit breaks up sliding snow into smaller amounts that a well-drained pad can handle. A structure built specifically to shield the unit from above, essentially a small roof of its own set well clear of the cabinet, can work too.
What doesn’t work, and what causes real damage, is wrapping the unit in a tarp or a snug-fitting cover for the winter. That traps moisture, blocks airflow the unit needs to keep running, and can cause more harm than the snow it was meant to keep out. Any structure or guard placed near a heat pump’s outdoor unit has to leave the intake and discharge paths completely open. That rule doesn’t bend for looks, for wind protection, or for convenience.
This is also where the advice diverges sharply from cooling-only equipment. A central air conditioner benefits from a loose, breathable top cover during the off-season precisely because it sits idle all winter. A heat pump doesn’t get that off-season, so that guidance doesn’t apply here at all.
Clearance, and the neighbor
The clearance a heat pump’s outdoor unit needs on each side, and above it, is set by the manufacturer and printed on the equipment’s own installation label or manual, not by a general rule that applies across brands and sizes. That label accounts for how the unit draws air in and pushes it back out, and crowding any one of those paths, even by a small amount, reduces airflow the same way burying the unit in snow does.
The check that gets skipped most often isn’t the clearance number itself, it’s confirming that whatever sits near the unit today, a fence panel, a deck skirt, a row of shrubs planted for privacy, hasn’t quietly closed in on that clearance since installation day. A screen added a year or two later for looks, or a storage shed built a little too close, can turn a compliant installation into a restricted one without anyone touching the unit itself.
Distance from windows matters for a different reason: a heat pump running through a January night has a fan and a compressor that don’t stop for anyone’s sleep schedule. A unit installed close to a bedroom window, whether it’s the homeowner’s own window or a neighbor’s on the other side of a property line, is a common source of complaints that are entirely avoidable by thinking through sound as well as snow at siting time. Local zoning or noise ordinances sometimes set their own minimum distances from property lines, separate from the manufacturer’s clearance figures, and both are worth checking before the unit goes in rather than after a neighbor raises it.
The reliable approach is the same one that applies to height and drainage: find the manufacturer’s clearance specification for the exact unit installed, apply it on every side and above, and treat anything added near the unit afterward as a potential intrusion into that space until it’s confirmed otherwise.
Common questions
Does snow sitting on top of the unit mean it’s broken?
No. Some frost and snow accumulation on the cabinet during normal winter operation is expected, and a working unit will typically clear it through its own defrost cycle. The concern is snow or ice that blocks the intake, buries the base, or builds up faster than the unit can clear it, not a light dusting on the top panel.
Can I shovel snow away from the unit myself?
Clearing loose snow from around the base and away from the intake is a reasonable, routine task. What to avoid is chipping at ice that’s bonded to the coil or cabinet, since fins bend easily and a coil damaged that way can affect performance for the rest of the season.
Should I build a roof over the unit to keep snow off completely?
A structure that shields the unit from snow sliding off a roof above can help, as long as it’s positioned well clear of the cabinet on every side and doesn’t restrict the intake or discharge airflow. A tight-fitting cover or wrap is a different thing entirely and should be avoided year-round on a heat pump.
Where do I find the exact height and clearance my unit needs?
On the installation manual or the rating label that came with the specific equipment installed at the house. Those figures are set by the manufacturer for that model and site condition, and they’re the only numbers that should be treated as authoritative for a given installation.