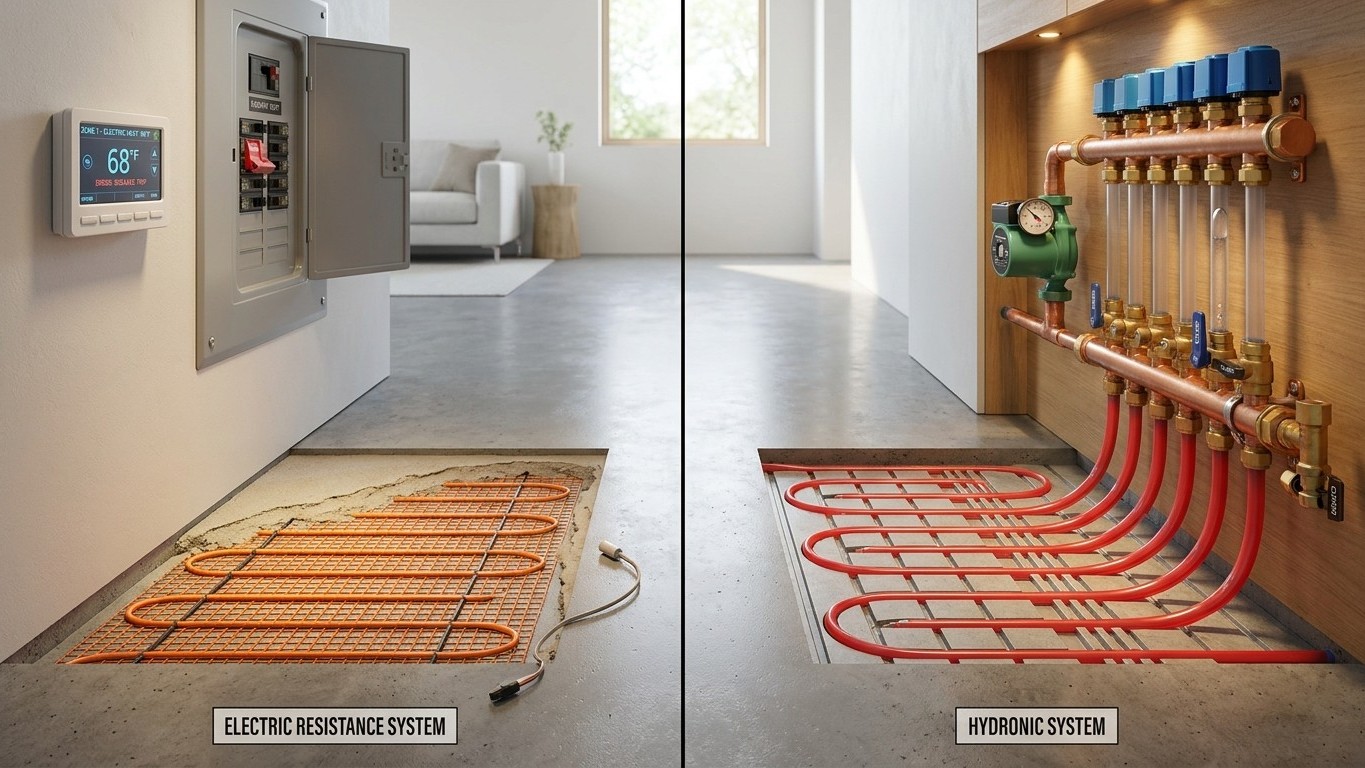

Most “dead” radiant floors are not actually dead. The system is usually alive but blocked at one specific point: a tripped breaker, a failed sensor, an air pocket in a loop, or a closed valve on a single zone. Figuring out which one starts with a simple question: is this an electric floor or a hydronic one? The fix, and how fast you can do it yourself, depends entirely on that answer.
Electric and hydronic fail differently

An electric radiant floor is a circuit. Current runs through resistance cable or a mat embedded under the finish floor, and that current has to get past a breaker, a GFCI (or AFCI) protection point, a wall-mounted controller, and a temperature sensor before the cable ever warms up. A break or fault at any one of those four points shuts the whole thing down, even though the cable itself is perfectly fine.
A hydronic radiant floor works on a completely different principle. It’s a loop, not a circuit. Warm water leaves a heat source (a boiler, or sometimes a water heater), gets pushed by a circulator pump, passes through a manifold that splits it into individual zone loops, and travels through tubing under the floor before returning to be reheated. Trouble shows up at the heat source, at the circulator, at the manifold valves, or as trapped air inside the loop itself, which blocks water flow the same way a clog blocks a pipe.
Telling the two systems apart without paperwork
If the house came without manuals, the physical clues are easy to read once you know where to look:
- Electric systems have a thin cable or mat pattern visible in old installation photos or under an access panel, a single low-voltage thermostat with a sensor wire running to it, and no boiler or water heater tied into the floor at all.
- Hydronic systems have visible tubing loops gathered at a manifold (often in a utility closet or basement), a circulator pump nearby, and a clear connection back to a boiler or a dedicated water heater.
- If you can find a manifold with multiple copper or PEX loops branching off it, the floor is hydronic. If all you find is a wall thermostat and a probe wire disappearing into the subfloor, it’s electric.
Both systems share one trait that confuses people troubleshooting a “no heat” call: thermal mass. A radiant floor has to warm the slab or the floor assembly itself before the room feels any different, so the response is measured in hours, not minutes. That’s normal behavior, not a symptom. Don’t assume the system is broken just because you don’t feel a change five minutes after adjusting the thermostat.
The floor sensor is the usual electric fault
When an electric floor won’t heat, the most common single point of failure is the floor sensor, not the cable. Most electric systems don’t rely on room air temperature alone. A dedicated sensor is embedded directly in the mortar or thin-set under the tile, wired back to the wall controller, and it’s that sensor reading that tells the controller whether to call for heat. If the sensor fails, whether from a bad connection, corrosion, or physical damage during installation, the controller has no valid input and simply won’t turn the cable on, even if every foot of heating cable underneath is in perfect working order.
This is frustrating because it looks like total system failure from the wall. The thermostat display might show an error code, a flashing symbol, or just refuse to respond to any setpoint change. Homeowners sometimes assume this means the whole floor needs to be torn up, when the actual failure is a component the size of a pencil.
Why a spare sensor often already exists
Quality controllers are built to accept a replacement sensor without requiring the original wiring to be reused. Installers who know this often leave a second sensor probe coiled up inside the wall near the controller box specifically for this scenario, so a failed sensor can be swapped without cutting into the floor at all. If your controller shows a sensor fault code, the first move is checking the wall cavity behind or below the thermostat for a spare cable labeled as a floor sensor, not reaching for a demolition hammer.
Not every installation includes that spare, and not every controller model supports a straightforward sensor swap the same way. This is exactly the kind of detail worth confirming against your specific controller’s documentation before assuming a repair is simple. But when a spare probe exists and the controller is designed for it, replacing a bad sensor is a wall-box job, not a flooring project. It’s one of the few radiant floor repairs a reasonably confident DIYer can actually finish in an afternoon.
If there’s no spare, and the sensor has to be run new through the floor assembly, that’s the point where the repair moves from a wiring fix to a flooring project, and calling in whoever installed the system (or a licensed electrician familiar with radiant systems) becomes the more sensible route.
One cold zone on a hydronic floor
A hydronic floor with one cold room and every other zone warm is telling you something specific: the boiler is working. If the heat source itself had failed, every zone fed by it would be cold at once, not just one. A single cold zone almost always points to that zone’s own loop, not to the equipment feeding the whole system.
Three things typically cause it. Trapped air is the most frequent, since an air pocket in the tubing blocks water circulation in exactly the same way a clog blocks a drain, and it tends to collect at the highest point of a loop. A closed or partially closed valve at the manifold is the second, often the result of a previous repair or a seasonal shutoff that never got reopened. A physical blockage, such as debris in the loop or a kinked line from an installation issue, is less common but possible, especially in older systems.
Diagnosing which of the three applies starts at the manifold. Loops that are open and circulating properly usually feel warm to the touch along their return line; a cold return on one loop while the others run warm is a strong sign that loop isn’t getting flow. Bleeding that specific loop to remove trapped air is the first thing worth trying, since it’s the fastest and least invasive fix. If bleeding doesn’t restore warmth, checking that the loop’s valve at the manifold is fully open comes next.
Rooms that run consistently cooler than the rest of the house, even with the loop circulating properly, sometimes have a different problem entirely: the floor simply can’t supply enough heat for that space. Floor surface temperature is capped by what’s comfortable underfoot and by what the flooring material can tolerate, which limits how much heat output a floor can deliver per square foot. A poorly insulated room, one with a lot of glass or an uninsulated slab edge, can have heat losses that exceed what the floor is physically able to supply, no matter how well the loop is functioning. That’s a design and insulation issue, not a mechanical fault, and no amount of bleeding or valve adjustment will fix it.
When more than one zone is affected, or the pattern doesn’t match a single-loop problem, the fault is more likely upstream at the zoning controls themselves rather than in the floor tubing. That’s covered in more detail on our boiler zones page, which walks through how zone valves and controllers can misbehave and take out heat to more than one area at once.
Whatever the cause, any work done near the boiler or heat source is a good moment for a basic safety reminder. The U.S. Fire Administration advises: “Keep anything that can burn at least 3 feet from all heat sources including fireplaces, wood stoves, radiators, space heaters or candles.” That applies just as much to boxes stored near a boiler room as it does to furniture near a radiator.
Common questions
Can a radiant floor be repaired without removing the flooring?
Often, yes. Electric floors with a spare sensor left in the wall, and hydronic floors with an air or valve problem at the manifold, can usually be fixed without touching the finish flooring at all. Cable breaks or tubing leaks under the floor are the exceptions that typically require opening up the assembly.
Why does my thermostat show heat is on, but the floor still feels cold?
Thermal mass is the most likely explanation. Because a radiant floor has to warm the slab or assembly before the surface feels warm, there’s a lag of hours between the call for heat and a noticeable change underfoot. If it’s been running for hours with no change at all, that points to an actual fault rather than normal lag.
Is it safe to check the sensor or manifold myself?
Checking a wall controller for error codes or feeling manifold loops for temperature differences is safe for most homeowners. Opening electrical panels, replacing sensors, or working directly on boiler connections is better left to someone familiar with the specific system, especially since controller compatibility varies by model.
What flooring can safely go over a repaired radiant system?
That depends entirely on the flooring material itself, since manufacturers set their own limits on heat exposure for tile, engineered wood, laminate, and vinyl. The flooring manufacturer’s own installation guidance is the authority here, not a general rule of thumb, and it should be checked before any new floor covering goes down over a radiant system.