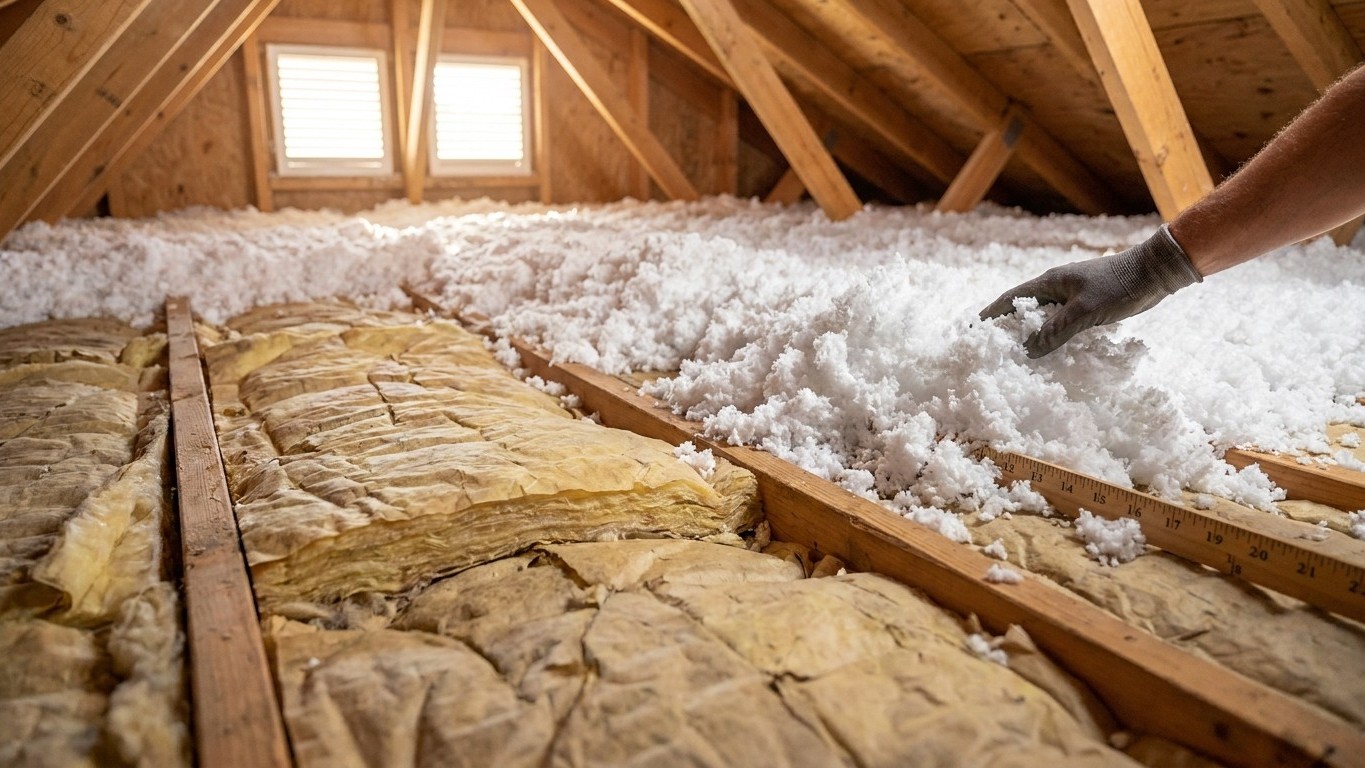

Insulation almost never needs full replacement just because it’s old. What decides the question is condition, not calendar age: whether the material got wet, burned, contaminated, or simply never had enough depth to begin with. Three of those mean remove it. The fourth means leave it exactly where it is and add more on top.
What is actually going on

Fiberglass batts, blown cellulose, and loose-fill mineral wool don’t wear out from sitting in an attic for twenty years. They’re inert once installed. What changes their performance is something happening TO them, not the passage of time. A batt that’s been fluffy and dry since 1998 is still doing its job in 2026. The distinction that matters is between insulation that has failed, meaning something physically damaged its structure or its fibers, and insulation that is simply undersized for current recommendations, meaning it was installed to an older, thinner standard and just needs company.
That second category is far more common than most homeowners assume. A house insulated in the 1980s or 1990s often has three or four inches of material in the attic, which met the code of its era but falls well short of what’s recommended today. The fix there isn’t removal. It’s adding more material on top of what’s already there, provided that existing layer is dry, clean, and not compressed flat.
U.S. ENERGY STAR publishes retrofit targets for existing wood-framed homes, broken down by climate zone, and the table separates two attic scenarios (starting from bare framing versus starting from an existing three to four inches) from a third figure for floors over unconditioned spaces:
| Climate zone | Attic, currently uninsulated | Attic, already has 3-4 inches | Floor |
|---|---|---|---|
| Zone 1 | R30 | R25 | R13 |
| Zone 2 | R49 | R38 | R13 |
| Zone 3 | R49 | R38 | R19 |
| Zones 4A and 4B | R60 | R49 | R19 |
| Zones 6, 5, and 4C | R60 | R49 | R30 |
| Zones 7 and 8 | R60 | R49 | R38 |
Notice those are three separate figures per zone, not three attic values. Two columns cover attics (one for bare framing, one for a home that already has a thin existing layer), and the third is a floor recommendation for a different assembly entirely. This page won’t guess which zone applies to any particular address; ENERGY STAR distributes that as a map, and buying material against the wrong number is an expensive mistake. Check the zone against the official ENERGY STAR climate map before shopping. And whatever R-value the table gives, don’t try to translate it into inches yourself. Depth per R-value differs by material and is printed on the product’s own packaging, not on any chart.
Rebates for topping up or replacing insulation still exist through some state and utility programs; check with your state’s energy office for what’s currently offered where you live.
Where it belongs, and where it does not
Four situations come up again and again when someone is deciding whether to strip insulation out or leave it be. Only three of them actually call for removal.
- Water exposure. Insulation that’s been soaked, from a roof leak, a burst pipe, or long-term humidity, loses its loft and traps moisture against the framing behind it. Left in place, wet fiberglass mats down and stays compressed even after it dries, cellulose can develop mold, and the wood it’s touching is now at risk of rot. This is a remove-and-replace situation, not a top-up situation.
- Smoke or fire damage. Insulation absorbs soot and combustion byproducts the way carpet absorbs odor. Leaving smoke-damaged material in place means the smell and the residue stay in the assembly indefinitely, since insulation doesn’t off-gas out on its own. Removal is the only real fix.
- Contamination. Rodent activity (droppings, urine, nesting material) is one common trigger. So is discovering vermiculite insulation, which was widely installed before the 1990s and can contain asbestos. Do not disturb, sweep, or vacuum a material you suspect is vermiculite, or any insulation you suspect may contain asbestos. That’s a job for testing and, if confirmed, licensed abatement, not a weekend project.
- Settling below spec. Loose-fill insulation naturally compacts a bit over the years, and old batts can look thinner than they were installed. This is the case that does not call for tearing anything out. If the existing layer is dry, clean, and structurally intact, the answer is adding more insulation on top of it, matched to the “already has 3-4 inches” column in the table above rather than starting from zero.
Mixing these up in either direction causes real problems. Topping up over insulation that’s actually wet or contaminated just buries the problem under new material and locks moisture or mold against the wood even more effectively. Tearing out and replacing insulation that’s merely thin, on the other hand, is wasted work and wasted material when a simple addition would have solved it.
The moisture side of the decision
Every insulation decision is quietly also a moisture decision, and this is where costly mistakes happen even when the R-value math was done right. Insulation slows heat flow, but it also changes how and where an assembly dries out when moisture inevitably gets into it, whether from indoor humidity, a small roof leak, or normal seasonal vapor drive. A wall or roof needs somewhere to send that moisture. Insulate it in a way that blocks the drying path, and moisture that used to pass through harmlessly starts accumulating instead, hidden inside the wall where nobody sees it until the sheathing is already soft.
Which direction a wall or roof assembly should dry, and whether it needs a vapor retarder at all, depends entirely on climate and construction type. The 2021 International Energy Conservation Code, for instance, does not require an interior vapor retarder in the three warmest climate zones, where the drying logic runs differently than it does in a cold northern climate. That’s not a footnote; it’s the whole reason a national article can’t hand out a single vapor barrier rule and call it done. Putting a vapor retarder on the wrong face of a wall assembly, or using one where the local code says none is needed, can trap moisture inside the cavity rather than keep it out.
It’s also worth being precise about what a vapor retarder actually does, because it gets confused with something else constantly. A vapor retarder slows the movement of water vapor through a material. An air barrier stops bulk air movement, and air movement carries far more moisture than vapor diffusion ever does. They’re different layers doing different jobs, and a wall can have one without the other, or need both in different configurations depending on climate zone and construction. If your project has opened a wall or roof cavity for any reason, the moisture and vapor control question needs its own dedicated look, matched to your specific climate zone and assembly. Wall-cavity insulation guidance in general only applies once siding or interior finish is already coming off for other reasons; it’s not a reason to remove siding on its own. Check a dedicated vapor barrier guide and your own state’s building and energy resources before deciding which side of an assembly gets a retarder, or whether it needs one at all.
What to settle before you buy anything
Before any insulation gets purchased, three things need answering, and skipping them is how homeowners end up with adequate R-value and a house that still feels drafty.
The first is air sealing. U.S. ENERGY STAR treats air sealing and insulation as two steps of a single project, and sealing comes first, because insulation slows conduction while air leaks move heat (and moisture) around it entirely. EPA estimates that homeowners can save an average of 15% on heating and cooling costs, or an average of 11% on total energy costs, by air sealing their homes and adding insulation in attics, floors over crawl spaces, and accessible basement rim joists. That’s an average from modeling a typical existing U.S. home, not a guarantee for any specific house, and it applies to those named areas rather than to walls, windows, or doors generally. Sealing gaps around penetrations, top plates, and duct chases before insulating means the new material actually gets to do its job instead of insulating over a leak.
The second is checking what’s already there. Depth, not appearance, tells the real story: measure the current insulation against the ENERGY STAR table above, using the correct column depending on whether there’s already three to four inches in place, and confirm it’s dry and undamaged rather than assuming from a glance.
The third is accessibility. Not every cavity is a simple attic floor. Knee walls, cathedral ceilings, and finished spaces without attic access all require different approaches, and some jobs genuinely need a contractor rather than a weekend project. A few safety points apply regardless of who does the work: walk only on joists in an attic, never on the drywall between them; keep required clearance around chimneys, flues, and certain recessed light fixtures rated for insulation contact, per the fixture’s own listing; treat a garage ceiling that separates living space from the garage as a fire-rated assembly that shouldn’t be casually altered; and if there’s a fuel-burning appliance in or near a space being air sealed, have combustion safety checked before tightening up the house around it.
Common questions
Does old fiberglass insulation lose R-value just from age?
Not meaningfully, as long as it stays dry, clean, and uncompressed. Fiberglass and cellulose are inert materials; their insulating value comes from trapped air pockets in the fiber structure, and that structure doesn’t degrade from years alone. What reduces performance is physical compression, moisture, or contamination, not the calendar.
Can I just add new insulation over old insulation?
Yes, when the existing layer is dry, undamaged, and free of contamination. That’s exactly the scenario ENERGY STAR’s “already has 3-4 inches” column addresses. It only becomes a problem if you’re adding on top of insulation that’s actually wet, moldy, or contaminated, since that buries rather than solves the underlying issue.
How do I know if insulation is contaminated with asbestos?
Vermiculite insulation, common before the 1990s, is the main red flag, and it can’t be identified with certainty just by looking at it. Don’t disturb, sweep, or vacuum it. Testing by a qualified lab, followed by licensed abatement if asbestos is confirmed, is the appropriate path rather than DIY removal.
Do I need a vapor barrier when I add new insulation?
It depends on your climate zone and the assembly involved, not on a single national rule. Some of the warmest U.S. climate zones don’t require an interior vapor retarder under the model energy code at all, while colder zones handle it differently. Check a dedicated vapor barrier guide alongside your state’s specific guidance before installing one on either face of a wall.