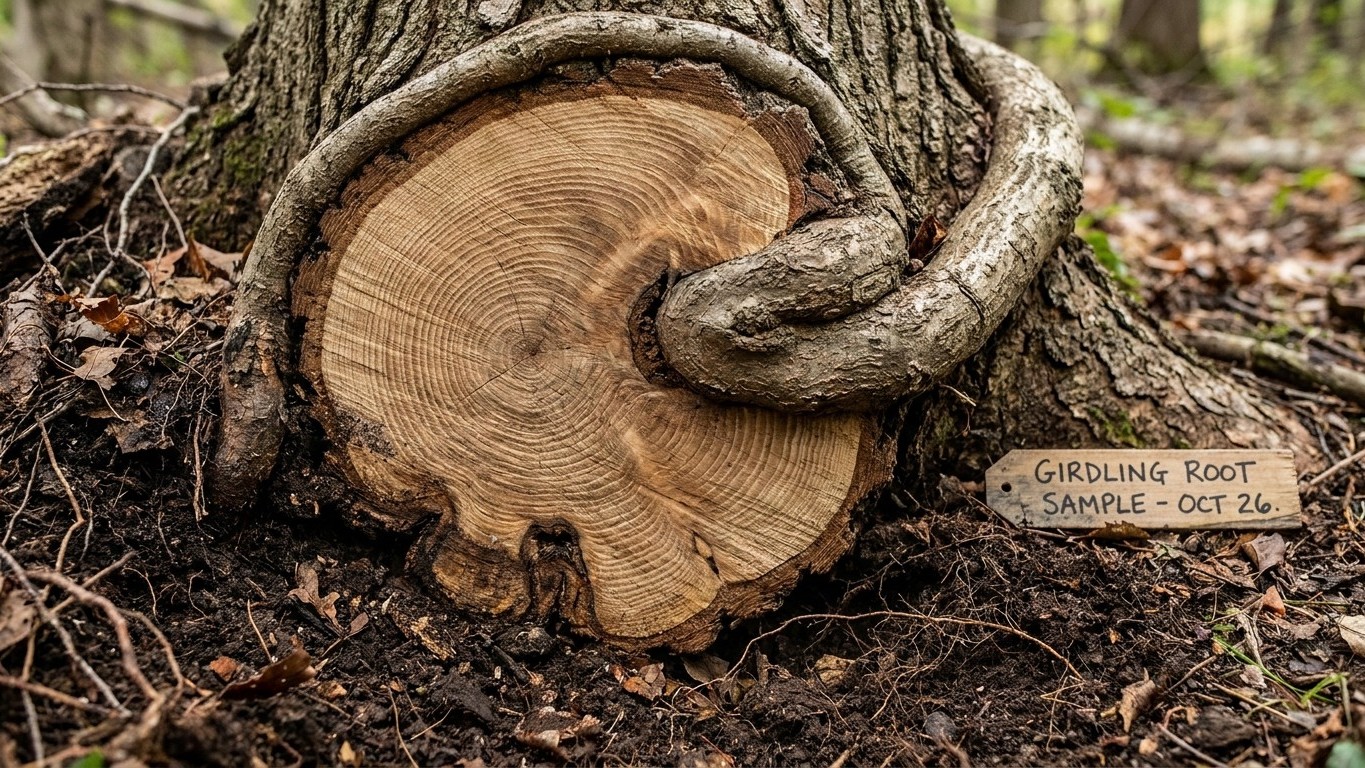

Girdling roots are roots that circle the trunk instead of spreading outward, usually because they grew that way inside a container before planting. As the root and the trunk both thicken with age, the root presses into the bark like a slowly tightening belt, cutting off the tree’s own plumbing. The damage is invisible for years. Catching it early, at planting or soon after, is the only reliable fix.
A root that turns and never turns back

Every root has a habit: it grows toward open space. Inside a pot, that space runs out fast. Once a root hits the plastic wall, it has nowhere to go but sideways, and then around. Left in that container even a season too long, it keeps circling, laying down wood in a spiral instead of a starburst. Nobody notices at the nursery. The foliage on top looks perfectly healthy, because the root is still delivering water just fine, for now.
The trouble starts after planting, when the tree begins doing what trees do: adding girth every year, both in the trunk and in that circling root. They’re growing toward each other from two directions, and there’s no room for both. One of them has to give. It’s almost never the root. The trunk tissue gets squeezed at the point of contact, and the vascular tissue just beneath the bark, the layer that moves sugars down to the roots and water up to the leaves, gets pinched a little more with every growth ring.
What makes this genuinely sneaky is the time lag. A tree with a girdling root can look completely normal for five, eight, sometimes ten years. It leafs out on schedule. It flowers. It might even put on decent growth for a while, because a partially girdled trunk can still move enough water to get by. Then one summer the canopy thins on one side. Or a section of bark starts to look sunken instead of rounded where the trunk meets the ground. By the time anyone connects that decline to a root, the root has been at work for the better part of a decade, buried under soil and mulch the whole time.
That delay is exactly why girdling roots don’t get the attention they deserve. A cracked pot gets fixed immediately. A leaning fence post gets noticed the week it starts to lean. A girdling root causes a problem that shows up so long after the mistake was made that most people never trace the two together. The tree simply seems to “decline for no reason,” and by then the one window where the fix was easy, back when the tree was still small enough to lift by hand, closed years earlier.
The five minutes that prevent it
There’s exactly one moment when dealing with a girdling root is genuinely easy: before the plant goes into the ground. At that stage the root ball is small enough to inspect, handle, and correct in the time it takes to dig the hole. Here’s the sequence worth following every time:
- If you’re still at the point of choosing a plant and the seller allows it, slide the root ball out of the pot before deciding to buy. A tangle of roots circling the outside edge, visible the moment the container comes off, is worth walking away from.
- Once home, and again just before planting, look at the outside surface of the root ball, not just the top. Girdling roots often show up along the sides and bottom, where they’ve been pressing against the container wall the longest.
- Take any circling roots in hand and gently tease them outward, away from the trunk, so they start pointing into the surrounding soil the way a healthy root system naturally would.
- For roots that won’t straighten, that spring back into their circular path the moment you let go, cut through them. A clean cut with a sharp tool, not a tear, gives the root the best chance to respond well.
Cutting a root on purpose feels like the wrong move. It looks like damage. But it’s the right one, and the logic is straightforward once you see it: a root that’s been severed responds by pushing out new growth from the cut end, and that new growth heads outward into open soil, the direction roots are built to grow. A root left circling does the opposite. It keeps following the shape it already has, because nothing has told it to do anything else. Left alone, it will still be circling in ten years, just a lot thicker.
Match the planting hole to the corrected root ball, not the original one. NC State Extension’s guidance is specific here: “An ideal planting hole is only as deep as the root ball and at least two to three times wider, with roughened sides sloping in toward the bottom.” That width matters as much as the root work itself. Roughened, sloped sides give the newly spread roots somewhere loose and workable to grow into. Smooth, vertical sides in heavy clay soil act like the wall of a pot all over again, and a root meeting that wall a second time has learned nothing from the first correction.
Spotting it on a tree already in the ground
A tree that’s been in the ground for a few years or more can’t be pulled back out for inspection, but it still shows signs, if you know where to look at the base of the trunk rather than up in the canopy.
| What you see | What it may indicate |
|---|---|
| Trunk enters the soil straight like a fence post, with no visible flare on one side | A root pressing against the trunk on that side is preventing normal flare development |
| A root visibly crossing over or against the base of the trunk | Likely the girdling root itself, doing its work at the surface |
| Thinning foliage or dieback concentrated on one side of the crown | Reduced water and sugar movement on the side served by the compressed trunk tissue |
| A lean that developed gradually, with no storm or wind event to explain it | Uneven root support, often tied to one side of the root system failing to establish properly |
Any one of these is worth a closer look, and the way to get that look is to excavate the root flare. This means gently removing soil and mulch from around the base of the trunk, by hand or with a small tool, working outward in a shallow bowl shape until the point where the trunk widens into its natural roots is visible. Done carefully, this doesn’t harm the tree, since you’re only moving soil, not cutting anything, and it’s the single most reliable way to confirm what’s happening beneath the surface instead of guessing from the canopy.
What you find determines what’s realistic. A young tree, a few years into the ground, with one root just starting to press against the trunk, can sometimes be corrected: the offending root cut back at a safe distance from the trunk, the soil regraded so water drains away from the exposed flare rather than pooling against it. A mature tree that’s already showing crown dieback and has clearly been compressed for years is a different situation. By that point the internal damage is usually done, and cutting the root won’t undo trunk tissue that’s already been crushed for a decade. That’s a hard thing to hear about a tree you’ve watched grow, but it’s the honest answer, and it’s exactly why the five minutes at planting matter so much more than any fix available later.
What to look at before you buy
Every girdling root problem starts in a container, which means the checkout counter at the nursery is the real front line, well before any digging happens. A few habits at the point of purchase catch most of the trouble before it comes home with you.
- Look for the root flare above the soil line inside the pot. Stock where the trunk visibly widens near the surface has typically not been sitting in that container long enough to develop a serious circling problem.
- Be wary of a plant that has obviously been in its pot for a long stretch: moss or algae built up on the surface, roots emerging from the drainage holes, or a root ball so dense it’s hard to tell there’s soil in there at all.
- Check the surface roots you can see without digging. If they’re already curving sideways along the top of the root ball instead of heading down and out, the same pattern almost certainly continues below.
- If the seller allows it, lift the plant fully out of its container before paying. This takes thirty seconds and tells you more than any label on the pot.
Getting the hole itself right the day you plant matters just as much as the stock you start with. Both the depth of the hole and how it’s finished at the surface affect whether roots stay where you put them, and that’s covered in detail in this site’s guide to planting depth.
A couple of finishing touches protect the correction you’ve already made. Mulch, kept to a 2-inch to 3-inch layer, suppresses weeds and keeps soil moisture even around the roots, but it should stop 6 inches short of the trunk, both to prevent bark decay and to keep voles from tunneling in against the bark over winter, unnoticed until spring. And if the tree needed staking to get through its first season, that staking should come off within one year, or growth may be reduced; for a tree planted in fall, midspring is often soon enough. None of that fixes a girdling root. All of it protects a tree that was planted correctly from developing new problems while the corrected roots settle in.
Common questions
Can a girdling root be fixed after the tree is mature?
Sometimes, if it’s caught early with minimal compression, but a mature tree already showing crown dieback from a long-established girdling root usually can’t be reversed by cutting the root at that stage. The internal trunk damage from years of compression is typically permanent.
How long does it take for a girdling root to cause visible damage?
Often around a decade. The tree can look healthy for years while the root slowly compresses the trunk, which is what makes the cause so easy to miss by the time symptoms appear.
Does cutting a circling root harm the tree?
A clean cut through a circling root prompts new growth to head outward into open soil, which is the direction roots naturally grow. Leaving the root uncut is the option that causes lasting harm, since it keeps circling and thickening against the trunk indefinitely.
Do repellents or root barriers prevent girdling roots?
There isn’t reliable evidence supporting products marketed for this purpose. The dependable prevention is inspecting and correcting the root ball at planting and matching the hole width to what NC State Extension recommends, not a product applied afterward.