
The short answer: a tree’s root flare, the point where the trunk widens into its first roots, needs to sit at or just above the surrounding soil, never below it. The hole itself should go only as deep as the root ball, and no deeper. Those two rules matter more than any tape measure. Miss them, and a tree can limp along for years before anyone traces the decline back to planting day.
Find the root flare before you dig

Everything else about planting depth flows from one spot on the plant: the root flare. That’s where the trunk stops being trunk and starts spreading into roots, and it belongs right at the soil surface, or an inch or two proud of it. Set it below grade and the bark down there, tissue built to live in air, sits in damp soil instead. It doesn’t die overnight. It rots slowly, girdling roots often form in the buried zone, and the tree limps through a few seasons of thin leaves and dead twigs before anyone thinks to connect the decline to how it went into the ground years earlier.
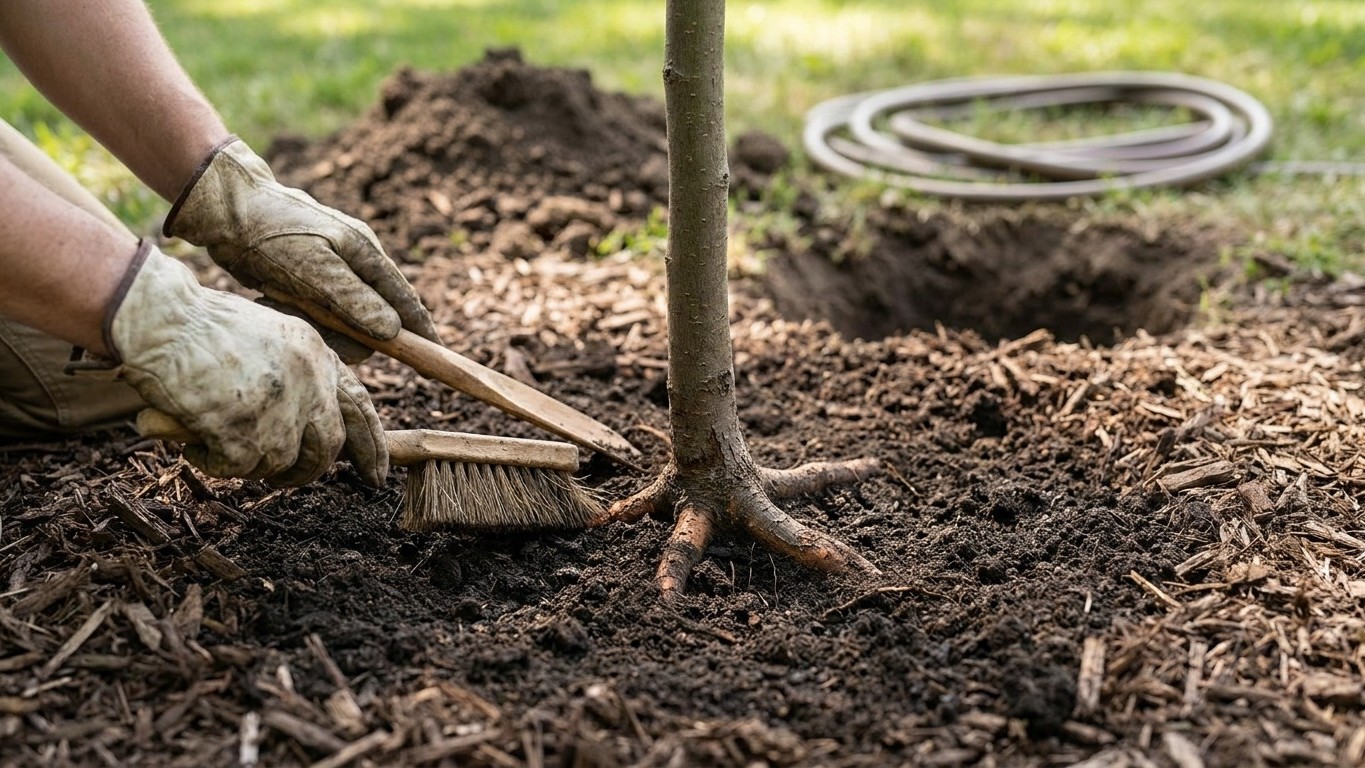
The frustrating part is that the flare is rarely visible when a plant arrives from the nursery. Container stock gets topped off with soil or bark fines during production, and balled-and-burlapped root balls are frequently built up with extra soil around the trunk for stability in transit. Either way, what you’re looking at on delivery day usually isn’t the real grade line. Before digging anything, brush and scrape the loose material away from the base of the trunk with your fingers or a hand trowel until you feel the trunk begin to flare outward. That’s the line the finished soil surface needs to match.
This is a visual check, not a measurement, and that’s exactly why it works on any plant, in any soil, at any nursery. You don’t need to know the species’ mature size or its hardiness zone to get this part right; those details live on the plant’s own page, not here. What you need is your eyes and a few minutes of scraping. Once the flare is exposed, the hole dimensions follow a simple standard from NC State Extension: “An ideal planting hole is only as deep as the root ball and at least two to three times wider, with roughened sides sloping in toward the bottom.” Notice that depth and width are treated as two different kinds of numbers. Depth is capped. Width has a floor, and no ceiling.
The pot is not the reference
Most deep-planted trees don’t get that way through carelessness. They get that way through a reasonable-sounding shortcut: dig a hole, set the root ball in, and line up the top of that root ball with the surrounding ground, on the assumption that the grower already positioned the flare correctly. It’s a fair assumption, and it’s wrong often enough to be the single biggest cause of planting failure. The root ball itself is frequently too deep in its own container or burlap, which means matching the pot’s soil line to the yard’s soil line just relocates the same mistake into a new hole.
The fix is a short sequence, done before the shovel ever hits new ground:
- Excavate the top of the root ball first, scraping away surface soil or mulch until the trunk’s flare is exposed, even while the plant is still sitting on the surface or in its container.
- Locate the flare precisely, marking it mentally or with a finger, since this is now your true reference point.
- Measure the hole’s depth from that flare, not from the container’s rim or the burlap’s top, so the hole is only as deep as the distance from the flare down to the bottom of the actual root mass.
Balled-and-burlapped stock deserves the same suspicion. Growers often mound extra soil around the trunk during field digging to protect the root ball, and that mound can bury the flare by several inches without any obvious sign from the outside. Pull that soil back before you ever lower the root ball into place. Skipping this step is how a tree planted by someone following every other instruction correctly still ends up buried, because the one number that mattered, the position of the flare, was never checked against the container or burlap at all.
Wider than deep, and firm underneath
Once the flare is found, the hole’s shape follows two rules rather than two numbers. It should be wider than the root ball, so new roots pushing outward hit loosened soil instead of the compacted wall of an undersized hole. And it should be no deeper than the root ball, full stop, so the plant has nowhere to go but stay put at the depth it was set.
Depth is the dimension that causes trouble, and width almost never does. Dig too wide and the worst outcome is extra labor. Dig too deep, or loosen soil beneath where the root ball sits, and that loosened soil settles under the weight above it over the following months. A tree planted at exactly the right depth in July can be sitting two or three inches low by the following spring, simply because the soil under it compacted after watering and rain worked it down. That’s how a planting job done correctly on day one turns into a deep-planted tree by the time anyone checks again.
This is why the NC State Extension guidance is written the way it is: “An ideal planting hole is only as deep as the root ball and at least two to three times wider, with roughened sides sloping in toward the bottom.” The depth clause is a ceiling, never to be exceeded. The width clause is a floor, with “at least” doing real work; wider is fine, and on heavy or compacted soil, wider is better. The roughened, sloping sides matter too. Smooth walls carved into clay by a shovel blade behave like the inside of a pot, and roots that reach them tend to circle instead of pushing outward.
Backfill with the same soil that came out of the hole, not with amended soil trucked in from elsewhere. Filling only the hole with rich, loose material creates a soft-sided pocket surrounded by harder native soil, and roots often stay inside that comfortable pocket instead of spreading into the yard around it, which leaves the tree poorly anchored and drought-prone for years. Once backfilled and watered in, a layer of mulch protects the root zone: NC State Extension recommends a 3-inch layer of mulch to reduce water loss and maintain uniform soil moisture and temperature around roots, while noting more generally that a 2-inch to 3-inch layer suppresses most annual weed seeds and makes it easy to hand-pull any that do germinate. More is not better here; deep mulch piled against the trunk holds moisture against bark and invites the same rot that deep planting causes. Keep it pulled back, at least 6 inches from the trunk, since NC State Extension is specific about why: it prevents both bark decay and vole damage, and a visible ring of bare trunk is the quick check that the clearance is actually there.
What to do about one already planted too deep
The signs are consistent once you know to look for them: no visible flare where the trunk should widen, a trunk that goes straight into the ground like a fence post, sparse or undersized leaves, and dieback showing up in the upper crown while the tree otherwise looks alive. Any one of these on its own isn’t proof. All of them together, especially on a tree that’s struggled since planting, point squarely at depth.
What happens next depends heavily on how long the tree has been in the ground:
- On a small plant, or one still within its first growing season, excavate the surface soil around the trunk to expose the flare properly, then leave it exposed at the correct grade rather than replacing the fill.
- On a tree planted this same season, it can often be lifted entirely, the hole corrected to the right depth, and the tree reset with the flare at the surface, which is far more reliable than trying to fix depth from above.
- On a large, established tree that’s been in the ground for years at the wrong depth, digging it up isn’t realistic and isn’t safe for the tree’s remaining root system. That situation calls for a professional arborist’s judgment, not a shovel.
None of these steps guarantees a full recovery, and it’s worth saying plainly: a tree with years of girdling roots or trunk rot from deep planting may already carry damage that excavation alone won’t reverse. What excavation and resetting do is stop the problem from getting worse and give the tree its best remaining shot at normal root function. If staking was used at planting, remember that NC State Extension advises removing all staking within one year after planting, since it may reduce growth if left longer, and for trees planted in fall, stakes can often come out by midspring. A tree that’s been reset also needs that same staking discipline going forward, checked against the local frost-free dates for your area rather than a fixed calendar date.
Common questions
How can I tell if a tree is planted too deep without digging it up?
Look at the base of the trunk. If it goes straight into the soil like a post, with no visible widening or flare, that’s the clearest above-ground sign. Thin foliage and crown dieback on an otherwise established tree support the same conclusion.
Does staking help a tree planted too deep?
Staking addresses stability in wind, not planting depth, and it doesn’t correct a buried flare. It should come out within a year regardless, since leaving it longer can reduce growth.
How much mulch is too much?
Beyond the recommended 2 to 3 inches, extra mulch stops helping and starts working against the tree, holding moisture against bark it should never touch. Keep it pulled back roughly 6 inches from the trunk so the flare stays visible.
Can a tree recover after being planted too deep for several years?
Small or recently planted trees respond well to excavation and correction. A large tree that’s been deep for years has likely developed girdling roots or trunk decay that excavation alone can’t fully undo, which is a case for an arborist’s assessment rather than a do-it-yourself fix.