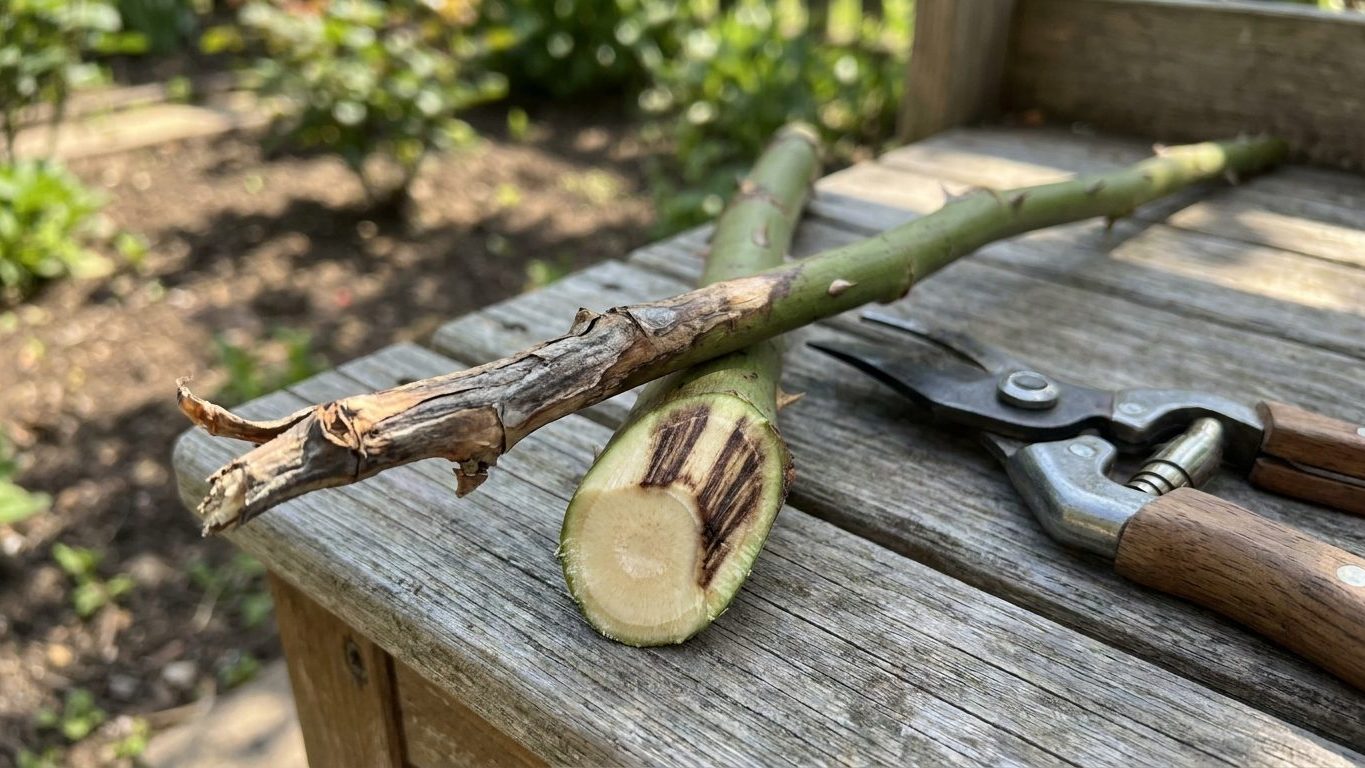

Cane dieback starting at the tip usually means either winter injury or a fungal canker got into the cane through a wound or pruning cut. It’s rarely fatal to the whole plant, but left alone it can travel down the cane and take out the bud union. The fix is mechanical, not chemical: cut back to clean white pith and disinfect your tools between cuts.
What you are looking at
The tip of a cane, sometimes just the top two inches, sometimes a foot or more, turns brown, purplish-black, or gray. The tissue looks shriveled and dry rather than soft and wet. If you scratch the bark with a thumbnail near the tip, there’s no green underneath. Left unpruned, the discoloration creeps downward toward the next leaf node, then the next, sometimes stalling at a healthy bud and sometimes continuing all the way to the crown.
Cut a dying cane crosswise about an inch below the visible damage. Healthy pith is white or pale cream and slightly moist. Infected or frost-killed pith is brown, gray, or streaked with dark rings. That cross-section is the single most reliable way to know how far the damage actually goes, because the bark above a healthy zone can still look faintly discolored for an inch or two after the internal tissue has recovered.
Don’t confuse this with three other things gardeners often lump together. Ordinary winter tip kill shows up only on the top few inches of canes that were left too tall going into dormancy, appears uniformly on most canes at the same height, and stops cleanly once you cut into green pith. Black spot is a leaf disease that shows dark spots ringed with yellow on foliage, not on bare cane tissue. Rose rosette virus produces something different altogether: clusters of tight, distorted red growth, excessive thorniness, and stems that thicken oddly, none of which looks like a simple browning tip. If what you’re seeing is confined to cane tips with no leaf spotting and no distorted new growth, you’re dealing with dieback, not one of those other problems.
What actually causes it
Most tip dieback traces back to one of two openings: a wound the plant never sealed, or cold that killed tissue outright. Canker fungi, several species in the genus Coniothyrium among the most common culprits in home gardens, don’t attack healthy, intact bark. They need an entry point. A pruning cut left more than a quarter inch above the nearest bud creates a stub of tissue with no living bud to seal it off, and that stub becomes an open door. Insect damage, hail wounds, and cuts made with a dirty blade do the same thing.
The common explanation gardeners reach for is “the cold killed it,” and sometimes that’s exactly right. But cold injury and canker infection often look identical from a few feet away, which is why the pith test matters more than the bark color. Winter-killed pith tends to be a uniform brown from the cut edge inward, without a defined border. Canker-infected pith usually shows a sharper transition line, sometimes with a reddish or purple margin between dead and living tissue, and the discoloration can extend well past where cold alone would reasonably reach given the season’s low temperatures.
| Cause | How it enters | Pith appearance | Typical timing |
|---|---|---|---|
| Winter injury | Direct cold exposure to exposed cane tissue | Uniform brown, gradual fade | Visible right after last frost, doesn’t spread further once weather warms |
| Canker fungus | Pruning stubs, wounds, insect damage | Sharp brown/purple margin against white pith | Can appear and spread any time conditions stay damp |
| Botrytis blight | Wounds during cool, wet weather | Grayish, sometimes fuzzy mold visible on surface | Spring or fall during extended damp spells |
Botrytis is the third possibility, and it’s the easiest to rule in or out: it produces a visible gray, fuzzy mold on the cane surface during humid stretches, something neither winter injury nor typical canker infections do. If you see fuzz, you’re looking at botrytis. If you don’t, you’re comparing winter injury against canker using the pith test above.
What to do now
The cane above the healthy pith line is not coming back, and there’s no product or technique that reverses dead tissue. The only useful move is to cut it out. Work down the cane in small increments, an inch at a time, checking the pith after each cut, until you reach solid white or pale green tissue with no discoloration or ring pattern. Make the final cut about a quarter inch above an outward-facing bud, angled slightly away from the bud so water runs off rather than pooling on it.
Disinfect your pruning shears between cuts, not just between plants. A quick dip in rubbing alcohol or a diluted bleach solution takes seconds and stops you from carrying canker spores from an infected cane straight into a fresh cut on a healthy one. This step gets skipped constantly, and it’s a major reason dieback reappears on the same bush a few weeks after a first round of pruning looked successful.
Bag or burn the removed canes rather than tossing them on a compost pile. Home compost rarely gets hot enough to kill canker spores, and a pile sitting near the rose bed can reinfect the same plant or its neighbors the following season. If the dieback has already reached the main framework of the bush, close to the bud union or crown, that’s a more serious situation than a single cane, and it’s worth watching the plant closely through the next flush of growth rather than assuming one round of pruning solved it. New growth emerging vigorously from below the cut is the sign the plant is out of danger; continued browning at the new cut edge means the infection is still moving and needs another round of cuts.
What does not work
Pruning sealant or wound paint on the cut end is the fix most gardeners reach for first, and it’s counterproductive. Sealing the cut traps moisture against the tissue instead of letting it dry, which favors the same fungi you’re trying to stop rather than blocking them. Roses don’t need a sealed cut the way a tree wound sometimes benefits from one; a clean angled cut left open to air dries and calluses on its own.
Fungicide sprayed onto a cane that’s already showing dead tissue does nothing for that tissue. Fungicides prevent new infection on healthy surfaces; they don’t reverse damage that’s already there. Spraying after the fact treats the wrong stage of the problem, and by the time cankers are visible, the fungus is already inside tissue the spray can’t reach.
Cutting off only the visibly black tip without checking the pith is the most common half-measure. It looks tidy, but if the infection has already moved an inch or two past where the discoloration shows on the bark, that cut leaves live fungus inside the cane and the dieback resumes within a couple of weeks, usually a little lower down and easy to mistake for a “new” problem.
Heavy nitrogen feeding to “push through” the damage backfires too. It encourages soft, fast new growth right at the moment the plant needs to be putting energy into sealing wounds, and tender new tissue is exactly what canker fungi and botrytis prefer to colonize next.
Preventing it next time
The single change that prevents the most dieback is making pruning cuts correctly in the first place: a quarter inch above an outward-facing bud, angled away from it, with clean shears. A ragged cut or a stub left above the last bud is the entry wound behind most cases, and it costs nothing to fix beyond a little more attention while pruning.
Disinfecting shears between plants and between cuts on a plant showing any dieback comes next in importance. A dedicated container of alcohol kept next to the pruning basket makes this a five-second habit rather than something skipped under time pressure.
Prune during dry weather when possible, and avoid heavy pruning right before a stretch of rain or high humidity, since both canker fungi and botrytis need moisture on fresh-cut tissue to establish. In regions with hard winters, leave canes at their full dormant-season height rather than cutting them back hard in fall, and hold major shaping cuts until early spring dormancy when the worst cold has passed. Clearing fallen leaves and dead cane debris from around the base each fall reduces the fungal spore load sitting near the plant going into the next wet season.
Common questions
Should I cut back to green wood or white wood?
White or pale cream pith is the safer target. Some green tinge just below the discoloration can still be transitional tissue that dies back further within days; solid white pith with no ring or streak pattern is the more reliable stopping point.
Can one dying cane spread to the rest of the bush?
Yes, if the cause is a canker fungus and the infected cane isn’t removed. The fungus can move down into the crown or bud union, and from there into other canes sharing that same base. Winter injury, by contrast, stays confined to the tissue that was actually exposed to the cold and doesn’t spread cane to cane.
Is it normal for a few inches of cane tip to die back every winter?
In cold climates, minor tip dieback of an inch or two on canes left tall for winter is common and usually cosmetic. It only becomes a concern when the discoloration extends well past a few inches, shows a sharp margin rather than a gradual fade, or keeps advancing after you’ve made a clean cut into healthy pith.
How long after pruning should I expect new growth to confirm the plant is fine?
New buds breaking from just below the cut, and staying green and firm rather than browning again, is the sign the cut caught healthy tissue. If a fresh cut starts showing the same discoloration within two to three weeks, the infection was still present past that cut line and needs another round of pruning further down.