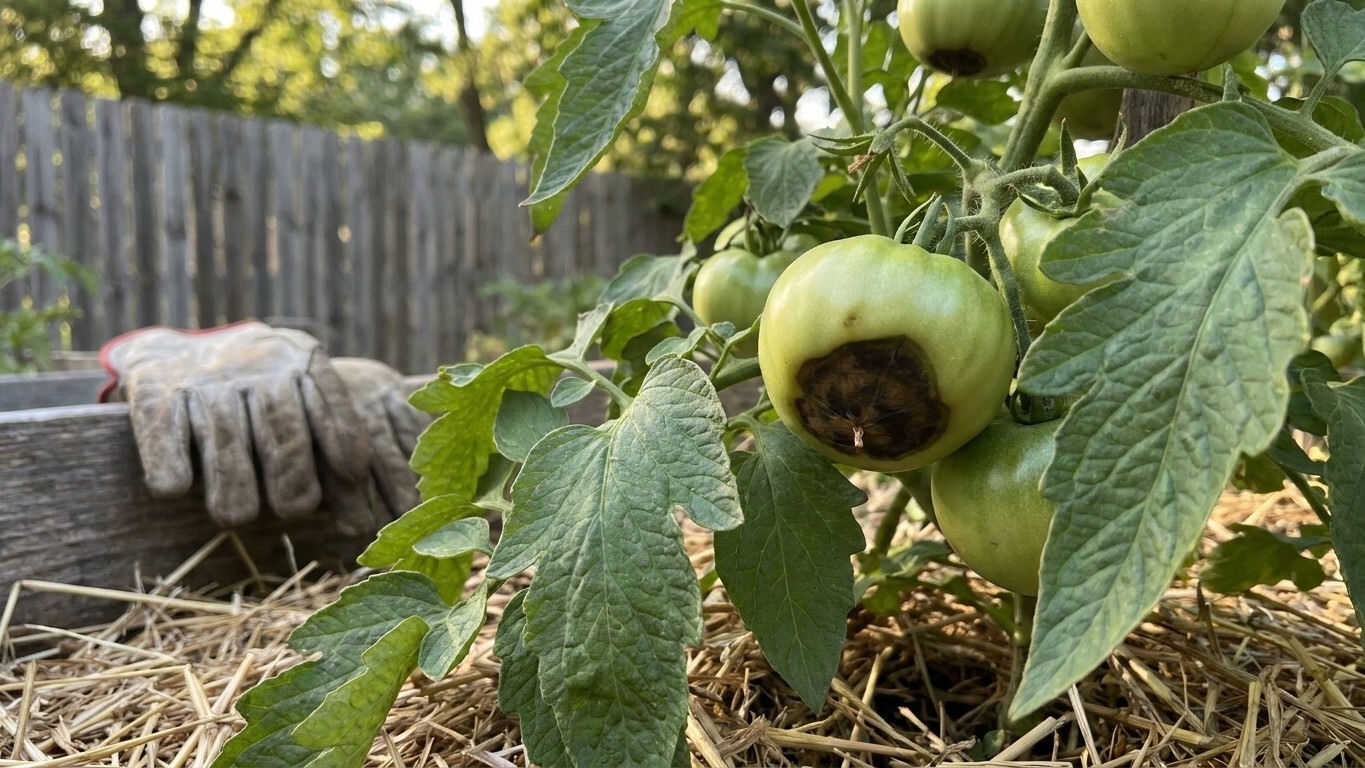

That leathery brown-black patch on the bottom of your tomato is blossom end rot, and it is not contagious, not fatal to the plant, and almost never a calcium shortage in your soil. It is a plumbing problem inside the plant. Here is how to confirm it, why it actually happens, what you can still save this season, and which fixes are a waste of time.
What you are looking at

Blossom end rot shows up at the blossom end of the fruit, the rounded bottom opposite the stem, where the flower used to be. It starts as a small water-soaked spot that looks slightly greasy or bruised, often while the fruit is still green or just starting to turn. Over the following days that spot enlarges, dries out, and turns leathery, sinking inward and darkening from tan to brown to black. On a badly affected fruit the lesion can cover a third or more of the bottom, flat or concave, with a texture like old shoe leather rather than rot in the wet sense.
It usually hits the earliest trusses hardest, the first fruits set on the plant, and tends to ease off as the season goes on. It can affect one fruit on a cluster and leave its neighbor untouched, which throws people off, but that is consistent with how the problem develops.
What it is not
A few look-alikes get confused with it constantly. Use this to sort them out:
| Problem | Where it appears | What it looks like | Cause |
|---|---|---|---|
| Blossom end rot | Bottom of fruit only | Sunken, leathery, dry, brown to black, no fuzz | Water/calcium delivery issue |
| Anthracnose | Anywhere on ripening fruit | Small circular sunken spots, sometimes with rings | Fungal, spreads fruit to fruit |
| Sunscald | Sun-facing side | Pale, papery, blistered patch | Direct sun exposure after leaf loss |
| Cracking | Top or shoulders, radial lines | Splits, often around the stem | Sudden water uptake after dry spell |
If your damage matches the first row, you are looking at blossom end rot. If you are also seeing radial splits on other fruit, that is a related but separate moisture problem, and it is worth reading Why Tomatoes Crack and Split, and How to Stop It Happening Again alongside this.
What actually causes it
Calcium moves through a tomato plant in one direction only, dissolved in water traveling up through the xylem, and it goes wherever the water is being pulled hardest. Leaves transpire a lot of water through their stomata and pull calcium toward themselves aggressively. Fruit barely transpires at all, so it is last in line for calcium even when the soil has plenty of it. When soil moisture swings between too dry and too wet, that water flow becomes erratic, and the fruit is the part that gets shorted first. The tissue at the blossom end, which is growing fast and needs a steady calcium supply to build strong cell walls, runs short and the cells collapse. That collapse is the rot you see.
This is the part gardeners get backward. The soil almost always has enough calcium already. The problem is not supply, it is delivery, and delivery depends on consistent water movement through the plant, not on how much calcium sits in the ground. A few other things make the shortage worse even when watering is reasonably good: a big flush of nitrogen fertilizer that drives fast leafy growth pulls calcium toward the new leaves and away from fruit; root pruning or damage from close cultivation limits how much water and calcium the roots can take up in the first place; and heavy fertilizer or salt buildup in the soil can interfere with calcium uptake at the root even when the mineral itself is present. Plants grown in containers are especially prone, simply because container soil dries out faster and swings between wet and dry more sharply than ground soil does.
To tell the causes apart: if the rot shows up mainly on the first couple of trusses and clears up on later fruit once your watering settles into a rhythm, that is a straightforward moisture problem and the most common version by far. If it keeps recurring on every truss all season despite watering you would call consistent, get an actual soil test through your local extension office rather than guessing, since a true calcium or pH problem is possible but far less common than people assume.
What to do now

The fruit already showing the lesion is not going to heal, and there is no spray or soil amendment that reverses damage already done to that specific tomato. Pick it off if it is holding back the plant’s energy, or leave it and let the plant abort it naturally, either is fine. If you assumed this whole crop is a loss, it is not: the affected fruit is the loss, not the plant, and this is a season-wide pattern you can still correct for every truss that has not set fruit yet.
Where to put your attention
Focus entirely on evening out soil moisture from here forward. That means:
- Water deeply and less frequently rather than a quick splash daily
- Add a mulch layer to slow evaporation and buffer swings between rain and dry spells
- Hold off on any high-nitrogen feed until moisture is under control
- Avoid cultivating close to the base, which tears feeder roots
If you are growing in containers, check moisture more often than you think you need to, since pots dry out faster than garden soil and that gap is a common source of the swings that cause this. Many plants correct themselves over the course of a season once roots are established and watering settles down, so do not be surprised if the trusses that set a few weeks after the affected ones come in completely clean with no intervention beyond steadier watering. If you are newer to the crop generally, it is worth reviewing the basics in How to Grow Tomatoes to make sure the watering and feeding routine underneath all of this is sound.
What does not work
Three remedies get reached for constantly, and none of them address the actual bottleneck.
Crushed eggshells in the planting hole do release calcium eventually, but they break down far too slowly to matter within a growing season, and in most soils they are adding calcium to a supply that was never short. Foliar calcium sprays aimed at the fruit are the most tempting fix because they feel targeted, but they fail for the same reason the plant fails: calcium moves through the xylem on a water current driven by transpiration, and fruit transpires so little that almost nothing sprayed on its skin makes it into the tissue that needs it. You are spraying the outside of a problem that is happening on the inside. Adding lime to raise soil calcium runs into the same wall, plus it risks pushing your soil pH higher than it needs to be if calcium was never the limiting factor. In every one of these cases the calcium is present, the plant simply cannot move it to the fruit fast enough, and no amount of adding more calcium fixes a delivery problem. The fix is watering consistency, not supply.
Preventing it next time
Of everything discussed here, consistent soil moisture is the single change that matters most, by a wide margin. Everything else is a smaller multiplier on top of that.
- Water deeply and on a steady rhythm rather than shallow and daily, so roots are not chasing moisture that keeps disappearing
- Mulch early to buffer the soil against rain and heat swings before fruit set even begins
- Go easy on fast-release nitrogen, especially early, since it drives leafy growth that outcompetes fruit for calcium
- Keep cultivation shallow and away from the root zone once plants are established
- In containers, size up the pot and check moisture more often than feels necessary
Uneven moisture is also a common thread behind fruit that splits its skin, so the same mulching and watering discipline that prevents blossom end rot does double duty for cracking. Heat and drought stress from the same root cause can also show up as curling foliage rather than fruit damage, which is a separate but related symptom worth knowing how to read on its own, covered in Curling Tomato Leaves: Telling Stress Apart From Herbicide Damage and Virus. If you do all of this and still see blossom end rot recurring across an entire season, that is the point to stop guessing and get a soil test through your local extension service to check pH and actual calcium levels before assuming water is still the culprit.
Common questions
Can I eat tomatoes that have blossom end rot?
Yes, if you cut away the affected section, the rest of the fruit is fine to eat. The lesion itself is dead, dried tissue rather than active decay, so as long as there is no soft rot or mold growing into the cut, the unaffected flesh is safe.
Does blossom end rot mean my soil needs more calcium?
Usually not. In most home gardens the soil already has enough calcium, and the rot is a sign the plant cannot move that calcium to the fruit fast enough because of uneven watering, not a sign to add more calcium.
Do peppers and squash get blossom end rot too?
Yes, peppers and squash, along with eggplant and melons, can all develop the same fruit-end lesion for the same underlying reason. The fix is the same in every case: steadier soil moisture, not more calcium in the ground.
Why does it only show up on some fruit and not others on the same plant?
Because it depends on how fast a particular fruit was growing during the specific stretch when water delivery was inconsistent. Fruit in an early, fast-growing stage during a dry spell is far more vulnerable than fruit that was barely swelling at the time, which is why one truss can be badly hit while the one right next to it is untouched.