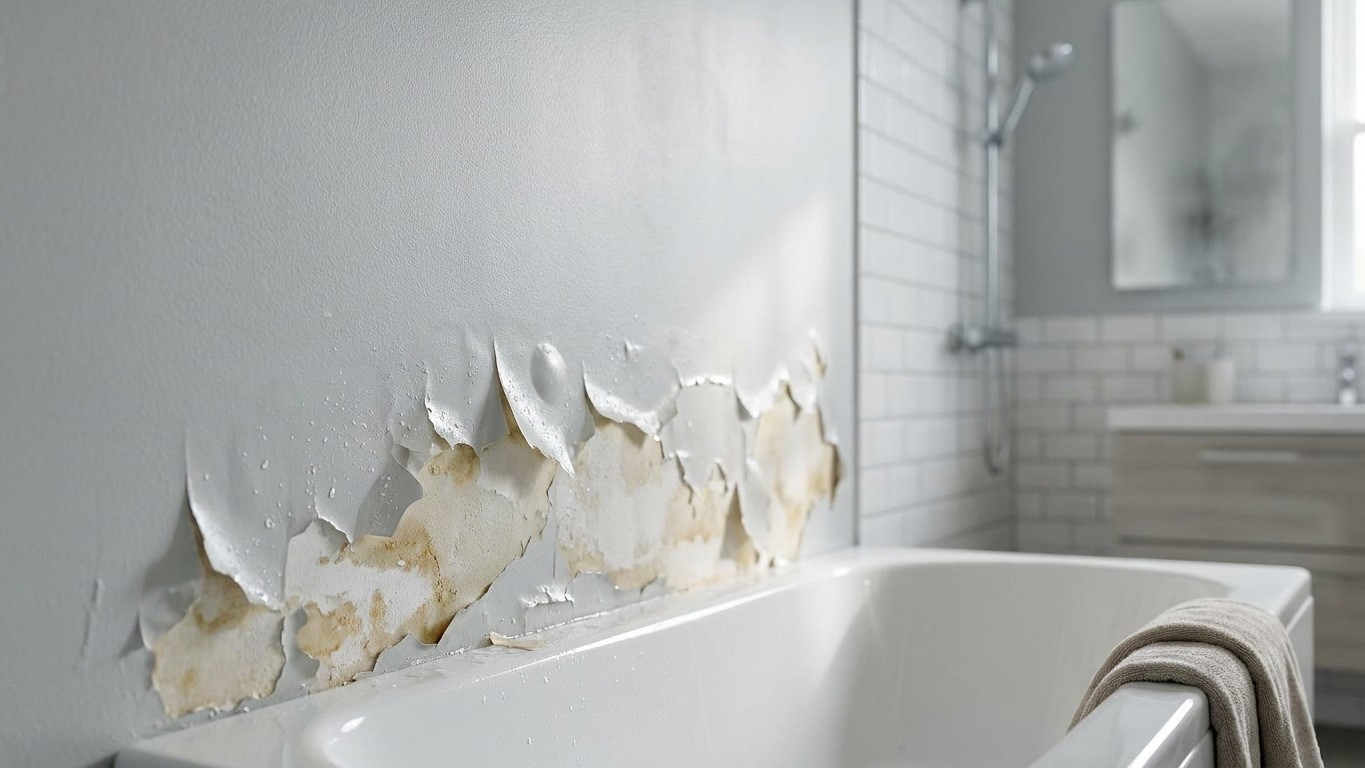

Bathroom paint fails faster than paint anywhere else in the house because bathrooms trap water vapor against surfaces that stay colder than the air around them. The fix isn’t a special can of paint. It’s understanding where moisture lands, prepping that surface properly, and moving air through the room before, during, and after the job.
What is actually going on

Warm, moist air holds water as vapor until it touches something cooler than the air itself. In a bathroom, that’s the exterior wall behind the tub, the ceiling above the shower, the window glass, the corner farthest from the heat register. The vapor gives up its moisture right there, as condensation, and it does this every time someone showers. A film of paint sitting on that surface gets wetted and dried, wetted and dried, dozens of times a month. Even a well-applied coat eventually loses its grip under that cycle. This is why a bathroom repaint that looked perfect for two years can start peeling in sheets along one specific wall while the rest of the room looks fine. The paint isn’t defective. The wall behind it is colder than the rest of the room, and nobody addressed that before rolling on color.
That distinction matters because it changes what “prep” means in a bathroom. In a bedroom, prep is mostly cosmetic: fill the nail holes, sand the rough spots, wipe the dust. In a bathroom, prep has to deal with a surface that may already be compromised by trapped moisture underneath the existing coat. Old paint that bubbled or peeled from condensation often has soap film, mildew, or soft, water-damaged material under it, and none of that will hold new paint no matter how good the new paint is. Scraping and sanding down to sound material isn’t optional here, it’s the difference between a job that lasts and one that fails again in a season.
That sanding and scraping raises a separate issue that has nothing to do with moisture. Any home built before 1978 may have layers of lead-based paint under the newer coats, and disturbing those layers, by sanding, scraping, or dry scraping, releases lead dust into the air and onto every surface in the room. This isn’t a maintenance inconvenience, it’s a health hazard, especially for young children and pregnant women. Before doing any surface prep on an older bathroom, check the EPA’s guidance on lead-based paint for how to prepare, contain dust, and clean up afterward. A room this small, with hard surfaces and limited air exchange, concentrates dust rather than dispersing it, so the standard precautions matter more here than in an open living room.
Ventilation is not a comfort issue in this room, it’s a requirement for the work itself. Sanding dust, fresh paint fumes, and moisture all need somewhere to go, and a closed bathroom door with the fan off traps all three against the person doing the work.
Doing it
The order of operations in a bathroom repaint isn’t a preference, each step protects the one after it. Skip one and the next one has nothing solid to hold onto.
- Run the fan and open what you can. Before touching anything, get the exhaust fan running and prop the door open, or bring in a portable fan if the bathroom has no window. Skip this and dust and fumes build up in a space that already has poor air exchange by design.
- Identify and remove failed material. Scrape and sand any area that’s bubbled, cracked, or soft down to a sound surface. Skipping this and painting over damaged material just seals the moisture problem under a fresh coat that will fail the same way, usually faster.
- Address mildew before painting, not after. Dark spotting in corners and along grout lines is usually mildew growth feeding on moisture and soap residue. Painting directly over it doesn’t kill it, it grows through the new film within weeks. It needs to be cleaned and fully dried before anything goes on top.
- Fill, sand smooth, and dust off. Any patched area needs to be sanded flush and wiped free of dust before priming. Leftover dust under paint shows up as a rough or dull patch once the coat dries.
- Prime bare or patched spots. A stain-blocking, moisture-resistant primer on repaired areas gives the topcoat something uniform to bond to. Skip priming over a patch and that spot often shows through as a different sheen once the room is finished.
- Apply the topcoat in thin, even coats. How long to wait between coats depends entirely on the paint, the room temperature, and how much humidity is in the air that day, so follow the recoat guidance printed on the container you’re using, not a fixed number of hours.
- Keep the fan running well after the last coat. Paint continues releasing moisture and fumes as it cures, and a bathroom with poor airflow slows that curing considerably, which is part of why peeling problems show up again in rooms where the fan barely gets used.
Finish choice matters more here than in any other room, because the sheen affects how well the surface sheds condensation and resists the wiping and cleaning a bathroom wall gets.
| Finish | Moisture resistance | Cleanability | Where it works best |
|---|---|---|---|
| Flat / matte | Poor | Difficult, marks easily | Ceilings away from direct steam |
| Eggshell | Moderate | Fair | Walls with light moisture exposure |
| Satin | Good | Good | Most bathroom walls |
| Semi-gloss / gloss | Best | Excellent | Trim, tub surrounds, high-splash zones |
What it looks like when it goes wrong
Bathroom paint failures have a handful of recognizable signatures, and they don’t all mean the same fix.
Bubbling that appears within days of painting usually means moisture was trapped under the new coat, either because the surface wasn’t fully dry before painting or because a leak is feeding water into the wall from behind. Popping the bubbles and repainting over them does nothing, the moisture is still there. This has to be traced to its source, often a plumbing issue or an exterior wall problem, before repainting has any chance of holding.
Peeling in sheets along one wall, months or years after painting, points to condensation cycling on a consistently cold surface, exactly the mechanism described earlier. The affected section needs to be scraped back to sound material and reprimed. Patching just that spot without addressing why it’s colder than the rest of the room (poor insulation, an exterior corner, a lack of airflow) usually means it fails again on the same schedule.
A chalky, powdery surface that rubs off on a finger often signals an old coat that was never meant for a wet room, breaking down under repeated humidity exposure. This can sometimes be washed, primed, and repainted successfully, but if the powdering runs deep, sanding and priming won’t be enough, the whole section needs to come off.
Dark spots or streaks returning through a fresh coat mean mildew wasn’t fully removed before painting. No topcoat, however good, stops mold that’s still alive underneath it. This has to be treated and dried out, and the affected area repainted, before it stays gone.
A rough, gritty texture across an otherwise fine wall usually just means dust wasn’t cleaned off before the topcoat went on. This one’s cosmetic and correctable: a light sanding and a fresh coat solves it without redoing any of the earlier steps.
The honest distinction that most painting advice skips: dust and minor texture issues are fixable with another coat. Anything tied to trapped moisture, active mildew, or an unaddressed cold spot is not fixed by painting again. It’s fixed by dealing with the underlying condition first, then repainting.
What to settle before you open the tin
A few decisions made before the first drop cloth goes down determine whether the job holds up or repeats itself within a year.
The age of the building comes first. If the home was built before 1978, existing layers likely include lead-based paint, and any sanding or scraping releases lead dust regardless of who’s doing the work. Homeowners working in their own home are legally exempt from the EPA’s Renovation, Repair and Painting rule, which requires certification for paid contractors on pre-1978 housing, but that exemption is a legal one, not a health one. The dust is exactly as harmful whether a professional or the homeowner disturbs it. A home test kit can suggest lead is present, but it should never be treated as the final word either way, and no result should be read as proof the paint is lead-free. Check the EPA’s published guidance before disturbing any old paint layer in a house of that age.
The surface itself needs an honest look before deciding on a plan. Is the peeling limited to one wall, or spread across the room? Is there a musty smell that suggests moisture is still active behind the surface, not just on top of it? Painting over an unresolved problem wastes the work and the material.
Ventilation capacity has to be checked, not assumed. A working exhaust fan that vents outside, not just into the attic, is the baseline. If the bathroom doesn’t have one, or the existing fan is weak, that’s worth fixing before repainting, since it’s the same airflow that will determine whether the new paint job condenses on again.
Natural and artificial light in the room affects how sheen looks once dry; a glossy finish under a single overhead bulb can look very different from how it appeared on the sample card. Testing a small patch in the room’s actual lighting before committing to a finish across every wall saves a repaint over color alone.