
The short answer
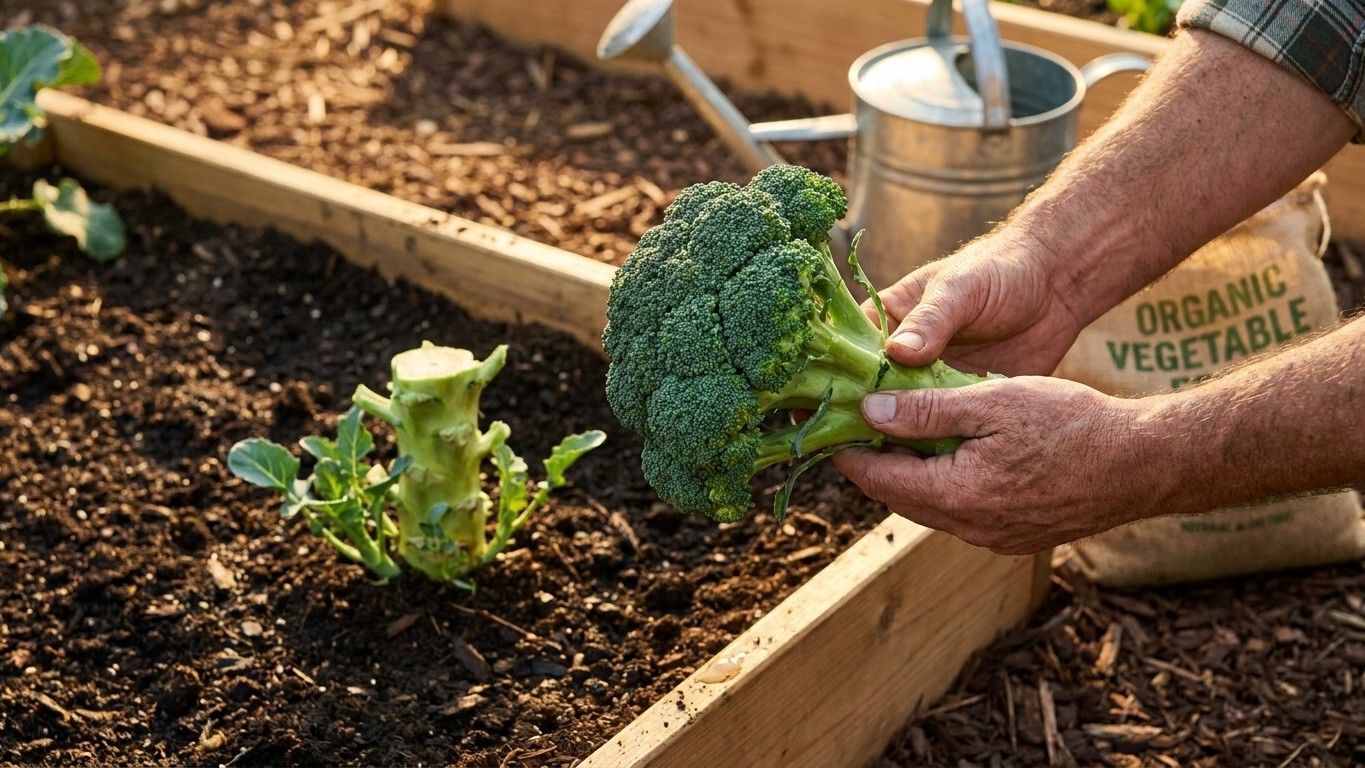
Cut the main head when it’s still compact, before any yellow flower buds crack open. According to Utah State University Extension, mature heads run 6-12 inches in diameter, and you should cut with stems 6 inches long. That stem length matters more than gardeners think: it’s not just for handling in the kitchen, it’s what’s left on the plant to keep pushing new growth from the leaf axils below the cut.
Once that head is off, the plant doesn’t quit. It redirects energy into the buds along the stem, and those become the side shoots, smaller florets that mature over the following weeks. Utah State University Extension is direct about what makes the difference between a plant that sulks after cutting and one that keeps producing: additional water and fertilizer. Without that push, the side shoots come in thin and sparse. With it, you get a genuine second wave of broccoli from the same plants you already have in the ground.
This changes how you should think about the harvest date. It’s not a single finish line where you pull the plant and move on. It’s the first of at least two cutting events, sometimes more, spread across several weeks. If you’ve budgeted your garden space assuming one cut per plant, you’re underestimating what a broccoli bed can give you.
Storage matters just as much as timing. Utah State University Extension recommends keeping cut heads at 32 F and 95% relative humidity, which will hold them for 1-2 weeks. That’s a narrow window compared to root vegetables, so plan to use or preserve your main heads relatively soon after cutting, especially since the side shoots will be coming in behind them and competing for space in the crisper drawer or the freezer bags.
The yield math backs up why the side-shoot crop is worth the extra effort. Utah State University Extension puts total yield at 7-10 lbs. per 10 feet of row, and that figure includes both the main heads and the follow-up shoots, not just the first cut. If you’re planting for a household, the source suggests 3-5 plants per person for fresh eating, plus another 5-10 plants per person if you’re storing or preserving. Those numbers only make sense if you’re counting on the side shoots contributing real weight, not treating them as a bonus you might get around to.
What actually decides it
Three separate factors determine whether your side-shoot harvest is worth the trouble, and they don’t substitute for each other. Missing one won’t be fixed by getting the other two right.
Timing of the main cut
Cut too late, after the flower buds have started to open, and you’ve already lost quality on the main head, and the plant has spent energy on flowering instead of on the reserves it needs to push side shoots. Utah State University Extension is specific here: heads should be harvested “when the heads are compact but before the flower buds open.” That window is your cue for the main cut, and it’s also the moment that sets up everything that follows. A plant cut at the right stage still has the vigor to send new growth from the stem. A plant cut late is already partway into its reproductive cycle and less inclined to bother with side shoots at all.
Water and fertilizer after cutting
This is the factor Utah State University Extension names directly as the one that produces “many” side shoots rather than a few scraggly ones. The plant needs continued deep watering, on the order of 1-2 inches per week, and it needs fresh nitrogen after the main head comes off, not just during the early growing weeks. Skip this step and the plant is running on whatever reserves it has left in the root system, which is rarely enough for a strong second flush.
Plant spacing set weeks earlier
Here’s the part that catches people off guard: a decision made at transplanting time still affects the side-shoot harvest weeks later. Utah State University Extension notes that closer spacing, 1 foot by 1 foot, can be used, but it comes at a cost. “Head size is reduced and side shoot development inhibited,” in the source’s own words. That’s not a mistake to fix after the fact, it’s a trade-off baked in at planting. Standard spacing of 12-18 inches between plants in the row, with rows 2-3 feet apart, gives each plant the root room and light access it needs to keep producing after the first cut. Tight spacing buys you more plants per bed but shrinks what each one gives back.
How to do it
- Watch the head as it fills out, and cut once it reaches 6-12 inches in diameter and is still compact, before the yellow flower buds start to open. Waiting past this point costs you head quality and weakens the plant’s ability to send up side shoots afterward.
- Cut with a knife, leaving 6 inches of stem attached to the plant. Don’t pull or snap the head off; a clean cut preserves the stem tissue the plant will use to push new growth from the leaf axils.
- Move the cut head into cold storage promptly, aiming for 32 F and 95% relative humidity, since Utah State University Extension notes that quality holds for only 1-2 weeks under those conditions. If you don’t have refrigeration that cold, plan to use or preserve the head sooner rather than later.
- Resume deep watering right away, targeting 1-2 inches per week, delivered infrequently rather than in light daily doses. Drip irrigation is the method the source points to for keeping this consistent without wasting water.
- Apply a fresh dose of nitrogen fertilizer after the main head is cut. The source’s fertilizer program calls for 1/2 cup of 21-0-0 per 10 feet of row four weeks after transplanting or thinning, another 1/4 cup when the head reaches the size of a quarter, and then more nitrogen after the main head comes off specifically to push the side shoots. Count back from your transplant date using those two earlier applications as your baseline, then treat the post-harvest feeding as the third round in that same sequence.
- If daytime temperatures climb above 80 F while the side shoots are developing, apply an organic mulch. This keeps root-zone moisture more consistent, which matters more during side-shoot development since the plant is working with a smaller root reserve than it had at the start of the season.
- Harvest side shoots as they reach 3-6 inches long, cutting each one individually rather than waiting for the whole plant to catch up. They won’t mature all at once, so expect to come back to the same plants every few days over several weeks.
What goes wrong
- Cutting the stem too short. If you snip the head flush with the plant instead of leaving 6 inches of stem, you remove the tissue the plant relies on to send up new shoots. Leave the full 6 inches every time, even if it feels like you’re wasting stem you could eat.
- No follow-up fertilizer. Plants that get watered but not fed after the main cut tend to produce a handful of thin, small side shoots instead of the “many” shoots Utah State University Extension describes. Apply another round of nitrogen right after cutting the main head, on top of the two earlier applications made during the vegetative growth stage.
- Planting too tight. If you used 1-foot by 1-foot spacing to fit more plants into a small bed, don’t expect a strong side-shoot harvest. The source is clear that tight spacing inhibits side shoot development along with reducing head size. If space is limited, it’s better to grow fewer plants at the recommended 12-18 inch spacing than to crowd more plants in and get less from each.
- Letting cut heads sit at room temperature. Broccoli loses quality fast once cut. Without cold, humid storage close to 32 F and 95% relative humidity, you’ll burn through that 1-2 week storage window much faster. Get heads into the refrigerator promptly rather than leaving them on the counter while you decide what to cook.
- Letting the soil dry out during shoot development. Side shoots are drawing on a plant that’s already spent significant energy on the main head. Inconsistent watering during this second phase shows up as small, tough shoots. Stick to the 1-2 inches per week guidance, delivered deeply and infrequently, and add mulch once temperatures push past 80 F to help hold that moisture.
Common questions
How many times can I harvest side shoots from one plant?
Utah State University Extension doesn’t specify a fixed number of cuttings, but describes an ongoing process: shoots develop over several weeks as long as the plant continues receiving adequate water and fertilizer. Expect to return to the same plants repeatedly rather than harvesting once and moving on.
Do all broccoli varieties produce side shoots equally well?
The source names three cultivars by their days to maturity, Packman at 50 days, Green Comet at 55 days, and Premium Crop at 65 days, but doesn’t attribute side-shoot performance specifically to any one of them. Days to maturity affects when you’ll reach the main harvest, not whether side shoots will follow.
Can I skip the extra fertilizer and still get side shoots?
You may get some regrowth, but Utah State University Extension attributes a strong side-shoot crop specifically to additional water and fertilizer applied after the main cut. Skipping that step means relying on whatever nutrients remain in the soil, which typically produces a weaker second harvest.
Why are my side shoots smaller than expected even though I fed the plant?
Check your original spacing. Utah State University Extension notes that plants set at 1 foot by 1 foot have inhibited side shoot development regardless of later care, since the root competition was Established at transplanting. Standard 12-18 inch spacing gives plants the room needed for both a full-size main head and a strong follow-up crop.