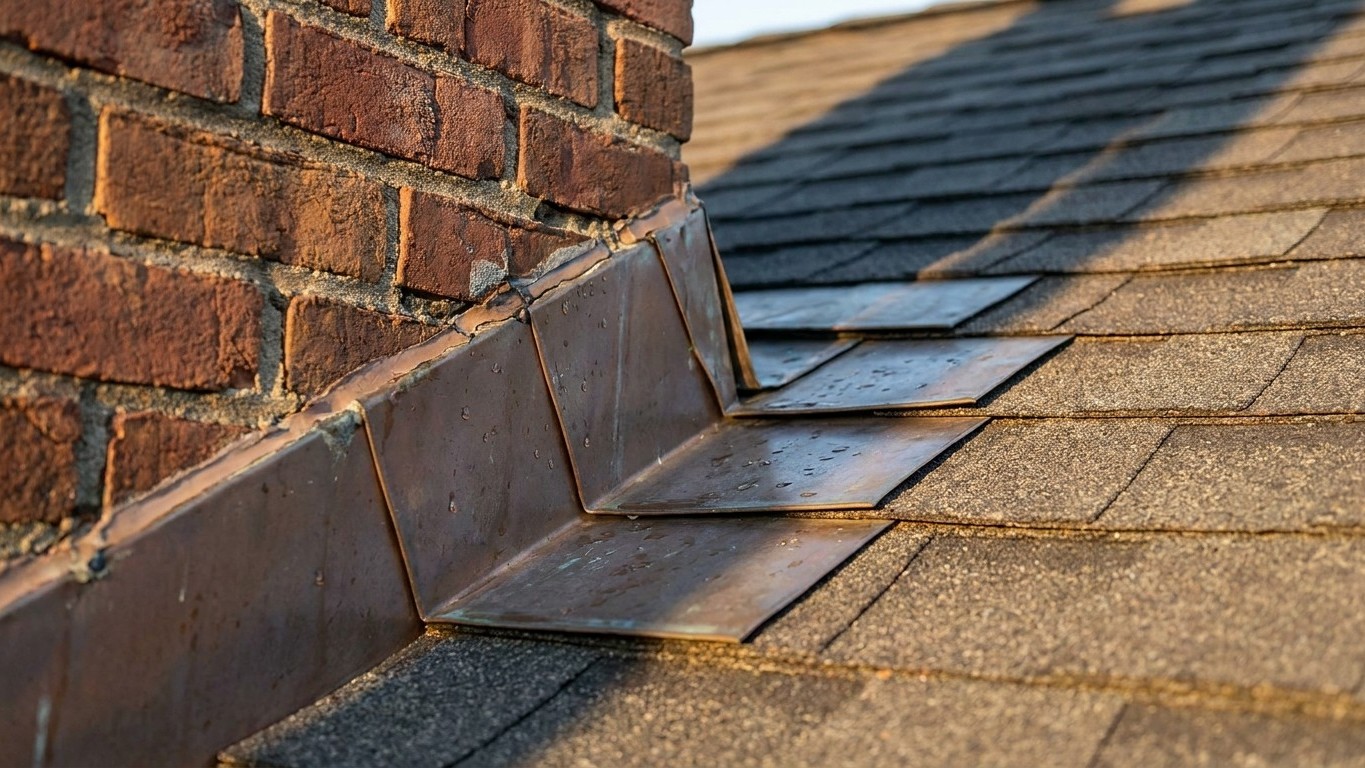

Chimney flashing is the metal barrier that seals the joint where a chimney meets the roof deck. It fails more often than any other part of a roof because it isn’t one flat surface, it’s a seam between two materials that move at different rates. Most roof leaks that show up as a stain near a fireplace, or water dripping into an upstairs closet, trace back to this exact joint rather than to the shingles themselves.
What is actually happening
A chimney doesn’t just sit on a roof, it interrupts it. The roof deck has to stop on four sides of a brick or block structure that was built separately, often settles differently, and expands and contracts with temperature in ways the roof around it doesn’t. Flashing exists to bridge that gap without gluing the two structures together, because they need to be able to move independently.
The system that does this job has two layers. The first is step flashing: small L-shaped pieces of metal, one per shingle course, woven into the roofing material as it climbs the side of the chimney. Each piece overlaps the one below it, so water running down the roof slope is shed onto the shingle surface rather than finding a gap. This layer does the bulk of the water-shedding work along the sides of the chimney.
The second layer is counter-flashing, set into the brick or masonry itself, usually cut into a mortar joint, and folded down over the top edge of the step flashing. Its job is to cover the step flashing from above so water running down the chimney face can’t get behind it. Step flashing sheds water down the roof; counter-flashing keeps water from getting behind it in the first place. Neither layer works fully without the other.
At the front of the chimney, a single piece called an apron or head flashing turns water outward before it reaches the step flashing. At the back, a saddle or cricket, a small peaked structure, diverts water and debris around the chimney instead of letting it pool against the uphill side.
The failure point is almost never the metal itself failing outright. It’s the joint: counter-flashing pulling loose from the mortar as the masonry shifts, sealant at that joint drying and cracking, or step flashing that was never properly woven into the shingles and was instead caulked on top as a shortcut. Once any one of those connections opens even slightly, water finds it, because water on a roof is always moving downhill and testing every seam it passes.
What you can see without climbing
Most of the useful information about chimney flashing condition can be gathered without ever setting foot on the roof. The routine has two parts, ground-level and attic-level, and doing both gives a reasonably complete picture.
From the ground
- Stand back far enough to see the whole chimney against the roofline, and use binoculars or a phone camera zoomed in rather than trying to get closer physically. Look at each of the four sides in turn.
- Check the base of the chimney for any visible gap, curled metal, or a strip of flashing that looks lifted away from the surface rather than lying flat.
- Look along the mortar line where counter-flashing should be tucked in. A dark gap, a strip of daylight, or an exposed metal edge without mortar around it is worth noting.
- Scan for streaks of rust-colored staining running down the brick or the roofing below the chimney. Staining is a sign water has been moving across that surface repeatedly, even if it dries between rain events.
- Photograph what you see, from the same spot, every few months. Comparing photos over time shows movement or deterioration that’s easy to miss in a single look.
From the attic
- Pick a dry, sunny day, turn off the attic light if there is one, and bring a flashlight rather than relying on it as the only light source.
- Look at the underside of the roof deck around the chimney chase for any point of daylight coming through. A pinhole of light is a hole water can also use, just in the opposite direction.
- Run the flashlight beam low and at an angle across the rafters and sheathing near the chimney. This raking light shows water stains, discoloration, or a slightly different sheen on wet wood far better than looking straight on.
- Touch insulation near the chimney chase if it’s safe to reach. Damp, matted, or discolored insulation is one of the clearest signs water has already gotten past the flashing at some point.
- Note any smell of must or mildew concentrated near the chimney compared to the rest of the attic, since that often shows up before visible staining does.
None of this requires a ladder or a walk on the roof surface. It requires patience and a flashlight, and it’s genuinely enough to catch most flashing problems while they’re still small.
What it costs to leave it
Water that gets past chimney flashing doesn’t stay at the chimney. It follows the path of least resistance, usually down the inside face of the chimney chase, along a rafter, or across the top of the ceiling drywall below, before it ever shows up as a visible stain in a living space. By the time a homeowner sees a brown ring on a ceiling, water has typically been finding its way in for some time already.
The roof deck itself, usually plywood or oriented strand board, is the first material affected. Repeated wetting softens the wood fibers, and the sheathing near the chimney can start to sag or feel spongy underfoot long before any exterior sign appears. Rafters and framing members near the chimney chase absorb moisture next, and wood that stays damp between drying cycles is what allows rot and, in the right conditions, mold to establish themselves in framing that’s structural, not cosmetic.
Insulation is often the quiet casualty. Fiberglass and cellulose both lose most of their insulating value once compacted and wet, and wet insulation stays wet far longer than the roof deck around it because airflow through the attic doesn’t reach it the same way. That means the energy performance of the home can quietly decline in that one section of attic well before anyone connects it to a chimney leak.
Interior finishes are usually the last thing affected, which is exactly why a chimney flashing leak feels sudden when it isn’t. Drywall, paint, and any finished ceiling below the affected rafters absorb water slowly at first, showing faint discoloration, then a more defined ring, then eventually bubbling or sagging if the water reaches enough volume.
None of this happens on a fixed schedule. It depends on how much rain the roof sees, how the water is channeled once past the flashing, and how well ventilated the attic space is. What’s consistent is the order: deck first, framing next, insulation alongside it, interior finishes last. Catching the problem before that last stage is the difference between a repair to the flashing and a repair that also involves drywall, insulation replacement, and framing repair.
What is not a householder job
Everything described above, the ground-level scan with binoculars, the attic check with a flashlight, is meant to be done without leaving solid, level ground or a stable attic floor. Actually working on chimney flashing is a different task, and it belongs to a roofer for a specific set of reasons.
Any chimney flashing above a single story is out of reach for a homeowner ladder set up safely, full stop. The angles involved in reaching a second-story roof, plus the height of the fall, put this well outside a reasonable DIY task regardless of tools or confidence.
Any roof surface that’s wet, mossy, steep, or frosted is not a surface to stand on at all, at any height. Moss holds moisture and turns a roof slick even when it looks dry from a distance. Frost does the same thing invisibly. A steep pitch removes the margin for error entirely, and there’s no safe way to compensate for that with footwear or caution alone.
Any repair that requires both hands occupied on a sloped surface, cutting sealant, repositioning metal, working a mortar joint, means no hand is free to hold on. That’s the point at which a task stops being something a homeowner should attempt regardless of how minor the repair looks from the ground.
The realistic path is to use the ground and attic checks described here to decide whether something looks wrong, then bring in someone qualified to confirm it and fix it. A closer look at what that inspection should cover is on the roof inspection guide, and guidance on finding and vetting a qualified professional is on the hiring a roofer page. If the damage followed a storm, a claim may apply. The insurance policy governs what’s covered and what documentation is required, and that varies by policy and by state, so photographs and dated notes from the checks above are worth keeping regardless of how the repair itself gets handled.
Common questions
Can chimney flashing be repaired without replacing the whole roof?
Yes, in most cases. Flashing is a separate component from the shingles around it, and a roofer can typically address a flashing failure, re-securing counter-flashing or replacing a section of step flashing, without disturbing the rest of the roof, unless the surrounding shingles have also been damaged by the same water intrusion.
Why does chimney flashing fail more often than the rest of the roof?
Because it’s a joint between two different structures, brick or block masonry and the roof deck, that move independently of each other with temperature changes and settling. Flat shingle surfaces don’t have that same movement to accommodate, so they’re not exposed to the same repeated stress on a seam.
Is a small gap in counter-flashing something to worry about right away?
It’s worth documenting and watching closely, and worth mentioning to a roofer at the next inspection, rather than assuming it will wait indefinitely. Small gaps are exactly where water starts finding its way in, and the attic check described above is the way to see whether it already has.
Does a chimney that’s no longer used still need working flashing?
Yes. Flashing protects the roof structure from water at that joint regardless of whether the chimney is actively venting a fireplace or furnace. A capped or unused chimney still interrupts the roof surface in the same way, and the flashing around it still has the same job to do.