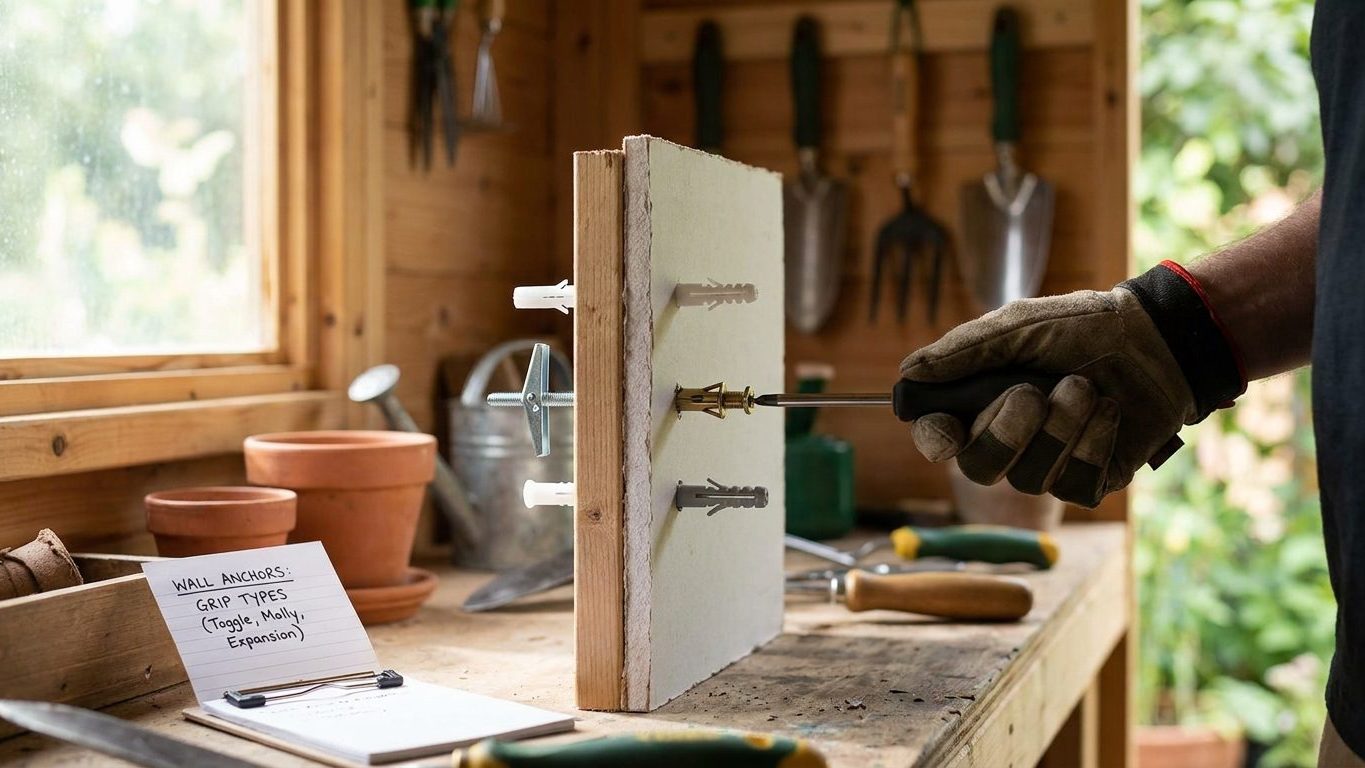

Hollow wall anchors split into four separate grip mechanisms, not one generic idea of a wall plug. A screw-in plastic anchor bites into the drywall itself, a toggle spreads its load across the back of the board, and a strap toggle does both while staying removable. Match the anchor to the weight and pull direction of what you’re hanging, not to whichever one is already in the drawer.
What is actually going on

A hollow wall is just a sheet of gypsum board fastened to studs, with nothing solid behind most of its surface. There’s no material to bite into, so each of the four common hollow wall fixings solves the same problem differently: how to spread a load across a thin sheet without tearing through it. The mechanism you choose decides both how much weight the wall can carry and whether the fixing ever comes back out.
A self-drilling plastic anchor works by friction and thread. You screw it straight into the board and its own threads cut into the gypsum core, gripping the material right around the hole. That grip is only as strong as the board at that exact spot, which suits light things like a small frame or a hook, and explains why these anchors loosen if the board around them crumbles.
A metal sleeve anchor, often called a molly, works differently. Once the screw is driven home, a sleeve behind the board flares outward and clamps the drywall between the flared metal and the fixing’s collar at the front. That clamping spreads the load over a slightly wider patch than a plastic anchor manages, and it holds up better under a straight pull, though it still depends on the board right around the hole staying intact.
The two remaining types work by toggling: a folded part passes through the drilled hole, opens up behind the board, and can’t come back through it. A spring wing toggle is spring-loaded metal wings that snap open flat against the inside face of the board as soon as they clear the hole. Because the wings sit flush against a wide patch of drywall, the load is carried by far more of the board than friction or sleeve types manage, which is why toggles generally outperform them on the same wall. The trade-off is that removing the bolt drops the wings inside the wall cavity for good.
A strap toggle spreads load the same way, with plastic wings that flip open behind the board, but the wings stay attached to a nylon strap that threads back out through the hole. You can pull the excess strap off and reposition the fixing without losing the toggle inside the wall.
None of this matters if you drill into a cable, a pipe, or a duct first. The usual assumption is that wiring runs in predictable paths to switches and sockets, but that’s a convention some electricians follow, not a guarantee, and it counts for nothing in a house rewired or extended over the decades. If you can’t confirm what’s behind the board with a detector or by checking the stud bay from an accessible side, don’t drill there. And if the fixing sits anywhere near a socket or switch, that’s a job for an electrician, not a drill bit.
Doing it
Once you know which mechanism you need, the process for each fixing is short, but skipping a single step is what turns a solid fixing into a hole in the wall. The table below lines up the four types against how they grip, what they suit, and whether they come back out.
| Fixing type | How it grips | Best suited to | Removable |
|---|---|---|---|
| Self-drilling plastic anchor | Threads cut into the gypsum core, held by friction | Light items: small frames, hooks, thin shelves | Yes, but leaves a wider hole |
| Sleeve anchor (molly) | Metal sleeve flares and clamps the board from both sides | Moderate loads with a mostly straight pull | Yes, sleeve can be driven back or drilled out |
| Spring wing toggle | Metal wings spring open flat against the back of the board | Heavier items, especially with load pulling straight out | No, wings drop inside the wall once the bolt is removed |
| Strap toggle | Plastic wings open behind the board, held on a retrievable strap | Heavier items where you may need to reposition later | Yes, strap can be pulled and refitted |
The steps that matter are the same across all four types, and each has a specific failure attached to skipping it.
- Mark the spot and check for cables or pipes before drilling. Skip this and the risk isn’t cosmetic, it’s a hazard.
- Drill the exact hole size the packaging specifies, not whatever bit happens to be in your hand. Too small and a toggle won’t pass through, too large and a plastic anchor has nothing left to grip.
- Push toggle wings fully through the hole before letting them spring or flip open. Skip this and the wings open half in, half out, and never seat flat against the back of the board.
- Pull back on a toggle before driving the screw home, so the wings sit tight against the inside face. Skip this and the screw tightens against nothing, leaving play in the wall even though it feels snug.
- Drive the screw to snug, not to force. Overtightening a plastic anchor strips the thread it just cut, and overtightening a sleeve anchor can crush a thin board instead of clamping it.
For a curtain pole bracket, where the pull is sideways as much as downward, the extra spread of a toggle usually matters more than it does for a picture frame. Putting up a curtain pole that holds goes through that sideways load in more detail.
What it looks like when it goes wrong
The most common failure is small and mostly cosmetic: a plastic anchor spins freely in its hole instead of drawing tight, because the threads have stripped out of the gypsum core. That’s a sign the anchor was oversized for a soft or damaged patch of board. Move over an inch or two and start again, or step up to a toggle, rather than jamming a bigger anchor into the same stripped hole.
A toggle that never seated properly shows up differently. The fixing looks fine going in and the screw feels tight, but the item hanging from it has a slight wobble or gives a little under hand pressure. That means the wings opened askew or never pulled flush against the back of the board. This is a safety issue, not a cosmetic one, because the fixing is carrying load on a fraction of the surface it was designed to spread it across. Take it out, confirm the wings opened flat, and refit.
Cracking paint or a crumbling ring of paper around the screw head, without any movement in the item itself, is usually cosmetic. It happens when the board’s paper facing tears slightly during installation, and it can be patched with joint compound once the fixing is confirmed solid.
Sagging that develops over weeks, a shelf edge dropping, a mirror sitting a little lower than when you hung it, is different again. That’s the board slowly deforming under a sustained load the fixing wasn’t rated to carry long term, and it will not resolve on its own. Take the item down. A fixing that has already crept under load is one to replace, not retest with the same weight.
Any fixing supporting a mirror, a television, or a loaded shelf that feels loose, wobbles, or has visibly pulled away from the board should be treated as failed immediately. A heavy object coming off a wall causes real injury, and there’s no reliable way to test a doubtful fixing except by loading it, which is the one thing you shouldn’t do.
What to settle first
Before any drill touches the wall, work out what kind of hollow wall you actually have. Modern interior walls are almost always drywall on wood or metal studs, but older houses often have lath and plaster instead, which behaves differently under a drilled hole and cracks in ways drywall doesn’t. If the surface is a hard, uneven plaster skim rather than smooth flat board, treat it as a separate job: fixing into old plaster without cracking it covers what changes.
Next, settle what’s inside the wall at the point you plan to drill. Cables, and in some homes water or gas lines, run inside stud bays, and the usual routing conventions are exactly that, conventions, followed inconsistently and not at all in some older construction. Use a cable and pipe detector, and where you genuinely can’t confirm what’s behind the board, choose a different spot rather than drill blind. Nothing you hang is worth finding a cable the hard way.
Then decide honestly whether the load belongs on a hollow wall at all. A hollow wall fixing distributes weight across the board itself, and every board has a limit past which it isn’t the fixing that fails, it’s the drywall around it. A large wall-mounted television, a heavy full-length mirror, or a loaded set of shelves is often better carried by locating a stud and fixing into solid timber, or by using a fixing rated specifically for the purpose and installed exactly as its packaging describes for your wall thickness. The only weight figure worth trusting is the one printed on the fixing’s own packaging, tested for a specific board type and thickness, because nothing else accounts for the true condition of your particular wall.
If you’re weighing which fixing suits which job across a whole room, not just one hole, hanging, shelving and fixing: the wall decides lays out how the wall type steers the decision before you get to individual anchors.
Common questions
Can I reuse the same hole if a toggle bolt already failed there?
Not for anything with real weight. The board around that hole is already compromised, and a spring wing toggle that failed once has left its wings loose inside the cavity, which can interfere with a new toggle passing through cleanly. Move over to solid board a few inches away, or find a stud, rather than reusing the damaged spot.
How do I tell if my wall is drywall or old lath and plaster before I even start?
Tap it. Drywall gives a hollow, even sound with a slight flex under knuckle pressure, while old plaster on lath sounds duller and feels harder, with almost no give. Thickness is another clue: plaster walls in older houses are often noticeably thicker than a single sheet of modern drywall, though thickness alone isn’t proof, so check a small test spot in an inconspicuous area first.
Can I just use two or three anchors instead of finding a stud?
Adding anchors spreads the load across more points on the board, but it does not turn a hollow wall fixing into a structural one, and it does nothing to fix a board that’s already thin or damaged. For anything heavy enough that you’re considering multiple anchors, finding a stud or using a fixing designed to bridge to one is the more reliable route.
Why did my anchor pull out even though the pack said it would hold more?
Packaging figures are usually generated under controlled conditions, on new, undamaged board of a stated thickness, with the fixing installed exactly to spec. Real walls vary: the board might be thinner or older than assumed, the hole might be slightly oversized, or the load might be pulling at an angle the fixing wasn’t tested for. Treat the printed figure as a ceiling under ideal conditions, not a guarantee for your particular wall.