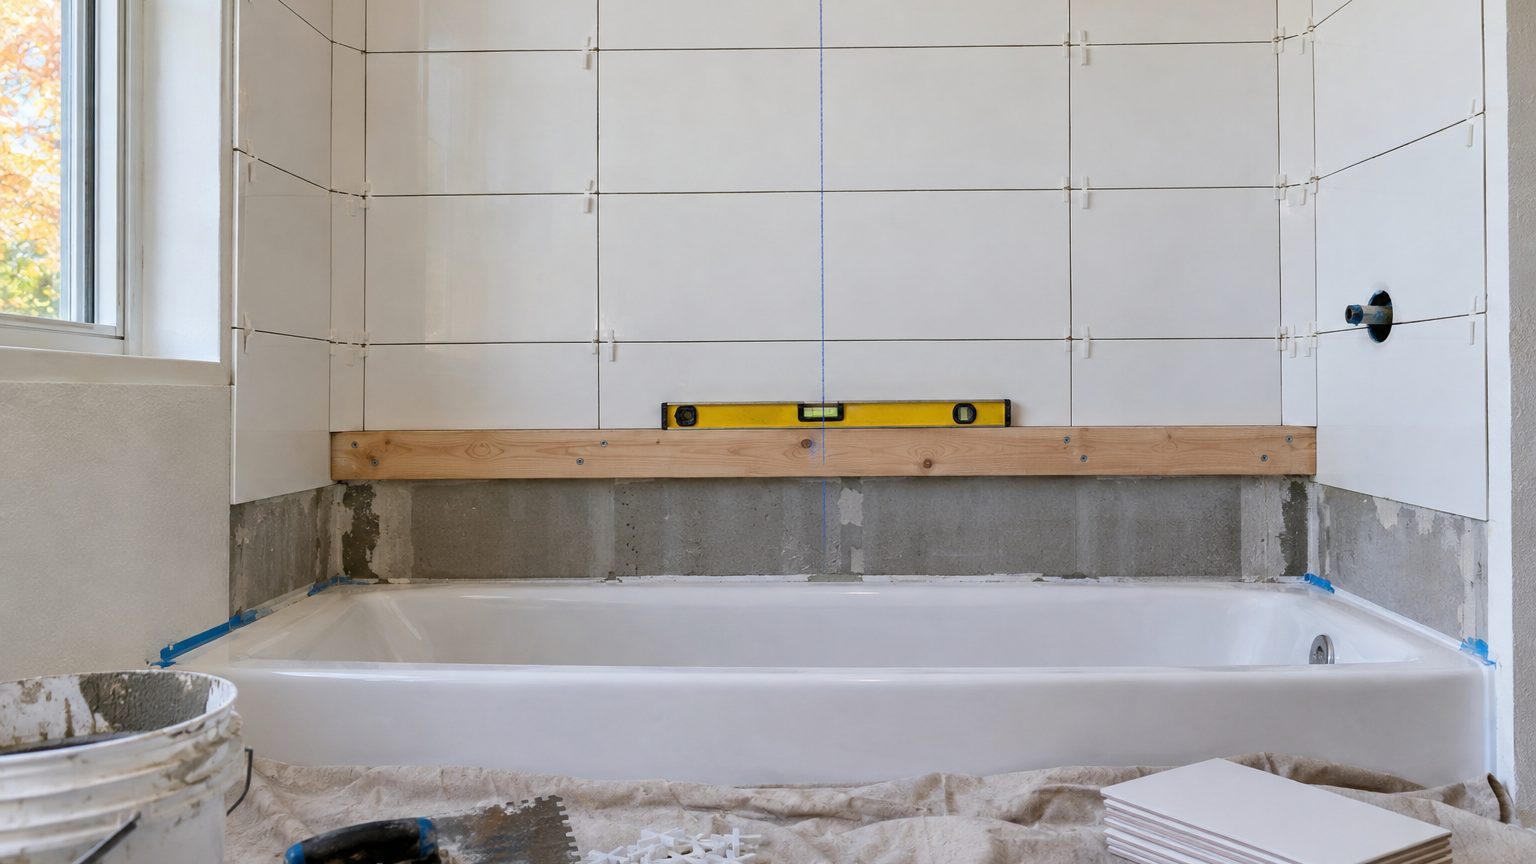

Start at a level line, not at the floor. For most walls that means a horizontal ledger board set one full tile (plus a grout joint) above the lowest point of the tub or floor, and a vertical centerline that tells you what your cuts will look like at the corners. Full tiles go up from the ledger. The cut row along the bottom gets done last, where a caulk joint and a tub rim hide a multitude of sins.
The reason is simple geometry. Tubs, floors and countertops drift out of level, and tile does not forgive drift. A first row that follows a sloping surface carries the slope up the wall, and every row above it inherits the error.
Why the floor is the wrong reference
Builders aim for level, but houses settle, tubs get set on mortar beds of uneven thickness, and floor framing sags a little between joists. A quarter inch of variation across a five-foot tub is not unusual. Lay a row of 12-inch tiles along that rim and you can watch the gap at one end widen row by row until the top course is visibly crooked against the ceiling line or a window frame.
Industry tolerances show how little room there is. The Tile Council of North America and ANSI standards ask for a substrate flat to within 1/4 inch over 10 feet for tiles with edges under 15 inches, and 1/8 inch over 10 feet for larger formats. That is the substrate itself, before any layout error gets added on top. Large tiles are the least forgiving, which is one reason the advice in our guide to tile for a small bathroom leans toward big tiles with a disciplined layout rather than big tiles slapped up from wherever the floor happens to begin.
Walls have their own problems. Studs bow, drywall seams build up, and corners are rarely a true 90 degrees. Checking plumb and flatness with a 4-foot level or a straightedge before you open a bag of thinset tells you how much correcting the setting material will have to do. Fill low spots with a patching or leveling compound first. Do not try to bury a half-inch belly in a thick layer of mortar.
One more point in the floor’s favor, to be fair: it is a fine starting point for a wall that is tiled floor to ceiling in a room where the floor was laid carefully and checked with a level. That is the exception. Treat it as a hypothesis to test, not a given.
Setting your layout lines, step by step
Good tile work is mostly planning, and the planning takes about an hour. Skipping it is how people end up with a one-inch sliver of tile hugging the ceiling.
Find the low point and snap the horizontal line
Rest a long level on the tub rim, countertop or floor along the wall and find the lowest spot. Measure up from there by one tile height, add the grout joint, and add roughly 1/8 to 1/4 inch if you want a gap above a tub for caulk. Mark that height, then carry a level line across the full width of the wall with a laser level or a 4-foot level and a pencil. Snap a chalk line over it if the wall is long. Check it at both ends and the middle.
Next, screw a straight board (a 1×3 or a length of straight lumber works) so its top edge sits exactly on that line. This is your ledger. The first full row rests on it instead of on the uneven tub. Once the thinset has cured, usually the next day, you pull the ledger and fill in the cut tiles below.
A caution for showers: fasteners driven through a waterproofing membrane or a sheet-applied waterproofing system create holes that need to be sealed. Many installers working inside the wet zone use a laser line and temporary spacers or bracing instead of a screwed-on ledger, or they patch the fastener holes with the membrane manufacturer’s sealant. Follow the instructions for whatever waterproofing product is on your wall.
Choose the vertical line and dry-fit a row
Find the center of the wall, or the center of the feature people will look at: the niche, the valve, a window, a vanity mirror. Strike a plumb vertical line there. Then lay a row of tiles along the ledger with spacers in place (no thinset yet) and see where the last tile on each end lands.
The goal is end tiles that are at least half a tile wide, and ideally equal on both sides. If the dry fit leaves a 1-inch strip on the left, slide the whole layout over by half a tile. Your centerline now falls on a grout joint instead of the middle of a tile, and the cuts at the corners are fat, even and much easier to make. Small adjustments cost nothing before the tile is stuck. After it is stuck, they cost a weekend.
A story pole speeds all of this up. Take a straight stick and mark it in tile-plus-joint increments from the ledger line up to the ceiling. Hold it against the wall and you can see instantly where the top row falls, where a niche shelf lands, and whether you are about to end with a thin strip against the ceiling. If you are, shift the starting line up or down so the top and bottom cuts are balanced, or so the cut row lands somewhere unobtrusive.
Walls with features: niches, windows, corners and backsplashes
Plain walls are the easy case. Most real bathrooms have a niche, a window return, a valve trim or a pony wall that complicates the plan. The principle stays the same: choose the features that must look right, and let the cuts fall where nobody looks.
Niches first. A recessed shower niche is best placed so that its edges and shelf line up with grout joints, which means working backward from the niche location when you set the ledger height. Many installers pick a height that puts the niche shelf at a grout line, then check the total row count to the ceiling. If the numbers do not work, the niche moves up or down an inch or two before the framing is closed in. If the wall is already built, the layout has to bend around it, so test with the story pole before committing.
Windows and returns come next. A window in a tub wall should have symmetric cuts on both sides, since the eye reads that frame instantly. Start your vertical layout from the window’s centerline if the window is the dominant feature, and verify the sill is not slanted for drainage before assuming it is level. Sills often slope slightly outward on purpose.
Outside corners (the exposed edge of a pony wall, for instance) deserve a finished edge: bullnose tile, a metal or stone trim, or mitered tiles. Plan the trim into the layout from the start, because trim pieces change the dimension of the field by a fraction of an inch, and that fraction matters when you are splitting cuts evenly.
Kitchen backsplashes follow similar logic. The countertop is rarely dead level, so a ledger just above it, or a level line in the middle of the run, keeps the pattern straight. Most people look at the center behind the range, so many tilers center the layout there and let the cuts fall at the end walls. If the backsplash stops at upper cabinets, check the gap to the cabinet bottom, since the top row often becomes the cut row.
Hardware is worth a thought as well. Framed or frameless glass doors and shower-curtain rods are fastened into the finished wall, and a drill bit that lands on a grout intersection or too close to a tile edge can crack a tile. If you are still deciding between the two, the trade-offs in shower door or curtain include where the hardware mounts, and that is the right time to shape the layout so anchors fall in the middle of full tiles.
Mistakes that force a redo
Most tiling disasters trace back to the first row, which is why people searching for a repair, rather than a new install, often find the problem started at the bottom. A few patterns show up again and again.
The first is trusting the tub. Starting directly on the rim without a ledger gives you a smooth-looking first row that drifts as it climbs. The second is skipping the dry layout, which produces thin end cuts that chip and look amateur. The third is spreading thinset over too large an area. Mortar forms a skin that stops bonding, and the open time depends on the product, the temperature and how porous the backer is. Spread only what you can cover within the time on the bag, and lift a tile now and then to check that the back is fully coated.
Fourth, and a quiet one, is closing the joint at the bottom with grout instead of caulk. Where tile meets a tub, a floor or an inside corner, the joint needs to be flexible, so use a 100 percent silicone or a color-matched sanitized caulk, not rigid grout. Leaving a small gap (about 1/8 inch) at the tub keeps the tile from being pressed down by the tub’s movement when it fills with water and a person.
If you spot a crooked row after three or four courses, stop immediately. Fresh tile can usually be pulled and reset within the first stretch of working time, cleaned of mortar and set again on a corrected line. Waiting until the thinset has cured means chiseling or grinding, and that can damage the backer board behind it. The fix at that point is rarely small.
For readers working through a bigger renovation plan, our Bathroom section covers the neighboring decisions (waterproofing, fixtures, finishes) that interact with where the first tile goes.
A last practical note: order about 10 percent extra tile for a straight layout and about 15 percent for diagonal or heavily cut patterns, and keep the leftovers from the same production lot. Dye lots differ slightly from one run to the next, so a box bought two years later for a repair may not match the wall by even a shade.