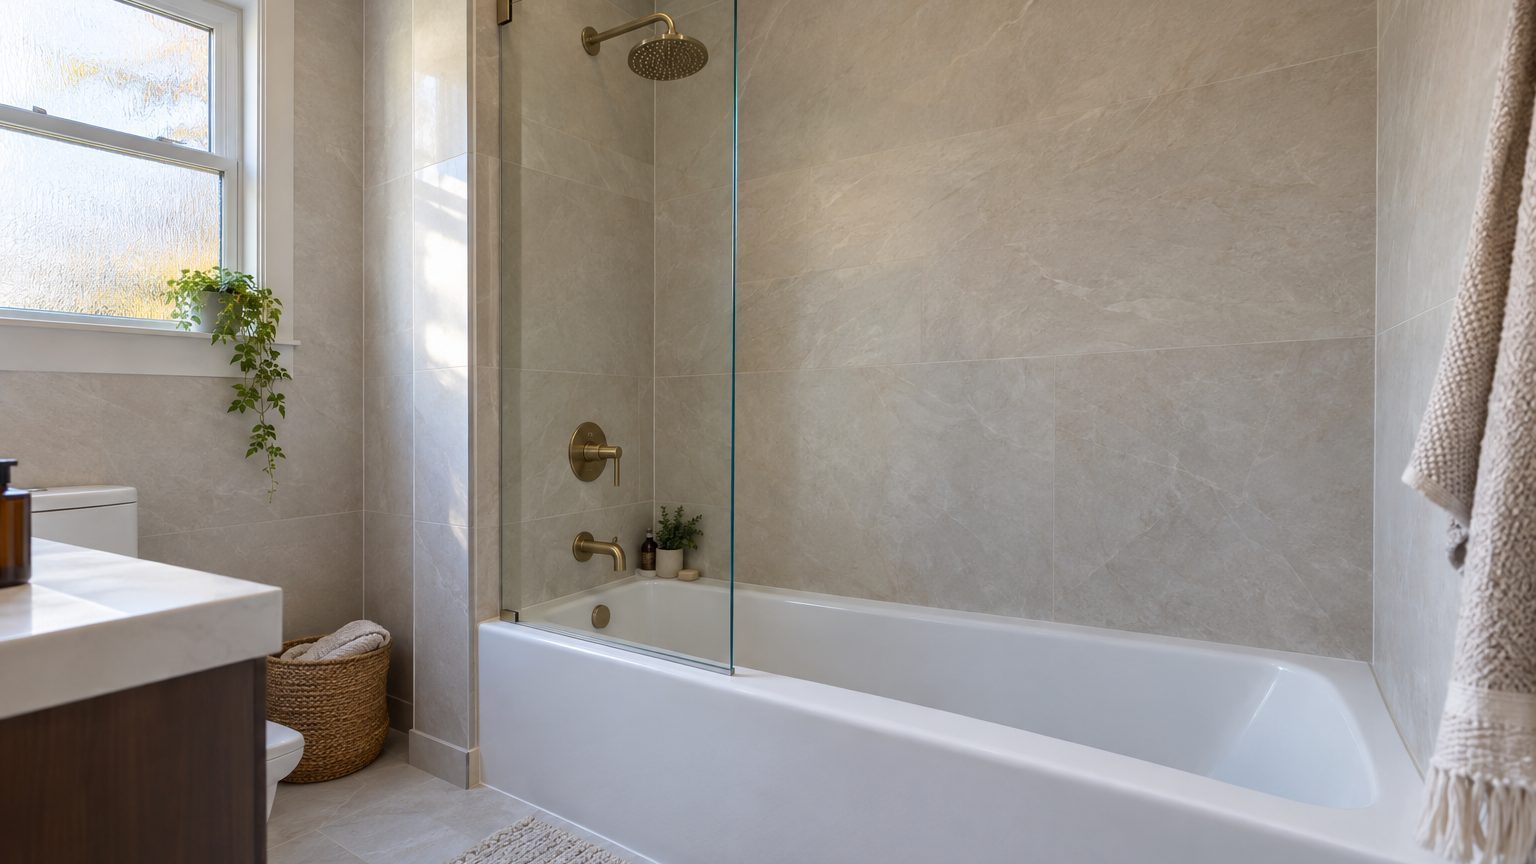

The best small bathroom tile ideas start with one rule: use large rectified porcelain tile, grout it in a color close to the tile, and keep the pattern simple. In a room where the tub wall is 60 inches long, every grout line is a small visual interruption, and a few dozen of them add up to a busy surface that makes walls feel closer than they are. Cut the number of lines and the room reads as calmer and larger, even though the square footage hasn’t changed.
That’s the headline. The details decide whether it works, because big tile in a small room is less forgiving than it looks. Walls need to be flat, layouts need planning before the first bag of thinset is opened, and the shower floor follows different rules entirely.
Why bigger tile makes a small room look larger
Start with the definition. The ANSI A137.1 tile standard treats a tile as “large format” when at least one edge measures 15 inches or more. A 12-by-24 sits just under that line on paper but behaves like large format in practice, since its long edge is 24 inches. A 24-by-24 or a 24-by-48 goes further still.
Count the math on a typical tub wall. A shower surround of 60 inches wide by 60 inches tall, tiled in 3-inch squares, has roughly 400 tiles and a grid of grout joints across the whole surface. The same area in 12-by-24 tiles needs about 15 pieces. Same wall, a fraction of the lines. The eye stops scanning a pattern and reads one continuous plane.
Rectified tile is what makes the effect work. Rectified means the edges are mechanically cut after firing so every piece is nearly identical in size and the sides are square. That allows narrower joints. Many manufacturers call for a minimum joint of 1/8 inch on large rectified tile, and some permit 1/16 inch, so check the box or the spec sheet before you commit. Non-rectified tile has slightly rounded, uneven edges and needs wider joints, often 3/16 inch or more, which undoes some of the benefit.
Grout color does as much work as joint width. A grout that matches the tile nearly erases the grid. A white tile with charcoal grout does the opposite, drawing a heavy graphic pattern across the wall. Contrast is a design choice, and a legitimate one, but in a small bathroom it works against the goal of fewer visible lines. Epoxy grout holds color better and resists staining, though it is less forgiving to work with than cement-based grout, so it tends to suit confident DIYers or a hired tile setter.
Finish matters too. Glossy tile bounces light around a windowless room, which helps. It also reveals every flaw in the wall behind it, from slight waves to uneven edges, because reflections exaggerate them. Satin and matte finishes hide imperfections better and are easier on bare feet when wet. For a room with a bright window, go glossy. For an interior bathroom with one fixture overhead, a soft satin usually looks better and forgives more.
Layout decisions that matter more than tile size
Orientation changes how a room feels. Vertical stacking of rectangular tile pulls the eye upward and makes an 8-foot ceiling feel taller. Horizontal runs stretch a narrow room sideways, which can help in a long skinny bathroom, the kind that runs from a hallway door to a window. Pick the direction that fights your room’s weakest dimension.
Offset is the next decision, and it’s where many DIY jobs go wrong. The classic half-offset brick pattern (also called running bond) looks fine on small tile. On long rectified tile, even slight bowing along the edge means the corner of one tile can sit higher than the next, a flaw called lippage. Most manufacturers and the Tile Council of North America guidance recommend a one-third offset for tiles with an edge over 15 inches. Stacked or straight-lay, with lines running continuous in both directions, avoids the issue and gives the cleanest look, though it demands tighter alignment and a very flat substrate.
Run the tile all the way up. Tiling only to chair-rail height or just above the tub breaks the wall into two zones and adds a horizontal line right at eye level. Tiling to the ceiling inside the shower, and ideally on the whole wall behind the vanity, gives you one uninterrupted surface. If budget forces a choice, tile the wet areas fully first and paint the rest in a color close to the tile.
Continuity between floor and wall is another trick. Using the same tile on both, or the same color in a different size, removes the border where the floor stops and the walls begin. Floors take smaller tiles more comfortably than shower walls do, so a common approach is a 12-by-24 on the floor and a larger version of the same color on the walls.
Plan the layout on paper before you buy anything. Take that 60-inch tub wall and 12-by-24 tiles laid horizontally. Starting at one corner gives two full tiles and 12 inches left over, which is acceptable. But if the wall is 62 inches, you end up with a 14-inch sliver. Centering a tile on the wall’s midpoint gives 19-inch cuts on each side, symmetrical and far more intentional looking. Do this for every wall, and check where niches, valves and the showerhead land. A niche that straddles a grout line looks accidental, while one sized to the tile grid looks designed. Many installers frame the niche so its edges fall on joint lines, and some skip the grid fight by using a prefabricated niche cut to the tile module.
Waste and spares
Order 10 to 15 percent extra for a straight layout, and closer to 15 to 20 percent for diagonal patterns or very long tile, because a single bad cut costs a whole piece. Keep at least one unopened box after the job. Tile from different production lots can vary in shade, and if a tile cracks years later, a matching replacement from the same lot is the only way to avoid a patch that shows. Large pieces are harder to replace than small ones, since removing a 24-by-48 without damaging neighbors is delicate work. That tradeoff belongs in the decision, not in the fine print.
Where big tile causes trouble
The shower floor is the first exception. Floors in a shower must slope toward the drain, a minimum of 1/4 inch per foot under plumbing codes. A large rigid tile can’t follow that slope without lippage or cracking, which is why showers with a center drain almost always use mosaics of about 2 inches or smaller. The extra grout lines also give more traction on a wet surface. If you want large tile on the shower floor, a linear drain along one wall allows a single-plane slope that a big tile can handle, but that’s a more demanding build and works best when planned with the plumber and tile setter before the subfloor is finished.
Slip resistance deserves a look on any bathroom floor. ANSI A137.1 sets a dynamic coefficient of friction of 0.42 as the minimum for level interior floors expected to be walked on while wet. Tile that meets the number is labeled, and the rating is usually on the spec sheet. Polished large porcelain on a bathroom floor often falls short, so check before you fall for a glossy sample.
Flatness is the second issue. For tile with an edge of 15 inches or more, the TCNA calls for the substrate to be flat within 1/8 inch over 10 feet, with no more than 1/16 inch variation over 24 inches. Older houses with plaster over lath, or walls that have been patched and re-patched, rarely meet that without work. Skim-coating or floor leveling adds cost and a day or two, and skipping it is how lippage happens. Run a straightedge across the wall before you order tile. If light shows under it, plan for prep.
Setting material changes too. Large tile calls for a medium-bed mortar designed for the weight and thickness, plus full coverage on the back of the tile, often achieved by back-buttering. Gaps under a big tile are weak points where it can crack or sound hollow. Cutting needs a wet saw with a table large enough for the piece, or a rail cutter rated for the length. Some installers charge more per square foot for large format because the handling is slower and the prep is stricter, so get quotes with that in mind and don’t assume fewer tiles means a cheaper job.
Waterproofing sits behind all of it. Cement board and similar backers are not waterproof on their own. A shower needs a continuous membrane, either a sheet system or a liquid-applied one, covering walls and floor, and every seam and corner must be sealed. Tile and grout are not the barrier. If you’re doing a bathroom redo, the membrane is where not to cut corners, since failures show up inside the wall long before they show up on the surface.
Corners, caulk, and the lines you can’t avoid
Even a perfect large-tile job has some joints that can’t be grout. Where tile meets the tub, where walls meet each other, and where the wall meets the floor, the standard is flexible sealant rather than grout, because those spots move with temperature and settling. Rigid grout there cracks. Silicone caulk in a color matched to the grout keeps the look consistent. Those seams are also the most likely place for mildew to take hold. If you’re already seeing dark spots there, Black Mold in Shower Caulk: When Cleaning Stops Working covers when to scrub and when to cut out the old bead and start over.
A few other choices extend the clean-line effect around the tile itself. A frameless glass panel or a clear shower screen lets the eye travel across the full width of the room instead of stopping at a curtain. Skipping decorative borders and bullnose trim in favor of a clean edge, such as a metal profile or a mitered corner, keeps the surface quiet. And if the door is eating floor space, A Sliding Door for a Bathroom: Pocket, Barn or Neither weighs the options for freeing that swing area.
For a quick plan, these five choices get most small bathrooms most of the way there:
- Rectified porcelain, 12 by 24 inches or larger, in a light to mid tone
- Grout within a shade of the tile, joints at the manufacturer’s minimum
- One-third offset or stacked layout, centered on each wall
- Tile to the ceiling in the shower, same family of color on the floor
- Small mosaic on the shower floor, matched caulk at every change of plane
More guidance on layout, repairs and fixtures lives in the Bathroom section, including what to do when an existing wall tile loosens or cracks and you’d rather repair than rip out.
One last nuance for anyone worried that large tile will feel cold or showroom-stiff: porcelain at this size can be laid over electric radiant mat systems, and a small bathroom is one of the cheapest places to do it, since a 40-square-foot room needs only a small heated area. The tile spreads the heat evenly, and the warm floor tends to make a plain, minimal surface feel more welcoming than any pattern would.
Sources : daltile.com