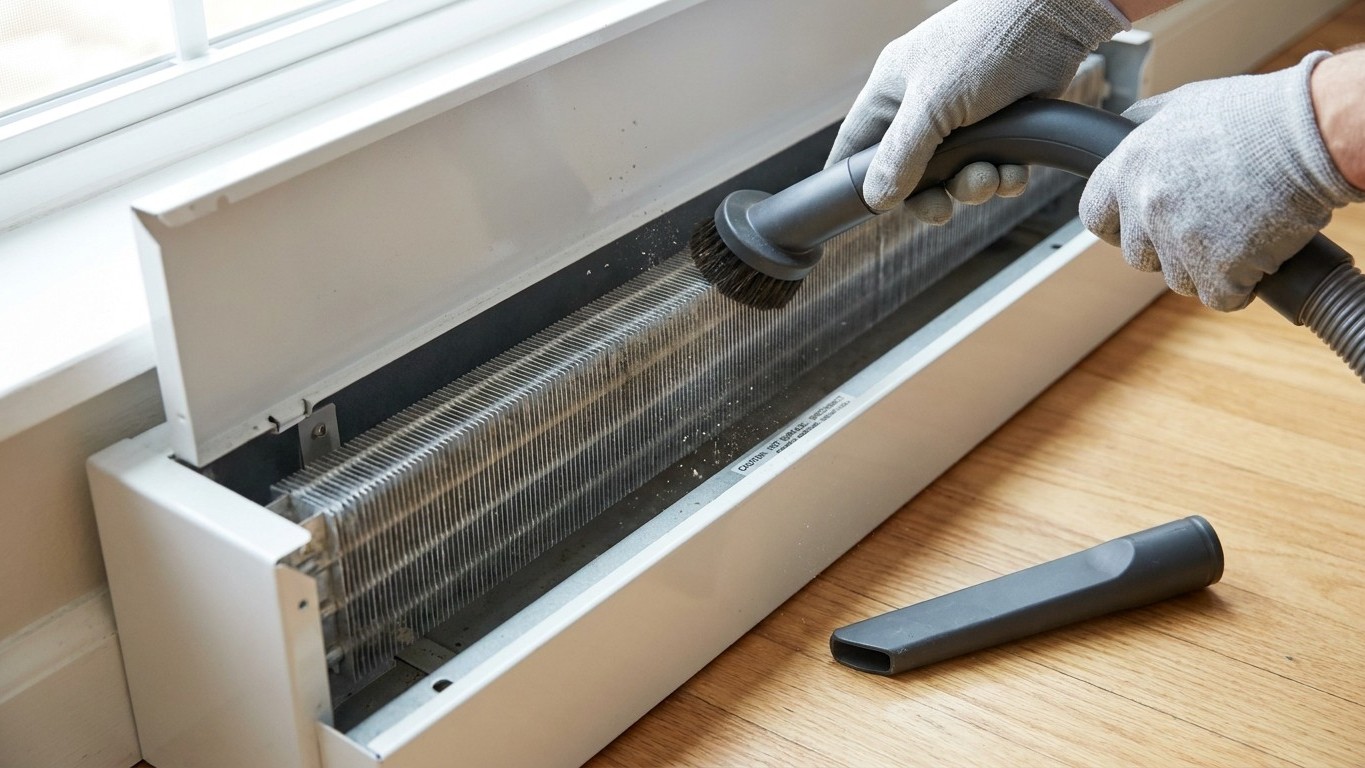

A clean baseboard heater means clear fins and a clear bottom channel, nothing more. Cut the power (or let a hydronic unit cool), lift or unclip the front cover, then run a vacuum with a brush attachment along the fins and a crevice tool through the slot at the bottom, where the heaviest dust always collects. Twenty minutes, once a year before the first cold snap, is usually the whole job.
The fins are the whole appliance
Strip away the metal cover and a baseboard heater is almost nothing: a heat source and a stack of thin metal fins standing in a row. Those fins are doing all the work. On an electric unit they’re bonded to the resistance element; on a hydronic unit they’re clamped around a copper tube carrying hot water from the boiler. Either way, their job is to take a small, hot surface and turn it into a large surface, because a large surface is what moves heat into a room.
The movement itself is convection, not radiation, and that’s the part people miss. Room air enters through a slot at the bottom of the unit, crosses the hot fins, warms up, and rises out through the top. No fan pushes it. The heater relies entirely on that column of air lifting on its own, the way warm air always rises past cool air. Block either end of that path and the whole cycle slows down.
Dust does both kinds of damage at once. A layer of dust sitting directly on the fins acts as insulation, the same way a blanket does, so less of the element’s heat ever reaches the air moving past it. Meanwhile dust and pet hair packed into the intake slot at the bottom restrict how much air can even get in to be heated. The heater isn’t broken in either case. It’s just working through a filter it was never designed to have.
That’s why this isn’t really a tidiness chore, even though it looks like one. A heater with insulated, half-blocked fins draws the same electricity or the same hot water it always did, but delivers less warmth for it. People often notice the room feels cooler than it used to and assume the unit is failing, when the fins simply haven’t been cleaned since the last time the appliance was installed. Dust buildup is also one of the more common causes of that first-day burning smell each heating season, which gets its own section further down.
None of this requires disassembly or tools beyond what’s already in most closets. It requires reaching the fins directly, which the cover is specifically designed to allow once it’s off.
Before you start
The two appliances that share the name “baseboard heater” don’t get cleaned with the same level of caution, so knowing which one is bolted to the wall comes first, before any of the rest of this.
- Identify the type. An electric baseboard heater is a resistance element inside a metal enclosure, wired at 120 or 240 volts and controlled by a line-voltage thermostat, either built into the unit or mounted on the wall. A hydronic baseboard is an emitter on a boiler loop: hot water runs through a finned copper tube, and there’s no line-voltage wiring to the fins themselves. A third option sold as “hydronic” is actually electric, a sealed tube filled with fluid and heated by an electric element inside it. If the unit has a cord or is wired into a circuit and there’s no boiler anywhere in the house, treat it as electric no matter what the label says.
- Cut power at the breaker for an electric unit, not just at the thermostat. A line-voltage thermostat interrupts the circuit under normal conditions, but it’s a mechanical switch that can fail closed, and some installations still leave part of the circuit live even with the thermostat turned down. The breaker is the only disconnect you can trust. Confirm the unit is dead before touching anything inside the cover.
- Let a hydronic unit cool instead. There’s no power to cut at the emitter itself, but the tube can be carrying near-boiler-temperature water. Give it time after the heating cycle ends rather than working on it while it’s hot.
- Gather a vacuum with a brush attachment and a narrow crevice tool, plus a dry or barely damp cloth for the exterior enclosure and the floor underneath, where dust tends to settle after being disturbed.
- Know how the cover comes off before you pull on it. Most baseboard heater covers lift up and away from clips or tabs along the top or bottom edge, without tools. Check the unit’s own label or manual for the exact release points and for any clearance guidance specific to that model, rather than guessing at how much force it takes.
The cleaning itself
With power confirmed off (or the hydronic unit cooled) and the cover set aside, the sequence is short and the order matters more than the tools do.
- Open the damper at the top of the unit fully, if it has one. This is the outlet for warm air, and leaving it partly closed while you clean means missing the fin surfaces nearest it.
- Lift or unclip the front cover and set it aside somewhere it won’t get stepped on. Most covers separate cleanly from the wall-mounted back plate, which stays in place.
- Vacuum along the fins with the brush attachment, moving the brush in the same direction the fins run, top to bottom, never sideways. A tool dragged across the fins bends them, and bent fins are exactly the airflow restriction this whole process is meant to remove.
- Work the crevice tool into the channel at the bottom of the unit, where the intake slot sits. This is where dust, pet hair, and debris accumulate most heavily, since it’s the low point air gets pulled through, and it’s usually the last spot people think to clean.
- Straighten any fins that have been pushed flat, gently, before closing the unit back up. Doing it now, with the cover off and the fins fully visible, is easier than trying later.
- Wipe down the inside of the enclosure and the cover with a dry cloth, then refit the cover and confirm it clips or seats back into place before restoring power.
Nothing wet belongs anywhere inside an electric unit’s enclosure, not on the fins, not near the element, not in the bottom channel. A cloth can be used on the outer shell of the cover once it’s off the wall and away from the wiring, but the inside of the heater is a vacuum-and-dry-cloth job only, full stop. On a hydronic unit the same caution still applies around any exposed electrical controls, even though the emitter tube itself carries water rather than current.
Bent fins, and the smell on first use
Fins get pushed flat for ordinary reasons, mostly a vacuum head or crevice tool dragged the wrong way, or a rug or piece of furniture that’s been resting against the cover. A few flattened fins here and there are a normal thing to find and an easy thing to fix. Straightening them by hand, one at a time, working slowly with light pressure, usually brings most of the row back into a workable shape. There’s no need to get every fin perfectly even. The point is restoring space between them so air can move through, not achieving a factory finish.
Some sections are past that point, though. If a run of fins is torn, badly rusted, or mashed together so tightly that they’ve fused rather than just bent, forcing them apart risks snapping them off entirely, which does more harm than leaving them flat. At that stage the fin section itself may need replacing rather than reshaping, which is a job for whoever services the unit rather than something to push through with pliers.
The other thing people notice, almost always on the first cold day of the season, is a faint burning smell when an electric baseboard heater kicks on for the first time in months. That’s typically dust that settled on the element over the off-season burning off as the metal heats up again, and it normally clears within about an hour as the dust finishes burning and the room airs out. It’s unpleasant but expected, and it’s actually one more reason the fin cleaning described above is worth doing before the season starts rather than after the smell shows up.
A smell that doesn’t fade, or one that reads as hot plastic rather than dust, is a different situation. That points to something in the wiring or the element itself rather than surface dust, and it’s a reason to switch the unit off at the breaker and have it looked at rather than waiting it out.
Common questions
How often should a baseboard heater be cleaned?
Once a year, before the heating season starts, is enough for most homes. Households with pets or heavy carpeting nearby may find twice a year keeps the bottom channel clearer.
Can a baseboard heater be cleaned without removing the cover?
The crevice tool can reach some of the bottom slot with the cover on, but the fins themselves are only accessible once the cover is lifted or unclipped, and that’s where most of the insulating dust sits.
Is it safe to vacuum a baseboard heater while it’s plugged in but switched off at the thermostat?
No. A line-voltage thermostat isn’t a guaranteed disconnect. Power should be cut at the breaker for an electric unit before the cover comes off, confirmed dead before any tool goes near the fins.
Why does the heater still feel weak after cleaning?
A cleaned but still underperforming unit usually points to something beyond dust, fins bent badly enough to restrict airflow even after straightening, a damper stuck partly closed, or on a hydronic unit, an issue with water flow through the loop rather than anything at the fin surface.