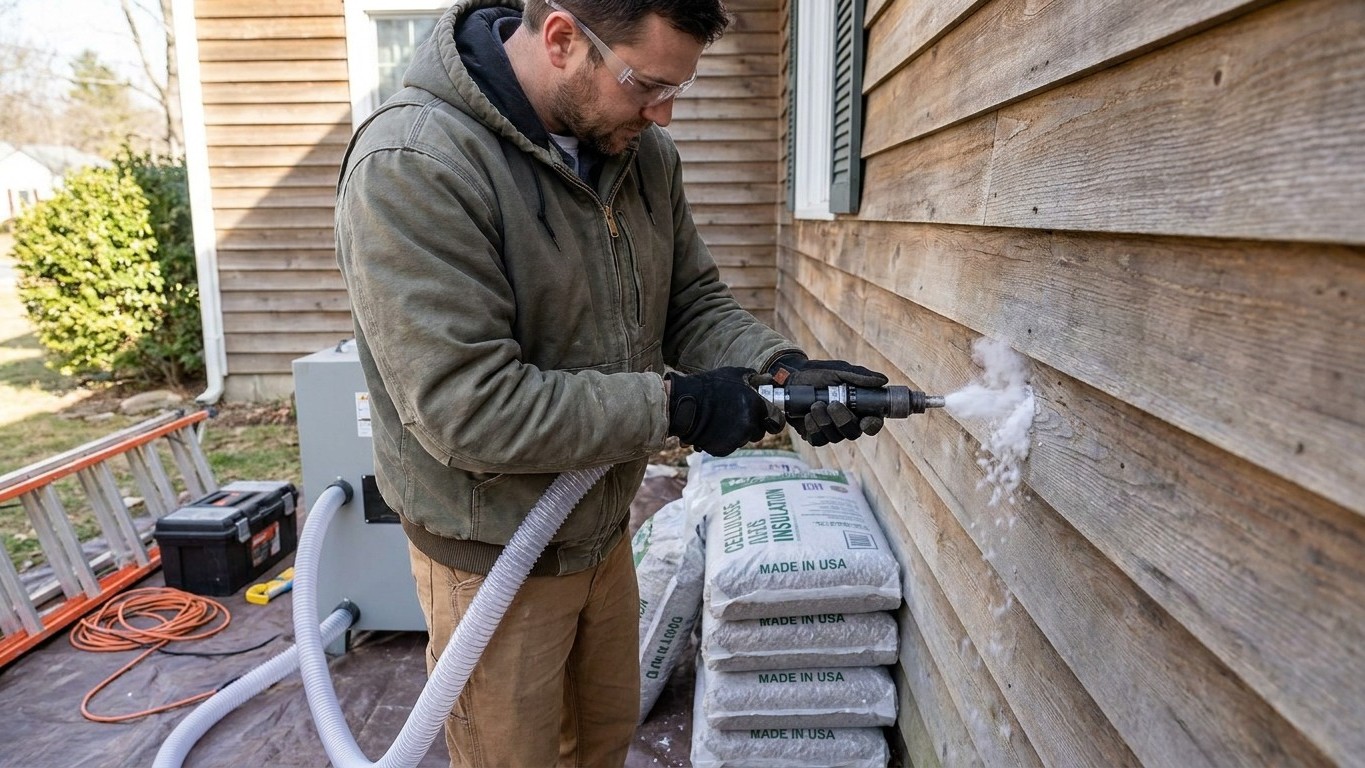

Yes, but only through small holes drilled into the wall from outside, then patched. This is a dense-pack job: a contractor locates each stud cavity, drills an access hole per bay, blows in loose Insulation under pressure, and plugs the hole. Drywall never comes off. It’s not the only path into an existing wall, though, and the other one only opens when the siding is already gone.
There are only two good moments

A finished wall is a closed box. Once the drywall is up and the siding is on, there’s no casual way to get material into that cavity. That leaves exactly two windows worth planning around, and they call for different tools, different labor, and different expectations.
The first window is right now, with the wall fully closed. A crew drills through the exterior siding or through the interior drywall, one hole per stud bay, and blows dense-pack insulation into whatever empty space is behind it. This is what most people mean by “insulate without removing drywall,” and it’s covered in detail below.
The second window only exists if the siding is coming off for its own reasons: it’s worn out, damaged, or being replaced as part of a larger renovation. U.S. ENERGY STAR’s guidance for walls applies specifically to that moment, whenever exterior siding is removed. It describes what to do with an open wall cavity and bare sheathing while everything is already exposed. That’s an important distinction, because this guidance is not a reason to strip functioning siding just to get at the insulation. It’s advice for people who are already re-siding, telling them not to waste the opportunity.
Confusing the two windows leads to bad decisions. Someone reads the ENERGY STAR wall numbers, assumes they need to tear off siding to hit them, and takes on a much bigger project than the wall actually requires. In most homes, if the siding is sound and not scheduled for replacement, drilling and filling from a few access points is the entire job. The full tear-off approach only makes sense when the exterior work is happening regardless of the insulation question.
There’s also a practical reason the two moments produce different results. Drilling and filling only adds insulation inside the cavity, between the studs. It can’t touch the studs themselves, which conduct heat straight through the wall no matter how well the cavity is packed. An open wall, by contrast, allows a layer of insulative sheathing across the entire wall surface, studs included. That difference matters more in some climates than others, and it’s the subject of the next two sections.
Drilling and filling
The mechanics sound simple and the execution isn’t. A technician starts by locating every stud along the wall, usually with a stud finder backed up by a small test hole, because framing spacing isn’t always the tidy 16 inches on center that plans assume. Older homes in particular can have irregular framing, added blocking, or fire-stops partway up the wall that split a single stud bay into two sealed pockets, each needing its own access hole.
Once the bays are mapped, holes go in, one per accessible section of cavity, usually from the exterior siding so the interior drywall and paint are untouched. A hose feeds dense-pack insulation, cellulose or Fiberglass, into the cavity under enough pressure to fill the space fully rather than just dump loosely from the top. That pressure matters. Loose-fill insulation poured or blown without enough density settles over the following years, leaving an inch or two of empty space at the top of each bay. That gap is invisible from outside and it quietly erodes the R-value the job was supposed to deliver.
What decides whether the job actually works
Success comes down to what’s already inside the wall. A completely empty cavity is the easy case: material goes in, fills the whole bay, done. A wall with old, sagging batt insulation is trickier, because the new material has to pack around whatever’s already there rather than displace it, and a lazy fill leaves voids behind the existing batt where no one can see them. A wall with substantial blocking or diagonal bracing partway through the bay effectively creates two smaller cavities that both need direct access, or the far side never gets filled at all.
None of this is a project to hand to a first-time DIYer with a rented blower. Reading a stud layout correctly, recognizing blocked cavities before drilling in the wrong spot, and packing material to the density that resists settling all come from doing the job repeatedly, not from a single afternoon with a manual. This is a job worth hiring out to someone who does dense-pack retrofits as their regular trade, and saying that plainly is more useful than pretending a weekend project will match professional results.
When the siding is coming off anyway
Once the exterior is stripped for replacement, the wall stops being a sealed mystery and becomes an open surface a crew can actually improve properly, not just fill. This is the scenario U.S. ENERGY STAR’s wall guidance describes, and it applies specifically whenever exterior siding is removed for its own reasons, not as a reason to remove it.
For an uninsulated wood-frame wall, the guidance is to drill holes in the sheathing and blow insulation into the empty cavity before the new siding goes on, effectively doing the drill-and-fill work from the easier, fully exposed side. On top of that cavity fill, the guidance adds a layer of insulative wall sheathing beneath the new siding, sized to the climate zone. For an already-insulated 2×4 wood-frame wall, the cavity is assumed to be handled, and the guidance calls only for that added sheathing layer.
| Wall condition | Zone | What ENERGY STAR recommends |
|---|---|---|
| Uninsulated wood-frame wall | Zone 3 | Drill sheathing and blow insulation into the empty cavity before new siding, plus R5 insulative wall sheathing beneath the new siding |
| Uninsulated wood-frame wall | Zones 4-8 | Drill sheathing and blow insulation into the empty cavity before new siding, plus R5 to R10 insulative wall sheathing beneath the new siding |
| Insulated 2×4 wood-frame wall | Zones 4-8 | Add R10 insulative wall sheathing beneath the new siding |
The zone labels above come from ENERGY STAR’s own climate zone map, and that map is the only reliable way to find out which zone applies to a given address. This page has no way to assign a zone to a state, a county, or a reader, and doing so would be a guess dressed up as a fact. Anyone planning this work should look up their zone before ordering material, since the sheathing thickness ordered depends directly on it.
Why sheathing does something cavity fill can’t
Cavity insulation, however well packed, only sits between the studs. The studs themselves run from the interior drywall straight through to the exterior sheathing, and wood conducts heat far better than insulation does. In a standard wall, those studs can account for a meaningful share of the wall’s total surface area, and every square inch of stud is a small thermal bridge that cavity fill never touches. A continuous layer of insulative sheathing across the whole exterior surface covers the studs along with the cavities, closing that bridge in a way that drilling and filling structurally cannot. That’s the real advantage of catching a wall while the siding is off: it’s the only point where the studs themselves get addressed.
The risk in an old wall
Filling a cavity that has sat empty for decades changes something beyond its R-value: it changes how the wall handles moisture. An empty stud bay lets a small amount of water vapor move and dry out on its own schedule. Pack that same cavity with insulation and the drying path narrows, sometimes enough to shift where moisture ends up when it gets in, whether from a leak, condensation, or vapor pushing through from a humid interior.
Older walls without a modern drainage plane behind the siding, and walls with a masonry exterior over wood framing, are the cases where this shows up most often. Those assemblies weren’t built with today’s vapor control layers in mind, and adding dense-pack insulation can trap moisture against the framing instead of letting it dry outward. There’s no single rule that separates the walls where this is a real concern from the walls where it isn’t. That depends on the specific wall assembly, the exterior cladding, the local climate, and the interior humidity load, and none of those can be answered in general terms here.
What that means in practice: this is a case for an assessment before drilling a single hole, not after. Someone qualified to evaluate the wall would look at what’s behind the exterior cladding, whether there’s an existing drainage gap or building paper, whether the framing shows any past water staining, and how the interior side of the wall is finished and vapor-retarded, if at all. Getting the vapor-retarder side wrong in an assembly like this doesn’t just waste material, it can trap water inside the wall cavity where nobody sees it until the drywall or the sheathing starts to fail.
One more caution belongs here, separate from moisture. Older walls, especially in homes built before the 1990s, can contain insulation or other materials that turn out to be vermiculite or to contain asbestos. That material should never be disturbed, drilled into, or blown around without it being identified first. If a wall’s history or age raises that question, that’s part of the same pre-work assessment, not something to find out mid-job.
Common questions
Can I drill and fill a wall myself with a rented insulation blower?
The equipment can be rented, but locating hidden blocking, avoiding wiring and plumbing, and packing material to a density that resists settling are skills built from doing this work repeatedly. It’s a job to hire out rather than attempt for the first time on a home you live in.
Does drilling and filling reach the same R-value as opening the wall?
It fills the cavity between the studs, but it can’t add sheathing across the studs themselves, which is where thermal bridging happens. An open wall, insulated while the siding is off, addresses both the cavity and the studs.
How do I find my climate zone before ordering sheathing?
ENERGY STAR publishes climate zones as a map, and that map is the only accurate source for a specific address. This page can give the R-value guidance by zone, but it can’t assign a zone without seeing where the wall actually is.
What’s the biggest risk in an older wall that’s never been insulated?
Moisture handling. A wall that’s never had insulation has been drying a certain way for decades, and filling the cavity can change that drying path enough to trap water against the framing, particularly behind masonry or on walls without a modern drainage plane. That’s worth an assessment before the work starts, not after.