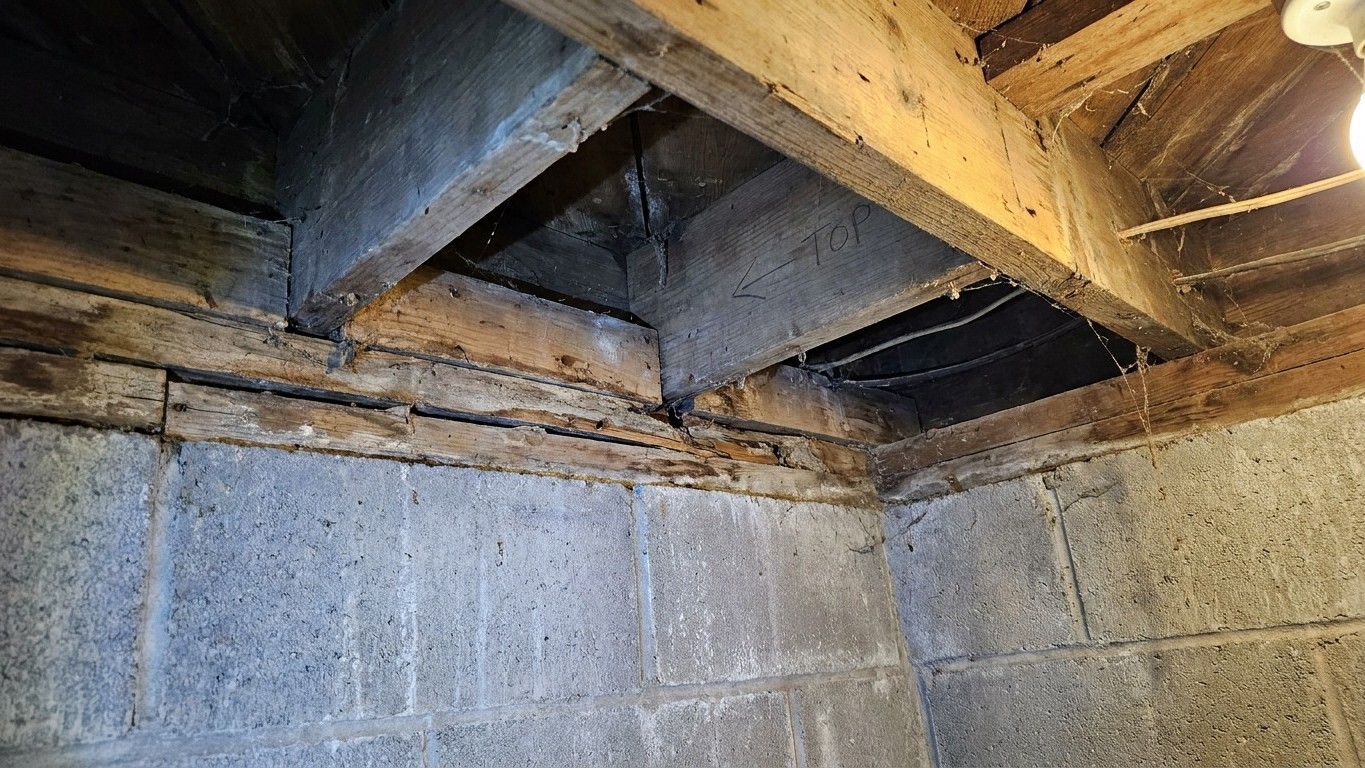

Rim joist insulation means sealing the joints around that band of framing at the top of your basement wall, then adding rigid or closed-cell foam insulation against the cold wood, in that order. Skip the sealing step and you trap moving air behind the insulation instead of stopping it. Skip the insulation and you’ve sealed a spot that was already losing heat through the material itself, not just through gaps.
The band of wood at the top of the basement wall

Stand in an unfinished basement and look up at the spot where the concrete or block foundation wall stops and the wood framing of the floor above begins. Running around that entire perimeter, between the ends of the floor joists, sits a band of lumber called the rim joist (sometimes the band joist). It’s usually just an inch and a half thick, sitting directly on the sill plate, which sits directly on the foundation. Three materials, three joints, all in a space most homeowners never look at twice.
That thinness is the whole problem. A poured concrete wall below it might be eight or ten inches thick. The rim joist above it is a fraction of that, made of solid or engineered wood with no mass to slow heat movement and, in most older homes, no insulation touching it at all. Warm air inside the house rises and collects near the top of the basement, right where this band sits, so it’s cold on one side and warm and often humid on the other, all day, every day of the heating season.
Add to that the sheer number of seams. Every few feet, the sill plate meets the foundation, the rim joist sits on the sill, and a floor joist butts into the rim joist end. Multiply that by the length of the house and you get dozens of joints where wood meets wood meets concrete, and every one of them is a potential path for air to leak in or out. A house doesn’t lose energy through walls in some generalized way; it loses energy through specific gaps, and this band of framing is unusually rich in them.
This isn’t a minor afterthought in the building science community. When the U.S. Environmental Protection Agency’s ENERGY STAR program describes the payoff of a whole-house air sealing and insulation project, it doesn’t just wave at “the basement.” It says so directly: “EPA estimates that homeowners can save an average of 15% on heating and cooling costs (or an average of 11% on total energy costs) by air sealing their homes and adding insulation in attics, floors over crawl spaces, and accessible basement rim joists.” That’s a modeled average for a typical existing U.S. home, not a guarantee for any single house, and it covers a bundle of work rather than the rim joist alone. But the fact that rim joists get named specifically, alongside attics and crawl space floors, tells you this small band of wood carries real weight in the overall energy picture of a house.
Seal, then insulate, here more than anywhere
ENERGY STAR treats air sealing and insulation as two steps of a single project, and its own guidance for other parts of the house, like the attic, puts sealing before Insulating every time. Nowhere does that order matter more than at the rim joist, because of how tight the quarters are and how many joints are packed into so little space.
The sequence looks like this:
- Clear the bay. Remove any old fiberglass batts, loose debris, or leftover insulation scraps so you can actually see the wood and the joints between the framing members.
- Seal the joints, working from the bottom up: where the sill plate meets the foundation, where the rim joist meets the sill plate, and where each floor joist end meets the rim joist. A bead of sealant or spray foam at each of these seams closes the paths air actually uses to move.
- Only after those joints are sealed, install the insulation against the rim joist itself, sealing its own edges tight to the framing so no gap is left between the insulation and the wood it’s supposed to be covering.
Reversing that order doesn’t just waste a step, it actively backfires. Once insulation is sitting in the bay, the joints behind it are no longer visible and no longer reachable without tearing the work back out. A homeowner who insulates first and plans to “seal later” is, in practice, choosing never to seal at all, because nobody goes back and pulls out insulation to chase a draft they can no longer even locate.
There’s a second reason the order matters here specifically: air movement and moisture movement are the same problem in a rim joist bay. Air doesn’t just carry heat loss, it carries water vapor. If that air is still finding its way past unsealed joints after the insulation goes in, it’s now moving through a covered, dark, hard-to-inspect cavity instead of an open one. That’s a worse outcome than doing nothing, not a neutral one. Sealing first means the insulation you add afterward is doing the job it’s designed for, slowing heat transfer through the wood, rather than trying to compensate for air leaks it was never meant to stop.
The trap: warm damp air on cold wood
Here’s where a well-intentioned rim joist project can go wrong in a way that isn’t obvious until months later. The rim joist sits at the boundary between conditioned indoor air, which carries humidity from cooking, showers, laundry, and simple breathing, and the cold outdoor-facing wood of the band joist itself. If the insulation placed against that wood is air-permeable, meaning it lets air pass through it rather than blocking it, warm humid indoor air can still migrate through the insulation and reach the cold wood surface behind it.
When that happens, the air cools as it nears the cold framing, and the moisture it’s carrying condenses right there, on the back side of the insulation, against the wood, out of sight. Nobody notices until the wood starts to darken, soften, or smell musty, and by then the rot has usually been developing for a while.
This is exactly why a fiberglass batt pushed into a rim joist bay is considered the classic mistake in this part of the house. Batt insulation is air-permeable by design; it slows heat transfer through the material but does nothing to stop air from moving through and around it, especially if it’s just wedged into place without sealing its edges. It looks like insulation. It photographs like a finished job. But it doesn’t block the air that’s actually causing the condensation problem.
Rigid foam board or closed-cell spray foam, sealed tight at every edge against the framing, avoids this failure because it does two jobs at once: it slows heat transfer and it stops air (and the moisture riding along with it) from reaching the cold wood surface at all. The seal at the perimeter of the board or the foam bead itself matters as much as the material choice. A rigid board that’s Insulating the middle of the bay but leaving gaps around its edges still lets air sneak around it to the cold wood, recreating the same condensation risk with a different-looking material.
One note on how far to take this: there’s no single R-value target that applies universally to rim joists the way there is for attic insulation, because the right approach depends on the wood, the climate exposure of that specific wall section, and the assembly around it. What matters more than hitting a number is getting the sequence right (seal, then use a material that keeps air off the cold wood) rather than reaching for the thickest batt available and calling it done.
Before you close it up
Once the sealing and insulating are done, resist the urge to consider the bay finished. A short set of checks before anything gets closed up or covered can save a much bigger repair later.
- Look closely at the wood for existing water staining, darkening, or soft spots before you insulate over it. Insulation hides problems as well as it hides good work, and covering rot doesn’t stop it, it just delays when you find out about it.
- Keep the insulation and any sealant clear of flues or vents that pass through or near the rim joist area. A combustion appliance, like a furnace or water heater, that vents through or near a space being air sealed needs its venting and combustion air supply evaluated before that space gets tightened up, since sealing changes how air moves through the whole basement.
- Don’t bury a termite inspection strip along the sill plate if your local building practice requires that strip to stay visible. In areas where termite inspectors expect to see a clear band of the sill plate, covering it with insulation can create a compliance problem and, more practically, hides the one spot inspectors rely on to catch an infestation early.
- Photograph each bay before you close it up. This sounds like a small step, but it’s genuinely useful: a photo of the sealed joints and the insulation placement gives you (or the next homeowner) a record of what was done and where, without having to tear anything open to check. If a problem turns up years later, that photo tells you whether the rim joist was ever addressed at all.
Common questions
Do I need to insulate the whole rim joist or just parts of it?
The guidance from ENERGY STAR covers accessible basement rim joists as a category, meaning the parts You Can Actually Reach and see. If sections are blocked by finished walls, mechanical equipment, or structural obstructions, address what’s accessible now and note the rest for later rather than leaving the whole project half-finished.
Can I just add a thicker batt if I’m worried about heat loss?
Adding more air-permeable batt material doesn’t address the underlying issue, since batts don’t stop air movement on their own. Thickness matters less here than whether the material and its edge seal actually block air from reaching the cold wood behind it.
Is rim joist work worth doing on its own, or only as part of a bigger project?
ENERGY STAR’s savings estimate is modeled for combined work across attics, floors over crawl spaces, and accessible rim joists together, not for any single area in isolation. Rim joist sealing and insulating is still worth doing on its own, but treat the published percentages as a whole-house figure, not a per-area promise.
What if I find water damage or rot when I clear out the old insulation?
Stop and address the moisture source and any damaged wood before insulating over it. Covering a wet or rotting rim joist with new insulation doesn’t fix the underlying problem, it just makes it harder to see and slower to catch.