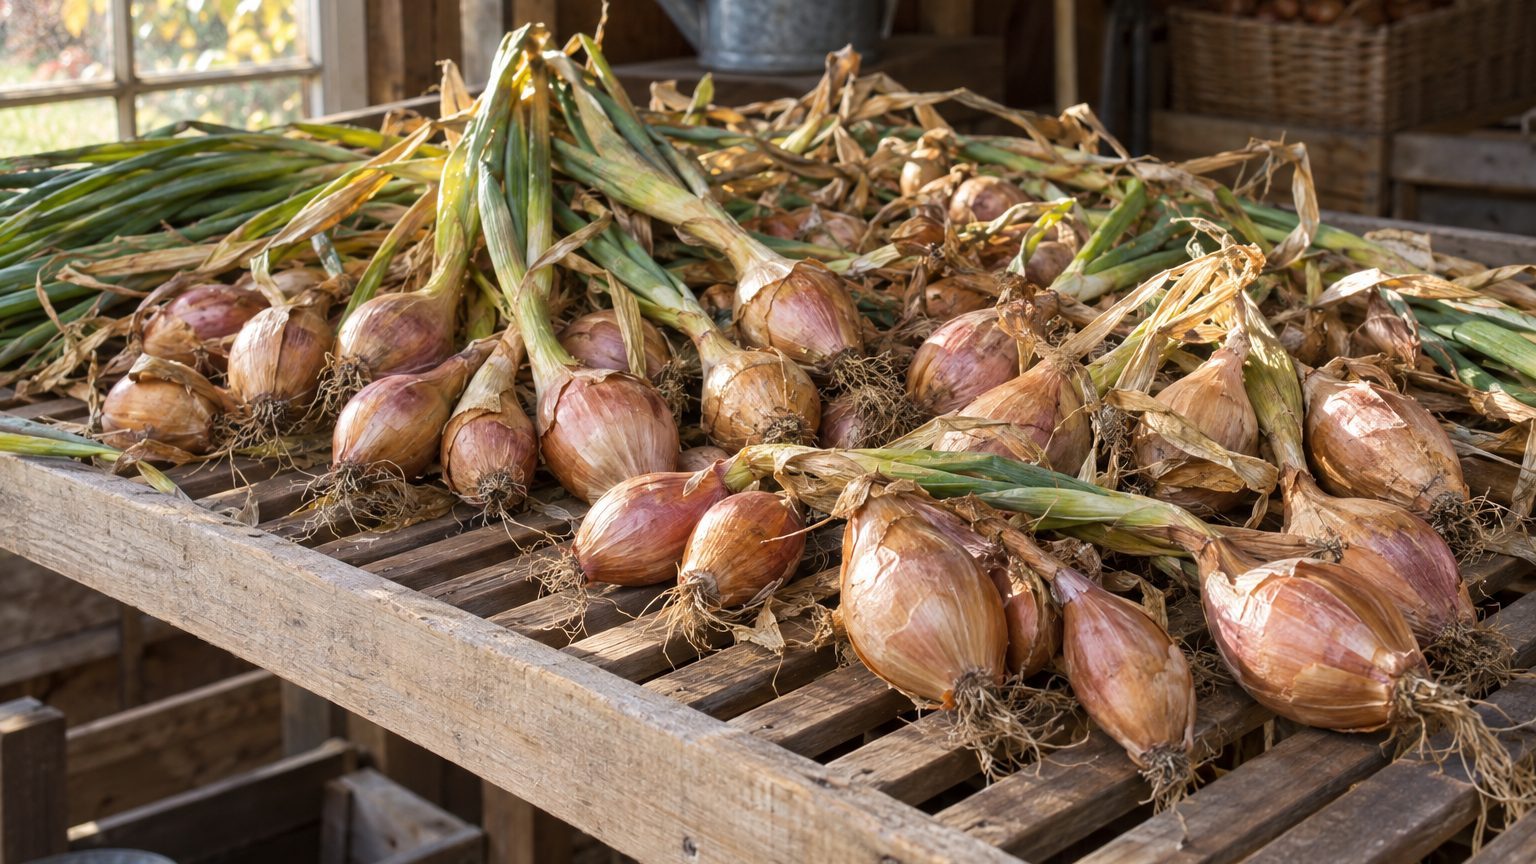

Curing shallots takes two to four weeks in a warm, dry, shaded, breezy spot, until the necks are shriveled and tight and the outer skins turn papery. Skip that step and a bulb that should last the winter may start rotting in a month. Do it right and the same bulb can sit in a cool pantry well into the following spring.
The logic is simple. A freshly pulled shallot is roughly 80 percent water, with a neck full of moisture and soft, damp tissue open to rot organisms. Curing dries the neck into a seal and turns the outer layers into a dry wrapper. Think of it as closing the bulb up for the winter.
Harvest Signals That Set Up a Good Cure
Curing starts before you lift a single bulb. Shallots tell you when they’re ready: the green tops yellow, flop over, and begin to brown from the tips down. When about half to two thirds of the tops have fallen, the plant has finished moving energy into the bulb. Pulling earlier gives you bulbs with thick, wet necks that never seal properly.
Timing depends on when you planted. Bulbs set out in fall typically finish in early to midsummer, while spring plantings tend to finish in mid to late summer, a few weeks later in cooler northern states like Maine or Minnesota. If you’re working from the fall schedule, the details are in Planting Shallots in Autumn. For the broader picture of how a single set becomes a cluster, see Growing Shallots: One Bulb In, a Handful Out.
Stop watering about two weeks before you expect to harvest. Dry soil nudges the plant toward maturity and keeps the outer skins from staying clammy. Then pick a dry day, ideally after a couple of rainless ones, and loosen the soil with a garden fork a few inches out from the clump. Lift the whole cluster. Pulling by the tops can snap the neck, and a broken neck is an open door for rot.
Handle them like eggs, or at least like ripe peaches. Bruises and nicks from a careless shovel or a toss into a bucket won’t show up for a few weeks, and then they’ll turn into the soft spots you find in February.
How to Cure Shallots, Step by Step
Leave the soil on. Resist the urge to rinse the bulbs. Washing wets the skins and the neck, and the whole point is to dry them. Shake off loose dirt, or let it dry and brush it off later.
Next, spread the clusters out in a single layer. A wire rack, an old window screen propped on sawhorses, a slatted crate, or even a clean section of hardware cloth all work, because air needs to reach the bottom of the bulbs as well as the top. Piling them in a bucket or on a solid shelf traps moisture underneath and defeats the exercise.
The location matters more than the container. You want:
- Shade or indirect light, so the bulbs don’t sunscald
- Temperatures roughly between 70 and 80°F (a bit warmer is fine, but sustained heat near 90°F or above can damage bulbs)
- Steady airflow, from an open-sided shed, a covered porch, a barn aisle, or a garage with the door cracked and a fan running
- Protection from rain and heavy dew
Direct sun is the common mistake. A few hours of full afternoon sun in July can cook the exposed side of a bulb, leaving a soft, translucent patch that turns slimy later. Gardeners in the Southwest and the Southeast, where midsummer air temperatures climb fast, should lean hard toward shade. In humid places like the Gulf Coast or the Mid-Atlantic, a box fan on low across the rack can shave days off the cure.
Leave the tops on while they cure. As the foliage dries, it pulls remaining moisture out of the neck and into the air. Most clusters take two to three weeks, and humid summers can push that to four. You’ll know the process is done by feel and sound more than by the calendar.
How to Tell the Cure Is Finished
Check the neck first, the narrow stretch just above the bulb where the leaves emerge. It should be dry, thin, and tight, with no give when you pinch it. If you can press it and feel any dampness or squishiness, the bulb needs more time.
The outer skins should feel crisp, almost like parchment, and rustle when you handle them. The roots should be wiry and dry. And the whole bulb should feel hard and firm, with no soft shoulders. When in doubt, give it another week. Over-curing a shallot in a dry, shaded spot rarely hurts anything, while under-curing is the usual cause of storage losses.
Trimming, Sorting, and Setting Aside the Early Eaters
Once the necks are dry, trim the tops to about an inch above the bulb and snip the roots to about a quarter inch. Some gardeners prefer to leave the tops long and braid them or tie them into small bundles, which works well with shallots because the clusters hold together nicely. If you braid, do it while the leaves still have a little flexibility, usually in the first week or so of the cure. Hang the braid somewhere airy rather than stacking it in a closet.
Sorting is where you get the real return on all the careful work. Go through each cluster and separate the bulbs into keepers and eat-firsts. Eat-firsts include:
- Any bulb with a thick, stubborn neck that never fully dried (growers call these “bull necks,” and they rot first)
- Bulbs with cuts, bruises, or soft spots
- Very small bulbs, which dry out faster and are fiddly to peel anyway
- Any with green shoots already emerging at the top
Put those in a bowl on the counter and use them within a few weeks. The rest become your winter supply. A single bad bulb in a mesh bag can spread rot to its neighbors, so a few extra minutes of sorting protects the whole batch.
Don’t peel the keepers. The papery skins are the storage packaging, and each layer you remove shortens the bulb’s life. Where to put them next, and at what temperature and humidity, is covered in Storing Shallots Through the Winter. In short, think of a cool, dry, dark spot with some air movement, and mesh bags or open baskets rather than plastic.
When the Weather Won’t Cooperate
Gardeners seldom get a perfect July. A stretch of wet weather as the tops are dying back is probably the most common curing problem in the eastern half of the country, and it’s also where a plan B pays off.
If rain is in the forecast and the shallots are still in the ground, you have two options. If the tops have mostly fallen, lift the bulbs anyway and bring them under cover, because bulbs sitting in saturated soil can start growing new roots or picking up rot. If the tops are still green, wait. Pulling them early to dodge a shower swaps a short-term worry for a long-term one.
Cure indoors if you must. A spare room, a basement with a dehumidifier, or a garage with a fan can all handle a rainy stretch. The goal is the same: dry air moving across single-layer bulbs. A room that feels muggy to you is muggy to the shallots. Many gardeners in humid states, from Georgia to Pennsylvania, run a dehumidifier or fan as a matter of routine in wet years.
Heat creates the opposite problem. During a heat wave, uncovered bulbs left on a driveway or a dark deck can get hot enough to cook. Shade cloth, a tarp propped up for airflow, or simply moving the rack to the north side of a building will fix it. A black plastic tub on concrete is the worst place for them.
A few other slips show up again and again. Using a sealed plastic bin for curing traps moisture. Cutting the tops off immediately, while still green, leaves a wet wound at the neck. Stacking bulbs deeper than a single layer creates damp pockets. And scrubbing bulbs clean “so they look nice” removes the very skins that protect them. None of these is catastrophic in a small batch, but together they explain most of the shallots that go soft by midwinter.
One last nuance worth knowing: not every variety keeps equally long. Many shallots stay in good condition for several months once properly cured, and some storage-oriented types hold on much longer, while softer, early-maturing types tend to fade sooner no matter how well you cure them. If you grow a mix, label the bags and cook the quick-fading ones first.