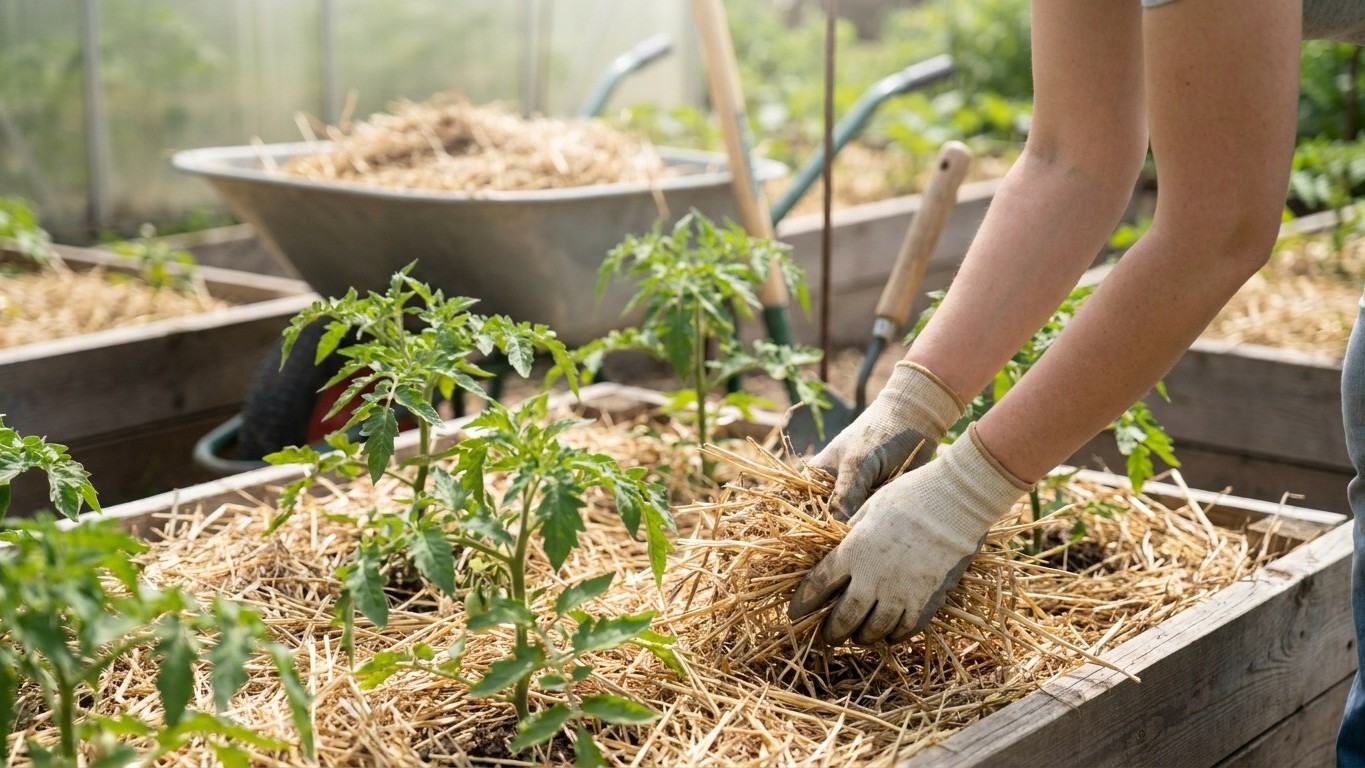

Mulch on tomatoes does two jobs at once: it keeps soil moisture even and stops rain or irrigation water from splashing soil-borne fungal spores onto the lower leaves. A layer of 2 to 4 inches of organic material, laid once the plant has rooted in and is putting on new growth, does both. Wait for that new growth before you spread it, and keep the material an inch or two clear of the stem.
Why this matters
Unmulched soil dries out on the surface within a day or two of watering, then swings wet again after the next irrigation or rain. That swing is one of the main drivers of blossom end rot and fruit cracking, because the plant can’t draw water at a steady rate when the top few inches of soil keep changing moisture level. A mulch layer flattens that swing out. It also shades the soil surface, which cuts down on the weed seedlings that would otherwise compete with the tomato roots for water and nitrogen.
The second job matters just as much and gets ignored more often. Early blight and septoria leaf spot both overwinter in soil and splash up onto the lowest leaves the first time it rains or you water from above. Once those spores are established on lower foliage, they climb the plant over the season. A mulch layer between the soil and the leaves is one of the simplest ways to slow that climb, and it costs nothing beyond the material itself. Combine it with steady feeding and the plant handles both stresses far better than it would with either one alone.
When to do it
Timing here is about the plant’s own state, not a date on a calendar, which will differ depending on where you garden anyway. The moment to watch for is new leaf growth after transplant, the small sign that the root system has taken hold and is actively growing rather than just surviving the shock of being moved. Mulching before that point, straight after transplanting, is a common instinct that backfires: organic mulch insulates the soil at whatever temperature it already is, and if that soil is still cool, the mulch keeps it cool for weeks longer than it would take to warm up bare.
Once you see that first flush of new growth, you’re clear to mulch any time before or around first flowers. Some gardeners wait even a little longer, until the first fruit has set, particularly in a wetter spring when the soil needs more time in open sun to warm and dry. There’s no real penalty for mulching a bit later than ideal. There is a penalty for mulching too early on cold, wet ground, since it invites the same fungal problems mulch is meant to prevent. If you’ve already handled the earlier steps in the tomato growing process and the plants are established with a few sets of true leaves past the seedling stage, you’re at the right point to move on to this task.
How to do it

Start with a clean, moist bed. Pull any weeds that have already come up, since mulch suppresses new weed seed but won’t smother anything already growing through it. Water deeply first if the soil has dried at all. You want to lock in moisture that’s already there, not lock in dryness.
Laying the mulch
Spread your chosen material to a depth of about 2 to 4 inches, roughly the thickness of a folded bath towel. Straw and shredded leaves both compress down over the season, so err toward the thicker end when you first apply it. Use a garden rake or a pitchfork to fluff and spread bales of straw, since compressed straw tends to mat down in clumps rather than settling into an even layer.
Keep the mulch pulled back an inch or two from the main stem in a small ring, so the base of the plant stays dry and exposed to air. Piling mulch right up against the stem holds moisture against it constantly, which is an open invitation to collar rot and gives slugs and pillbugs a shaded spot to hide right where they can do the most damage.
Extend the mulched area out to at least the plant’s drip line, the point where the outer leaves end, since that’s roughly where the active feeder roots are working. A few materials to choose among:
- Straw: light, easy to spread, breaks down over the season and feeds the soil as it goes.
- Shredded leaves: often free, similar effect to straw, slightly slower to break down.
- Dried grass clippings: fine in a thin layer, but pile them too thick fresh and they mat into a slimy, airless layer.
- Wood chips: long-lasting, better suited to paths and perennial beds than annual vegetable rows.
- Black or red plastic sheeting: warms soil rather than cooling it, useful in a cooler climate or early in the season.
Top the layer up once or twice through the season as organic mulch compresses and breaks down. By late summer a straw or leaf mulch laid in spring is often half its original depth, and a light refresh keeps the weed and moisture benefits going through to harvest.
What goes wrong

The error that looks like extra care but isn’t is piling mulch high and tight against the stem, sometimes called volcano mulching when people do it around trees. On tomatoes it traps humidity right at the point where collar rot and stem cankers get started, and it gives ground-dwelling pests a sheltered highway straight up to the fruit. The fix is simple: keep that inch or two of bare soil around the base no matter how thick the mulch is everywhere else.
Fresh, uncomposted wood chips or sawdust are another common trap. As they break down, the microbes doing the decomposing pull nitrogen out of the surrounding soil to fuel themselves, a process called nitrogen tie-up. Tomatoes mulched directly with fresh chips can show the pale, slow-growing look of nitrogen deficiency even when you’re following a normal feeding schedule, because the mulch is competing with the plant for the nutrient. Well-aged chips or a layer of chips over composted material avoids the problem.
The other two failures are timing and depth in opposite directions. Mulching too early, before the soil has had a chance to warm under open sun, keeps root growth sluggish for weeks. Mulching too thin, under an inch, does almost nothing: weed seed still gets enough light to germinate, and the soil surface still dries out between waterings almost as fast as if there were no mulch at all.
Doing it differently
Container-grown tomatoes still benefit from a mulch layer, though pots dry out faster than open ground, so even a mulched container needs more frequent watering checks than a mulched bed. A shallower layer, closer to an inch, is usually enough given the smaller soil volume, and it keeps the mix from staying too wet for the container’s drainage rate. In a greenhouse or high tunnel, where there’s no rain to trigger soil-splash disease, the calculation shifts toward soil temperature and weed control rather than disease prevention, which is where plastic mulch earns its keep, particularly in a cooler climate that benefits from the extra soil warmth it holds.
Some gardeners skip material mulch altogether in favor of a living mulch, low, spreading companion plants sown thickly enough to shade the soil themselves. This works, but it trades one set of tradeoffs for another: those companion plants are now competing for the same water and nutrients as the tomato, so spacing and choice matter more than with an inert material. The companion planting guide covers which pairings genuinely help and which are more folklore than function. If you’re growing an heirloom variety specifically to save seed for next year, mulch choice doesn’t change the seed-saving process itself, covered separately in the guide to saving tomato seeds, though keeping fruit off bare, splashy soil does mean cleaner fruit to work from at harvest.
| Material | Weed Suppression | Soil Temperature Effect | Feeds the Soil | Best For |
|---|---|---|---|---|
| Straw | Good | Cools | Yes, as it breaks down | Open garden beds |
| Shredded leaves | Good | Cools | Yes, slowly | Free material, soil building |
| Dried grass clippings | Moderate | Cools | Yes, quickly | Thin layers, topped up often |
| Wood chips | Good | Cools strongly | Slowly, can tie up nitrogen at first | Paths, perennial beds |
| Black plastic | Excellent | Warms | No | Cool climates, early season |
| Landscape fabric | Excellent | Moderate | No | Reusable across seasons |
Common questions
Can I use grass clippings from my lawn as tomato mulch?
Only if that lawn hasn’t been treated with a broadleaf herbicide. Those products are designed to kill broadleaf plants, tomatoes included, and residue can persist in clippings long enough to damage or kill the plants you mulch with them. If you’re not certain the lawn is chemical-free, use straw or shredded leaves instead.
Do I need to remove old mulch before adding new mulch each season?
It’s worth clearing out mulch that sat under diseased plants the previous season rather than leaving it in place. Fungal spores from blight or leaf spot can survive in old plant debris and mulch over winter, so pulling it out and starting with a fresh layer each season reduces how much disease carries over into the new crop.
Is plastic mulch okay if I’m gardening organically?
Standard polyethylene sheet mulch isn’t compostable and isn’t accepted under most organic certification standards, though biodegradable mulch films exist and some carry OMRI listing. If certified organic status matters to you, check current USDA organic program standards or ask your state extension office, since acceptable materials do change.
Does mulch cause blossom end rot if I put it down too soon?
Mulch itself doesn’t cause blossom end rot, uneven watering does, and mulch generally helps prevent it by keeping soil moisture more consistent. The risk is laying mulch over soil that’s already dry, which traps that dryness in place rather than fixing it. Water the bed thoroughly first, then mulch.