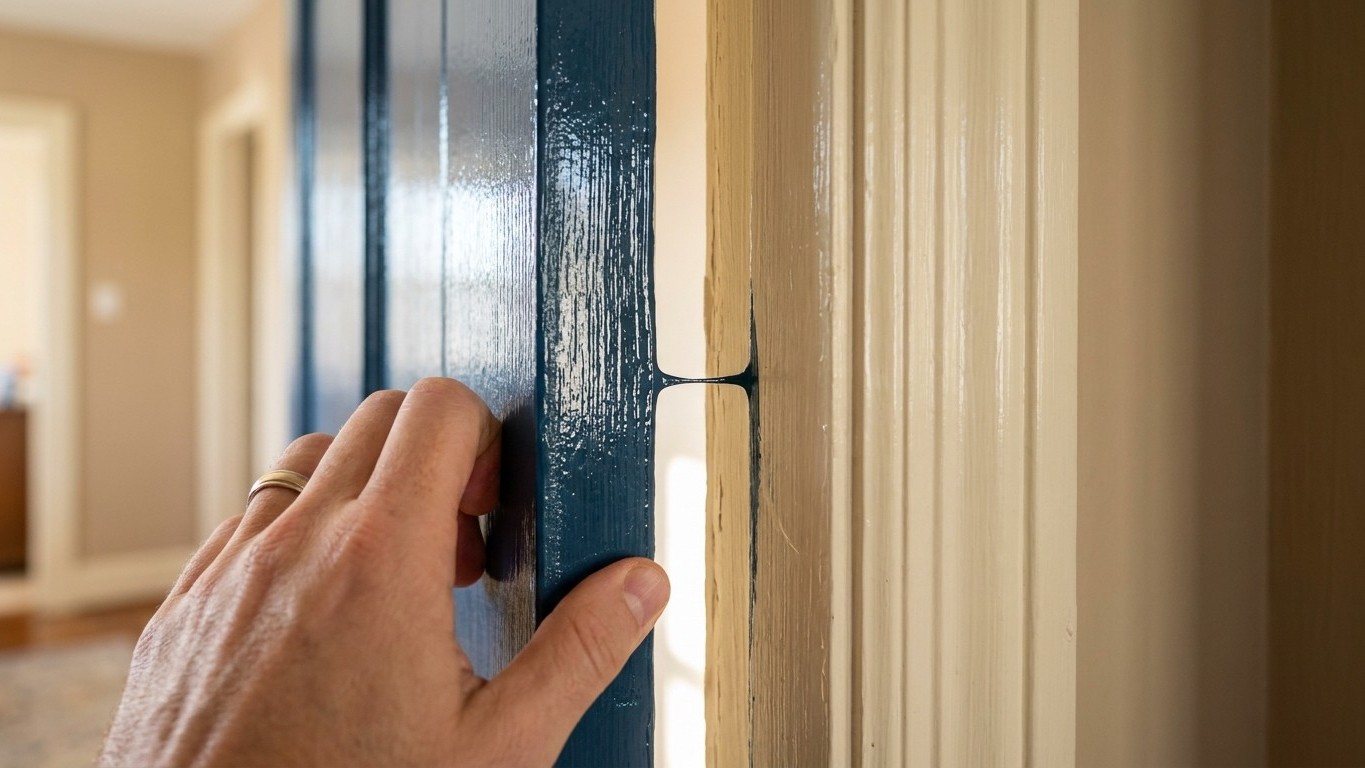

A door that seals itself shut a few weeks after painting hasn’t been painted wrong. It’s been closed too soon. The paint film needs time to harden all the way through, not just on the surface, and shutting a freshly painted door against a freshly painted frame before that happens gives the two coats a chance to fuse. The fix isn’t a better paint. It’s patience, and knowing what to do if you skipped it.
What is actually going on

Paint dries in two stages that look identical from across the room but behave very differently. The surface can feel dry to a light touch within a day, sometimes less. That’s just the solvent or water carrier evaporating off the top layer. Underneath, the resin is still cross-linking and hardening, a process that can run for days or weeks depending on the product, the room temperature, and the humidity. Paint manufacturers put a cure time on the can for exactly this reason, and it’s the only number that applies to your door, not a general rule pulled from a different job in a different season.
The technical term for what happens when you close a door too early is blocking. Two painted surfaces, both still soft underneath that dry-feeling top skin, are pressed together under the weight of the door and the pull of gravity on the latch. The resin from one surface migrates into the resin of the other. When you try to open the door again, you’re not overcoming friction, you’re breaking a bond that has partially formed between two films of the same material. That’s why a stuck door often tears when it finally gives, rather than sliding free.
Heat speeds this along in a way people don’t expect. A door that sits in direct sun for part of the afternoon, or a frame near a heat register, gets warm enough to soften the paint film again even after it seemed fully cured. Close that door while it’s warm and you can get blocking weeks after the original paint job, on a surface that would have been fine at room temperature. Humidity works the other way, slowing the cure and stretching out the window during which the door is vulnerable.
Doors and window sashes are worse candidates for this than almost any other painted surface in a house, because they’re the one place where two coated surfaces are designed to meet and press against each other under load. A painted wall never touches another painted wall. A door does, every time it closes, and a swelled-shut window does it continuously along the whole length of the sash.
None of this work should happen with the room sealed up. Curing paint keeps releasing vapor into the air well after it feels dry, and mechanical prep work, sanding old paint back, scraping a stuck seam, throws fine particles into the air you’re standing in. Open a window, run a fan pulling air out rather than just stirring it, and keep that airflow going for as long as anyone is in the room working, not just while the paint is wet.
Doing it
The sequence that prevents a stuck door is not complicated, but each step is doing a specific job, and skipping it changes the outcome in a predictable way.
| Step | What it does | What happens if you skip it |
|---|---|---|
| Prop the door open at an angle after painting, not flush against the frame | Lets air reach both painted faces evenly while the film cures | The edge nearest the frame cures slower and stays soft longer than the rest of the door |
| Insert small spacers (a folded cardboard shim works) between the door and the frame if you must leave it unattended | Keeps any accidental contact from becoming full pressure contact | A draft or someone brushing past can swing the door shut against soft paint |
| Check the can for the recommended cure time before closing the door normally | Confirms the film has hardened enough to resist pressure, not just to the touch | You’re guessing, and the guess is usually too optimistic |
| Test with light pressure before closing all the way the first few times | Catches any remaining tackiness before it becomes a bond | The first full close becomes the first blocking event |
If a door is already stuck, resist the urge to pull hard on the handle. That’s how paint tears rather than releases. Instead, work a thin, stiff blade, a putty knife or a flat scraper, along the full seam where the door meets the frame, on both the face and the edge if you can reach it, moving in short strokes rather than trying to lever the whole thing open in one spot. The goal is to cut the bonded paint film cleanly along the gap rather than rip it. Once the seam is free along its whole length, the door should swing without additional force. If it doesn’t, something beyond paint (swelling, hinge sag) is also at play, and forcing it further just adds new damage on top of the original problem.
Some finishes make this worse than others. High-gloss enamels, which are formulated for hardness and durability once fully cured, tend to stay softer for longer during the cure window than flatter finishes on the same schedule. Oil-based enamels historically had the longest cure times of any commonly used door and trim paint, which is part of why doors painted with them were traditionally left open for an extended stretch before anyone touched the latch. Whatever product is in your hand, the can’s instructions override any of this as a general pattern.
What it looks like when it goes wrong
Blocking leaves marks that are easy to misdiagnose as a bad paint job when they’re actually a timing problem, and the two require different fixes.
Torn or peeled patches at the closing edge, where you can see one layer of paint has lifted away and stuck to the opposite surface instead of staying on the door, cannot be fixed by touching them up. The torn area has to be scraped back to a sound edge, feathered smooth, and repainted as a repair patch, because paint won’t bond reliably to a ragged torn edge no matter how carefully you brush over it.
A shiny, slightly compressed strip along the edge where the door met the frame, without any actual tearing, is a lighter version of the same problem and is usually correctable. A light hand-sanding to knock down the gloss and even out the texture, followed by a thin recoat of that section, generally blends back in. The difference between this and the torn version is whether the film separated (unrecoverable without stripping the patch back) or just got compressed and glazed (recoverable with light abrasion).
Ridges or a slightly raised line along the closing edge, thick enough that you can feel it with a fingertip, usually mean paint built up unevenly near the edge during the original job, and blocking then locked that ridge in place against the frame. This has to be sanded down to a flat profile before the door will close cleanly again, because no amount of additional cure time makes a physical ridge thinner.
A door that swings freely again after you free it but now catches only at the very top or bottom corner, rather than along the whole edge, is telling you the problem has moved past paint. That pattern usually points to a hinge that’s loosened or a frame that’s shifted, and painting or sanding the edge further won’t resolve it. Worth checking hardware and frame alignment before assuming more paint work will help.
Drips or sags that ran down near the closing edge and were trapped against the frame when the door was shut too soon often show up later as a slightly tacky or cloudy patch even after everything else has hardened. Because that trapped moisture and uncured resin sits differently than the surrounding paint, it usually needs to be sanded back and recoated rather than left to finish curing on its own.
What to settle before you open the tin
A few checks before you start painting prevent most of the sticking problems described above, and they take a few minutes each.
Look at the building’s age first. If the door, frame, or window predates 1978, there’s a real chance the existing paint layers contain lead, and any sanding, scraping, or mechanical prep you do to get a smooth surface can put lead dust into the air. That’s a different set of precautions than anything covered here, so read through the lead paint safety page on this site before disturbing any old finish on an older door or window.
Check the existing surface with your hand, not just your eyes. A chalky residue that rubs off on your fingers means the old paint has broken down and needs a thorough cleaning and possibly a bonding primer before new paint goes on top, or you’ll get poor adhesion regardless of cure time. A slick, glossy old finish needs to be scuffed with sandpaper so the new coat has something to grip.
Set up raking light, a lamp or work light held at a low angle across the surface, before you start and again before the final coat. This catches ridges, drips, and uneven buildup that flat overhead light hides completely, and it’s much easier to fix those problems while the paint is still workable than after it’s cured and locked them in place.
Confirm you have real ventilation, not just an open door to the same closed hallway. A window that actually moves air through the room, or a fan pulling air outward, needs to be running before you start prep work and needs to keep running through the whole cure period, not just while you’re actively brushing paint.
Think about the weather forecast for the next several days, not just the day you’re painting. High humidity or a cold snap right after painting stretches out the cure window well beyond what you’d expect in dry, mild conditions, and that’s exactly the stretch when the door needs to stay propped open rather than closed on a normal schedule.
Finally, decide whether to remove the hardware, hinges, handle, strike plate, before painting, rather than painting around them. Pulling hinges takes a few extra minutes but means you’re never trying to keep wet paint off moving metal parts, and it removes one more surface where paint could bridge two pieces that are supposed to move independently.