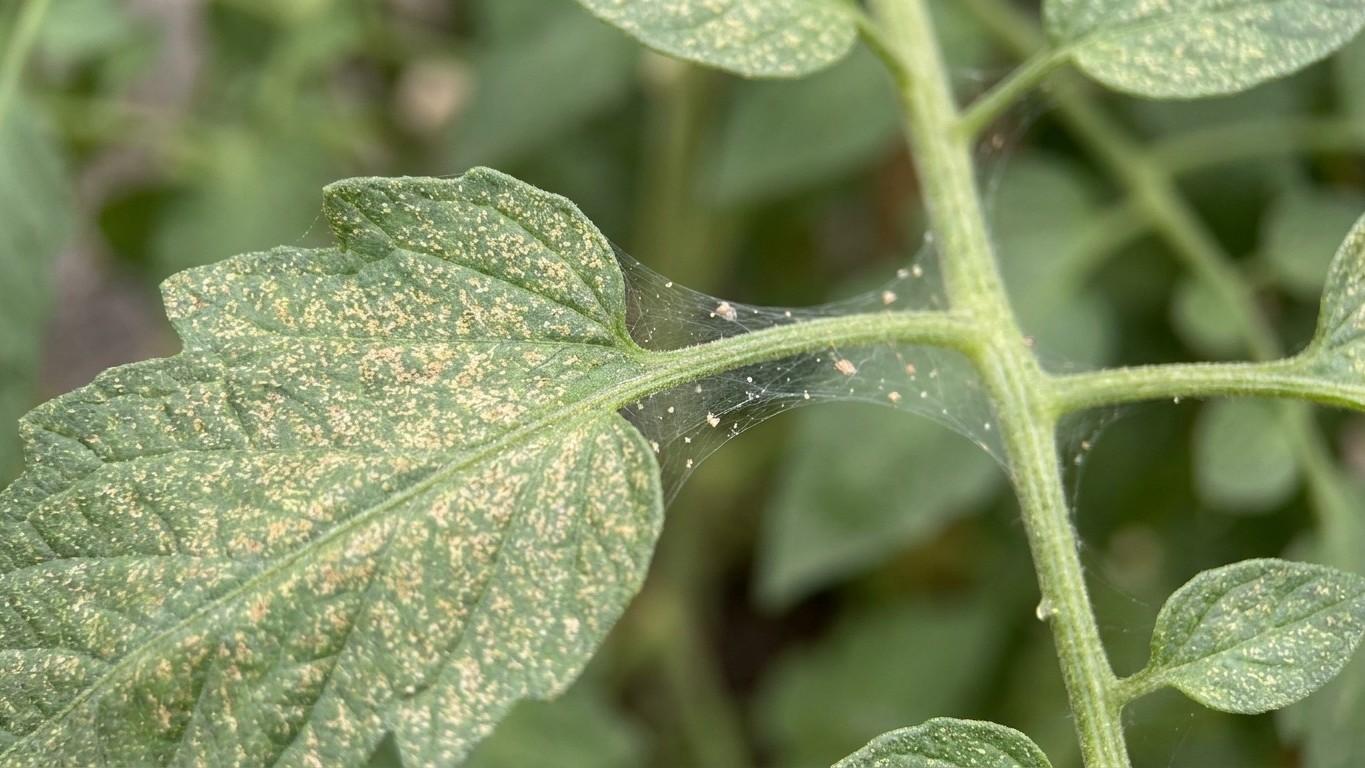

Fine speckling across the top of tomato leaves, a faint bronze or dusty cast when you step back, and tiny threads of webbing tucked into the spot where leaf meets stem: that combination points to spider mites. On an established, well-watered plant, this is mostly cosmetic and rarely kills the crop. On a young seedling or a plant already stressed by drought and heat, it can strip leaves fast enough to matter.
What the damage looks like

Spider mites are not insects. They are arachnids, closer kin to ticks than to beetles or aphids, and that distinction explains a lot about how they feed and why the damage looks the way it does. Each mite pierces a single leaf cell with its mouthparts and sucks out the contents, leaving behind a tiny bleached or yellow-white dot. Multiply that by hundreds of feeding punctures per leaf and you get the classic stippled look: a fine, even speckling that from a few feet away reads as a dusty gray-green or bronze tint rather than individual spots.
The detail that separates spider mites from almost everything else on a tomato plant is the webbing. Look closely at the junction where a leaf stem meets the main stalk, or the underside of a leaf where the veins branch. In a heavy infestation you’ll find fine, dry-looking silk strands, sometimes with tiny dots caught in them that move if you touch the web. That silk is not decorative. Mites spin it for protection and to move between leaves, and its presence at leaf joints is the single most reliable visual clue that you’re dealing with mites rather than another pest.
Adult two-spotted spider mites, the species most common on garden tomatoes, measure about 1/50 of an inch, roughly the size of a period on a printed page. At that size they’re essentially invisible to the naked eye except as slowly moving specks. A hand lens or a smartphone camera zoomed in on the leaf underside will usually show pale or greenish bodies, sometimes with two darker spots on the back, clustered along the veins where they feed.
Feeding damage almost always starts on the lower, older leaves and works upward, since those leaves have been exposed the longest and sit closest to dusty soil where mite populations often build first. Left unchecked through a hot, dry stretch, stippled leaves can go from lightly speckled to yellow to crisp and brown, curling and dropping while the fine webbing spreads to cover several leaves at once, sometimes tenting whole leaf clusters in silk.
Making sure it is this and not something else
The webbing and the stippling pattern are distinctive, but a few other tomato problems produce leaf symptoms that get confused with spider mites, especially early on before webbing is obvious.
Aphids
Aphids cluster in soft-bodied groups on new growth and the undersides of leaves, causing curling and a sticky honeydew coating that often turns black with sooty mold. There’s no fine silk webbing at the leaf joints, and aphids are large enough to see clearly without magnification. Wipe a finger along a curled leaf; aphids smear as soft green or black bodies, while mites leave almost nothing visible.
Thrips
Thrips cause a silvery, papery streaking on leaves and flowers along with tiny black specks of frass, but they don’t spin webbing and their damage tends to follow leaf veins in streaks rather than an even speckled field. Tapping a leaf over a white sheet of paper will dislodge thin, elongated thrips that run rather than the round mite bodies that crawl slowly.
Broad mites
Broad mites are even smaller than spider mites and cause distorted, curled, and hardened new growth rather than stippled older leaves, and they rarely produce visible webbing. If the damage is concentrated on the newest leaves and looks like twisting rather than speckling, broad mites or a viral issue are more likely culprits.
Heat and drought stress
Plain environmental stress can bronze older leaves without any pest present at all. The tell is the absence of moving specks under a hand lens and no webbing anywhere on the plant; stressed leaves also tend to look uniformly dull rather than finely dotted.
The single test that settles it: hold a plain white sheet of paper under a suspect leaf and tap the leaf sharply. Spider mites fall as tiny specks that then crawl across the paper. Dust doesn’t move. Aphids and thrips look and behave differently once they land. That one check, done in under a minute, is usually enough to confirm or rule out mites.
When it shows up
Spider mite outbreaks track conditions, not a date on the calendar. They build fastest during any stretch of hot, dry weather, particularly after a period of drought stress that leaves plants under-watered and their leaves less able to shed early feeding damage. Dusty conditions matter too: mites establish more easily on foliage coated in road dust or dry garden soil, which is why plants along gravel driveways or unmulched, wind-exposed beds tend to show symptoms first.
Young seedlings and recently transplanted starts are the most vulnerable stage, since a small plant has far fewer leaves to spare and heavy stippling can slow growth noticeably before the root system is established. On a mature, actively fruiting tomato plant with a full canopy, a light-to-moderate mite population is usually a cosmetic nuisance that the plant tolerates while continuing to set and ripen fruit normally.
Indoor seed-starting setups and greenhouses create another favorable window, since the warm, dry, still air that helps seedlings germinate also happens to be close to ideal for mite reproduction, and the absence of rain or overhead watering there removes one of the main natural checks on their numbers. Plants moved outdoors after a warm, dry indoor start sometimes carry a small mite population with them, which then flares once outdoor heat sets in.
Any period where a tomato plant goes several days without adequate water while daytime temperatures run hot is the condition to watch, regardless of what point the plant has reached in its life cycle.
What to do now
- Hit the undersides of leaves with a strong jet of water. A forceful spray from a garden hose, aimed up under the foliage, physically knocks mites and webbing off the plant and is often enough on its own for a light infestation. Repeat every two to three days for a week or two.
- Fix the water stress first. Since drought conditions favor mite population growth, deep and consistent watering at the base of the plant does double duty: it supports the tomato and makes the environment less favorable for the pest. Avoid letting the soil dry out completely between waterings.
- Remove the worst leaves. Any leaf heavily coated in webbing or almost entirely bronzed contributes little to the plant at that point. Snip it off and dispose of it away from the garden rather than composting it nearby, which can reintroduce mites.
- Protect and encourage natural predators. Predatory mites, lady beetles, and lacewings all feed on spider mites and can hold populations in check without any spraying at all. This is the step most home gardeners skip, and it’s the reason broad-spectrum insecticides often make a mite problem worse: they kill the predators faster than they kill the mites, since mites reproduce quickly and often rebound while their natural enemies take longer to recover.
- Use insecticidal soap or horticultural oil if the population is still climbing. These contact products, widely sold for home garden use, work only on mites they directly touch, so thorough coverage of leaf undersides is essential, and they should be reapplied every five to seven days. Apply in the cooler part of the day to avoid leaf burn on stressed foliage.
- Reach for a labeled miticide only as a last resort. A small number of miticide products are labeled for home vegetable garden use against spider mites, but availability and restrictions vary by state, and label instructions on tomato-specific use and pre-harvest intervals must be followed exactly. This step should follow, not replace, the water spray, hydration fix, and predator protection above.
Stopping it coming back
- Keep tomato plants on a consistent watering schedule through hot stretches; mulch around the base to hold soil moisture and reduce the dust that mites use to establish on lower leaves.
- Hose down nearby gravel paths, driveways, or dusty beds periodically during dry weather, since dust buildup on foliage makes leaves more hospitable to mite colonies.
- Inspect new transplants and any seedlings started indoors with a hand lens before setting them in the garden, checking leaf undersides and joints for early webbing.
- Avoid routine use of broad-spectrum insecticides on tomatoes when no serious pest problem is present; these products remove the predatory mites, lady beetles, and lacewings that would otherwise keep spider mite numbers low on their own.
- Go easy on high-nitrogen fertilizer. Lush, nitrogen-rich growth tends to support faster mite reproduction, so a balanced feeding program serves the plant better than heavy nitrogen pushes.
- Check plants weekly during any prolonged dry spell using the white-paper tap test, catching a small population before webbing spreads across multiple leaves.
Common questions
Do spider mites kill tomato plants?
Rarely on an established plant with adequate water. Severe, untreated infestations during hot, dry weather can defoliate a plant enough to reduce fruit production, but most mature tomato plants tolerate moderate mite pressure without dying.
Can I eat tomatoes from a plant with spider mites?
Yes. Spider mites feed on foliage, not fruit, and they pose no direct risk to the tomatoes themselves. Wash produce as usual before eating.
Do spider mites spread to other plants?
They can. Mites move on silk threads, on wind currents, and by crawling to neighboring plants, so an infestation on one tomato can spread to nearby vegetables, particularly during hot, dry conditions that favor rapid population growth.
What is the fastest way to get rid of spider mites on tomatoes?
A strong water spray to the leaf undersides, repeated every few days, combined with fixing any drought stress, brings down light-to-moderate populations quickest without harming the predatory insects that help keep mites in check long term.