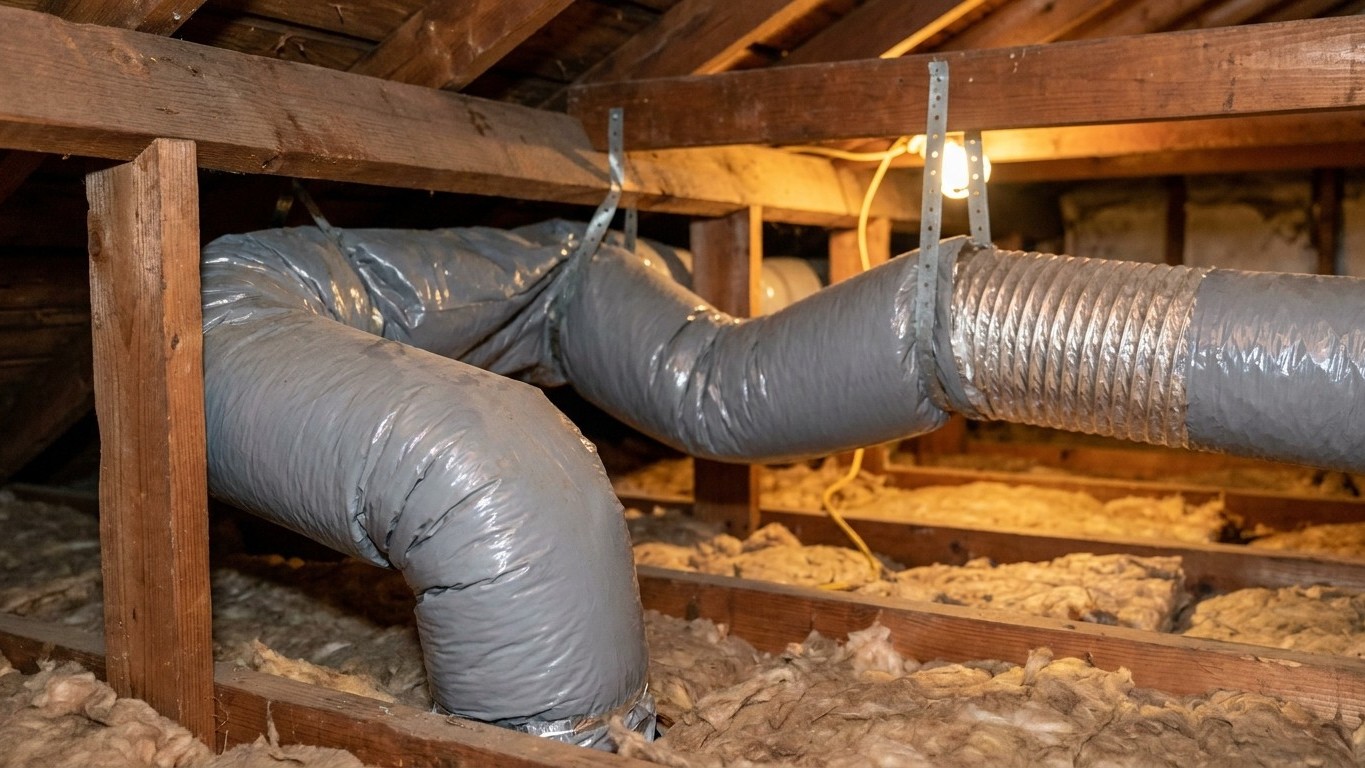

Flexible duct fails in four specific ways: it kinks at a turn, it gets crushed under something heavy, it sags in a loose belly between supports, or it gets stretched so tight the liner corrugates instead of running smooth. Each one throttles the airflow to whatever room that duct feeds. This applies to forced-air systems only, the ones with a furnace, air handler, or heat pump pushing air through ducts. Radiators, baseboard heat, and ductless mini-splits don’t have ducts at all, so none of this applies to them.
What flexible duct is, and what it costs you
Flexible duct is built from an inner liner wrapped around a coiled wire helix, then covered with insulation and an outer plastic jacket. The wire gives the duct its shape and lets it bend around obstacles that would stop rigid metal duct cold. That’s the whole appeal. A contractor working in a cramped attic or a joist bay full of wiring and plumbing can snake flex duct where sheet metal simply wouldn’t fit, and do it in a fraction of the time.
That flexibility is also the trap. Because the material forgives a crooked route, it gets installed on crooked routes, again and again. A rigid metal duct forces some discipline, since you can’t bend it around a bad decision. Flex duct has no such limit. It’ll go around two studs, over a beam, and under a water pipe if you ask it to, and it’ll look installed even when the airflow through it is a fraction of what the system needs.
Smooth pipe already has the advantage
Even a flexible run installed exactly right, pulled straight and taut, properly supported, still moves air less efficiently than smooth metal duct of the same diameter. The corrugated inner surface creates friction that a smooth wall doesn’t. That’s the baseline cost of choosing flex duct at all, and it’s baked into how HVAC contractors size these systems in the first place.
The trouble starts when a run drifts from that ideal condition. Every kink, every sag, every crushed section adds resistance on top of the resistance that was already there by design. A system sized to push air through a straight, taut run of flex duct has to work harder for every foot of slack, every tight bend, every place where the diameter narrows because something is pressing on it. None of that resistance is visible from the room the duct serves. What’s visible is a bedroom that never gets quite as cool as the rest of the house, or a vent that barely moves air at all.
The four faults, and how to spot them
Four things go wrong with flexible duct, and they don’t look the same or cause the same trouble. Some are obvious the moment you see them. Others hide in plain sight for years because nothing about them looks broken.
| Fault | How it looks | Effect on the room | Fixable in place? |
|---|---|---|---|
| Kinked | Sharp fold at a tight turn, liner pinched almost shut | Severe drop in airflow, sometimes a whistling or hissing sound | Usually yes, by easing the turn wider |
| Crushed | Flattened section under a stored box, a joist, or a foot | Airflow choked at that point, worse the longer it’s loaded | Rarely; the wire helix is bent, not just the jacket |
| Sagging | Loose belly hanging between two support points | Gradual, easy-to-miss reduction in airflow and static pressure buildup | Yes, with re-tensioning and added support |
| Stretched loose | Liner pulled so tight the ridges show through, almost rope-like | Reduced usable diameter, restricted flow along the whole run | Sometimes, by easing tension back to the manufacturer’s intended length |
Why sagging is the one people miss
Sagging gets less attention than the other three faults, and that’s exactly the problem. A kink looks wrong the second you see it. A crushed section usually has an obvious culprit sitting on top of it. Sagging just looks like duct hanging the way duct hangs, especially in an attic where nobody’s looking closely.
But a long, loose loop between two supports does two things at once. It adds extra length to the run that the air has to travel, and it creates a low point where the duct’s own weight pulls the diameter narrower than it should be. Multiply that by every support span in a long attic run, and a duct that looks fine from a quick glance is quietly working far harder than it needs to. It’s also the fault most likely to be original to the installation rather than something that happened later, since it usually traces back to wire ties spaced too far apart or hung too loose from the start.
Fixing what can be fixed
Three of the four faults respond to hands-on correction without tearing out the run. Here’s the order that makes sense for a homeowner working in an accessible attic or crawlspace.
- Pull the run taut and re-support it at proper intervals with wide straps, not wire. Support spacing matters more than most people assume, and a duct sagging between two widely spaced hangers needs additional support points added along its length, not just tightened at the ones already there.
- Ease tight turns into wider ones. A 90-degree bend crammed into a small space is often the result of routing the duct the short way instead of the smart way. Widening the turn, even by rerouting a few feet of run, reduces the restriction at that point significantly.
- Replace a crushed section rather than trying to reshape it. Once the wire helix has been flattened, bending it back doesn’t restore the original diameter. Cutting out the damaged section and rejoining the run with a proper connector fixes the restriction for good.
- Clear storage off any run in an attic. Boxes, holiday decorations, and foot traffic across ductwork are the leading reason crushed sections happen in the first place, and the fix here is simply not putting weight on duct again.
Narrow straps and plain wire are the wrong tool for supporting flex duct, and it’s worth saying plainly why. A thin strap or a loop of wire concentrates the weight of the duct into a narrow band, and over time it cuts into the outer jacket and the liner underneath, creating a permanent narrow spot exactly where the support sits. A wide strap spreads that same weight over more surface area, so the support holds the duct up without pinching it. Since airflow problems can reduce your system’s efficiency by up to 15 percent, according to U.S. ENERGY STAR, a support that creates its own restriction is working against the very thing it’s supposed to hold in place.
When to replace rather than repair
Some damage isn’t worth chasing with tape and re-tensioning. A torn liner is one of them. Once the inner surface is split, taping the tear from outside doesn’t restore a smooth air path, and air escaping into the insulation layer around it goes nowhere useful. A jacket that’s come apart at a seam or pulled away from a connection is similar. It might still look like intact duct from a few feet away, but it’s no longer doing the job of containing air and insulation together.
Length is another honest signal. A run that’s far longer than it needs to be, looping across an attic to avoid a joist or a vent stack, adds resistance for no reason other than how it was installed. Shortening that run by rerouting it more directly is a repair in name but a near-total replacement in practice, since there’s rarely a way to remove excess length without disconnecting both ends.
The same goes for a route with so many turns that straightening them out means rerouting the whole thing anyway. At that point, easing one bend at a time stops being a repair project and becomes a redesign, and it usually makes more sense to just run a new section on a cleaner path.
Replacing a run in an open, accessible attic is realistic for a careful homeowner with the patience to measure twice, buy the right length, and make clean connections at both ends. A run buried inside a finished wall or a floor cavity is a different matter entirely. Getting to it means opening finished surfaces, and that’s the point where calling in a professional stops being optional and starts being the only practical option.
Common questions
Can flexible duct be repaired without replacing the whole run?
Often, yes. Kinks, sagging, and overly tight tension usually respond to re-tensioning, wider supports, and easing turns. Crushed sections and torn liners are the exceptions, since the internal wire helix and the liner surface don’t restore to their original shape once damaged.
How do I know if a room’s airflow problem is coming from the duct itself?
A weak or reduced airflow at one vent, especially compared to other rooms on the same system, points toward a restriction somewhere in that specific run. Checking the accessible parts of that duct for kinks, crushing, or sagging is the logical first step before assuming the problem is with the equipment itself.
Does sagging duct actually waste noticeable energy?
It adds resistance the system has to work against, and airflow problems in general can reduce a system’s efficiency by up to 15 percent, according to U.S. ENERGY STAR. Sagging by itself isn’t measured separately from other airflow faults, but it’s counted among the causes that add up to that total.
Is it safe to just cut out a crushed section and tape it back together?
Cutting out the crushed section is the right move, but taping it back together isn’t a durable fix on its own. The damaged section needs to be replaced with a new piece of duct and properly joined at both ends with a connector rated for the job, not just wrapped in tape.