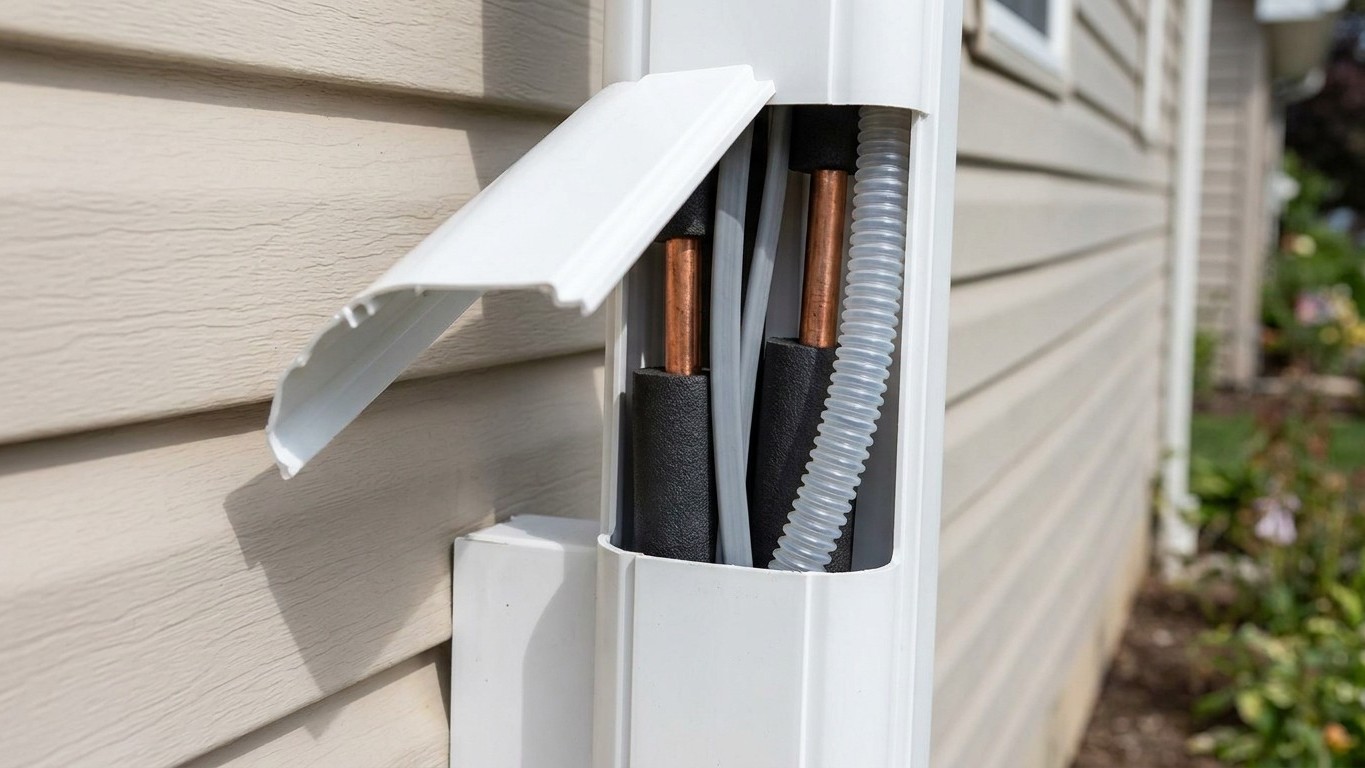

Run your hand along that white plastic channel on the outside wall and you’re touching the only connection between your indoor head and outdoor unit. A ductless Mini-Split has no ductwork anywhere in the house, the line set is the whole story. Inside it: two insulated copper refrigerant lines, a power and communication cable, and a condensate drain, all bundled together. When something goes wrong with a Mini-Split, it goes wrong somewhere along this run, and knowing what’s inside changes what you look for.
What is actually in that white trunking

Pop the cover off a section of line set trunking (most snap on and off without tools) and you’ll find three separate systems traveling side by side. Two copper tubes, each wrapped in foam insulation, carry refrigerant between the outdoor compressor and the indoor head. A cable, usually flat and gray, carries power to the indoor unit and lets the two units talk to each other so the system can modulate output. And a plastic drain tube, often the thinnest thing in the bundle, carries away the condensate that collects on the indoor coil whenever the system is cooling.
That’s the whole point of the trunking: it takes three things that used to be routed separately (or left exposed, in older installs) and bundles them into one covered channel run along the wall from the penetration point to the outdoor unit. It looks tidy. It also means three quite different failures can produce symptoms in the same six-foot stretch of wall.
Water stains below the trunking could be a drain problem. Frost or sweating on the copper could be an insulation problem. A head that won’t power on could be the electrical cable. Telling these apart from the outside, before you call anyone, is most of the diagnosis, and it’s the reason this page exists as its own topic rather than a footnote on installation.
One clarification worth making bluntly: if a guide you’re reading mentions duct leaks, duct cleaning, or a furnace filter, it’s talking about a different kind of system entirely. Central, ducted systems move air through sheet metal or flex duct hidden in your attic or walls. A ductless Mini-Split doesn’t have any of that. If someone’s telling you to check your ducts, they’ve handed you someone else’s manual by mistake.
The drain has to fall the whole way
Of the three things running through that trunking, the condensate drain is the one that depends entirely on gravity, and it’s the detail installers get wrong most often. There’s no pump pushing that water along in a typical setup. The line has to slope downward, continuously, from the indoor head all the way to wherever it exits outside. Any dip in the tubing, any spot where it rises slightly to clear an obstacle, any place where the trunking sags between its wall clips, creates a low point. Water pools there instead of draining, and eventually it backs up.
Once that happens, the symptoms show up in predictable places. Water staining or dripping on the wall below the indoor head is the most common sign, usually appearing during or right after the unit has been cooling for a while. A gurgling sound from the drain line, especially when the system cycles on, often means air is trapped behind a low spot. A musty or sour smell near the indoor unit, or coming from the drain outlet outside, usually means standing water has been sitting long enough to grow something in it.
Inspecting the run from outside
You don’t need to open the trunking to get a decent read on the drain. Walk the length of it and sight along the bottom edge. It should look like a straight, gentle slope, or at worst a series of short straight runs joined at slight angles, always trending downward toward the outlet. A visible sag between two clips, where the trunking bellies down and then the drain tube inside has nowhere to go but pool, is often visible just from the shadow it casts. Check where the drain tube exits the trunking outside; it should terminate in the open, dripping freely, not buried in mulch or pointed back at the foundation.
Standing water inside a wall-mounted system doesn’t always announce itself with a puddle on the floor. Sometimes the first sign is a smell, or a sound, long before there’s visible damage. If you want a closer look at what those smells usually mean and how condensate problems typically show up before they get expensive, this site’s guides on condensate and on smells from a mini-split system cover both in more depth.
The insulation, and what the weather does to it
The foam sleeve wrapped around each refrigerant line does one job: it keeps the cold line cold on the inside and dry on the outside, so condensation forms where it’s supposed to (on the indoor coil) and not where it isn’t (dripping down your exterior wall). That foam is not permanent. Sunlight breaks it down over years, UV exposure makes it brittle and cracked, and any section left exposed, whether because the trunking cover slipped or because an installer left a stretch uncovered near the outdoor unit, ages faster than the rest.
Once the lagging splits or thins, cold refrigerant lines start sweating in humid weather the same way a glass of ice water sweats on a summer porch. That moisture runs down the pipe, down the wall behind the trunking, and shows up as a damp patch or a stain that has nothing to do with the drain at all. It’s also a quiet efficiency loss: bare or thinly insulated line picks up heat from the surrounding air on the way to the indoor unit, making the system work harder to deliver the same result.
A once-a-year look, ideally in spring before the cooling season ramps up, catches most of this before it becomes a wall repair. Four things are worth checking:
- Look over the full length of the trunking for cracked, yellowed, or loose covers, and for any spot where it’s pulled away from the wall.
- Look specifically for any stretch of refrigerant line insulation left exposed, especially near the outdoor unit or at any joint where the trunking doesn’t fully close.
- Check that the wall penetration, where the lines pass through to the outside, is still sealed tight with no visible gap or crumbling caulk.
- Check that the outdoor end of the drain line is clear of debris and pointed away from the foundation, not puddling against it.
That third item deserves its own warning. The wall penetration is a hole cut through your home’s building envelope, the same barrier that keeps conditioned air in and weather out everywhere else. An unsealed or poorly sealed penetration doesn’t just let a little draft through. It’s a direct path for humid outside air, insects, and in colder climates, wind-driven rain, straight into the wall cavity behind your finished wall. Left long enough, that’s the kind of gap that turns into hidden moisture damage long before anyone notices a draft.
What is not yours to open
Everything covered so far, the trunking, the drain routing, the insulation, the sealant at the wall, is exterior housekeeping. The refrigerant lines themselves are a different matter entirely. They’re part of a sealed, pressurized system, and that seal is not something to break open on a hunch. The service valves at the outdoor unit are not something to adjust. Flare nuts and fittings are not something to tighten “just to stop a leak” you think you hear. And a system that’s running low on refrigerant doesn’t need a top-up, it needs someone qualified to find the leak, because refrigerant doesn’t simply run out over time in a sealed system. If it’s low, it’s leaking, and adding more without finding the source just delays the same repair while paying for refrigerant twice. Handling refrigerant is regulated work in the United States, and that’s not a technicality to work around.
None of that means there’s nothing left to do. The list of things a homeowner can reasonably handle is longer than it might seem: keeping the trunking clipped down and free of sag, replacing a cracked cover section, checking and clearing the drain outlet outside, resealing the caulk at the wall penetration if it’s shrunk or cracked, and keeping any exposed lagging shaded or covered. Those five items cover almost everything that goes wrong with a line set that doesn’t involve refrigerant, and every one of them is visible from outside without opening a single fitting.
Common questions
Can I extend or reroute my mini-split’s line set myself?
Rerouting means cutting into refrigerant lines, which are part of a sealed pressurized system. That’s regulated work best left to someone qualified to handle refrigerant, even if the trunking and drain portions look simple enough to manage.
Why does my line set trunking feel warm in some spots and cold in others?
That’s usually normal: one copper line runs warmer, one runs cooler, depending on whether the system is heating or cooling. A cold spot that’s noticeably wet or sweating, though, points to a gap or thin patch in the insulation rather than normal operation.
Is a musty smell from the indoor unit related to the line set at all?
Often, yes. Standing water in a sagging or poorly sloped drain line is one of the most common sources of that smell, since stagnant condensate sitting in a low point gives odor-causing growth somewhere to take hold.
Does the line set need any maintenance if the system is working fine?
A yearly visual check still matters even when everything seems fine, since UV damage to lagging and slow sealant failure at the wall penetration both happen gradually, often well before they cause a symptom you’d notice indoors.