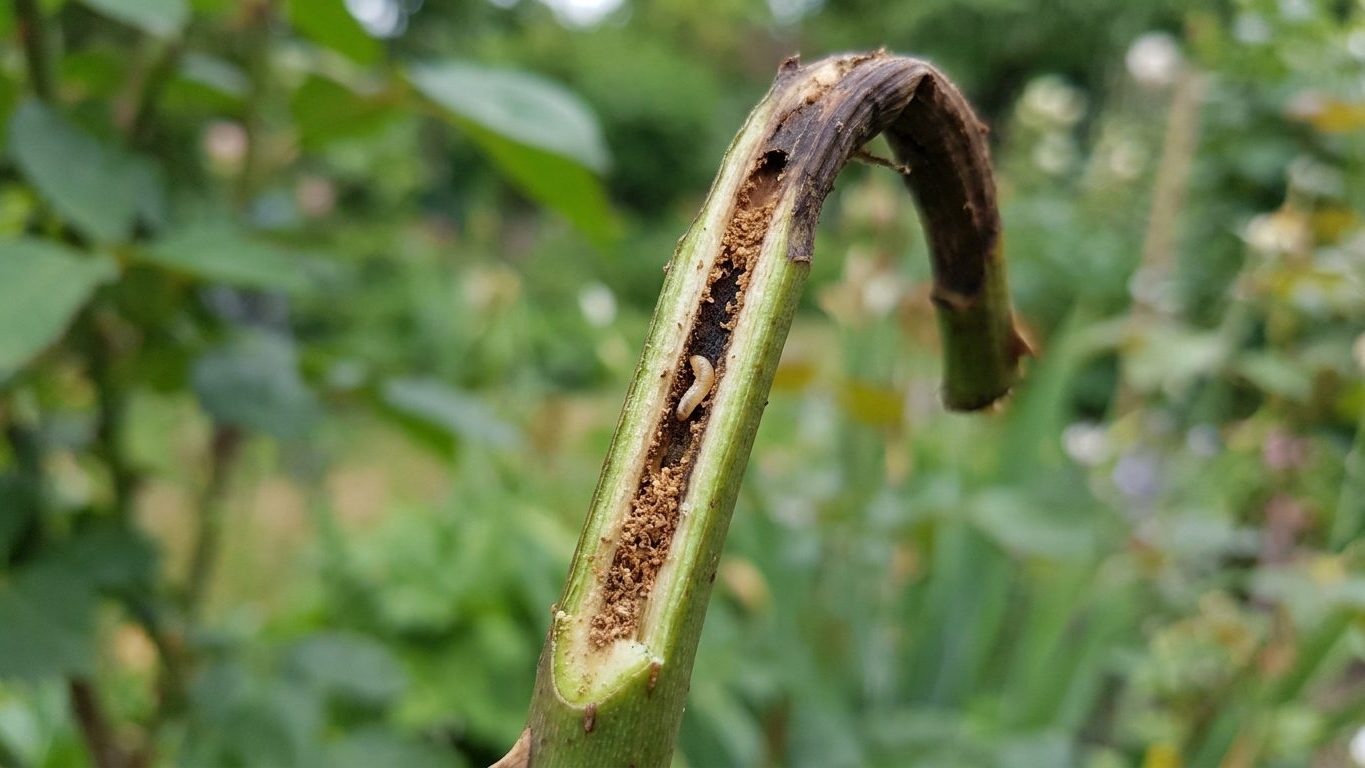

A tunnel bored straight down the pith of a rose cane, usually starting right at a fresh pruning cut, is the calling card of a rose cane borer. The larva feeds inside the stem rather than on leaves or buds, so the visible sign is almost always at the tip: a cane that wilts, blackens, or snaps a few inches below where you last made a cut. On an established rose this rarely kills the plant. On a young cane or a first-year shrub, it can take out that stem for the season.
What the damage looks like
The detail that separates this problem from nearly everything else on a rose bush is location: the damage starts at the pith, inside a cut or broken cane end, not on a leaf surface or a bud. Snap or slice the cane a few inches below the wilted tip and you’ll usually find a narrow tunnel running down the center, often packed with fine, sawdust-like frass, sometimes with a small white or cream larva still inside. The outer bark can look completely normal while the inside is hollowed out for several inches.
Above the entry point, the cane tip typically wilts first, then blackens and dies back, sometimes called “shepherd’s crook” dieback because the stem droops over before it goes fully brown. Below the tunnel, the cane often stays healthy and can still push new growth from a lower bud, which is part of why this pest looks alarming but usually isn’t a plant-killer on a mature bush.
Two things make cane borer damage easy to spot once you know to look. First, the entry hole is almost always at a wound, meaning a pruning cut, a broken cane from wind or hail, or a spot where a previous cane was removed flush to the crown. Borers rarely tunnel into unbroken, uncut bark. Second, the tunnel runs lengthwise down the pith, not across the cane and not just under the surface of the bark. That lengthwise, pith-centered tunnel is the signature detail worth remembering, since a few other rose problems can also cause dieback or swelling but none of them hollow out the center of the stem starting from a cut end.
If you’re seeing multiple canes affected on the same bush, check whether they were all pruned around the same time and left unsealed. That pattern points straight at cane borers using open cuts as an entry point, rather than a random or scattered infestation.
Making sure it is this and not something else
Before treating for cane borer, rule out three look-alikes that cause similar dieback but need a different response, or none at all.
Cane girdler or crown gall swelling
Some cane-damaging insects and the bacterium behind crown gall cause a swollen, knobby ring on the cane rather than a hollow tunnel. Slice into a swollen area: girdling or gall damage shows solid, distorted tissue, not an open channel packed with frass. If the cane is swollen but solid inside, it isn’t a borer.
Winter dieback or frost crack
Cold damage blackens the pith and can kill a cane tip in a way that looks similar from the outside. The test is the same cut-and-check: frost-damaged pith is discolored, sometimes water-soaked or dry and brittle, but there’s no tunnel and no frass, and you won’t find a larva.
Ordinary pruning shear damage
A ragged or crushed cut from dull shears can callus poorly and die back an inch or two, mimicking early borer damage. The difference shows up over time: shear damage stays shallow and stops progressing, while a borer tunnel keeps extending down the cane as the larva feeds, and it will show frass where shear damage won’t.
In every case, the single reliable test is the same: cut into the cane a few inches below the visible damage and look for a hollow, frass-filled tunnel with or without a larva inside. If that’s what you find, it’s a cane borer.
When it shows up
Cane borer damage follows a wound, not a date on the calendar. The vulnerable window opens the moment a cane is cut, broken, or otherwise exposed at the pith, and it stays open until that cut callus over and seals on its own. A freshly pruned cane with an open, unsealed cut is the single biggest predictor of an infestation, far more than any particular week of the growing season.
Adult borers, whether wasps or beetles depending on the species involved, are drawn to that exposed pith to lay eggs. A cane pruned hard back to a thick stem, then left with a bare, flat-cut top, is a much easier target than a cane with a small, angled cut that heals quickly. This is also why the problem tends to cluster right after a round of heavy pruning, whether that’s a routine seasonal cutback or storm cleanup after broken canes, rather than showing up randomly throughout the year.
New, vigorous canes pushing up from the base are also more attractive than old, woody ones, since the pith is softer and easier to tunnel through. A rose that’s just been rejuvenated with a hard cutback, or one that recently sent up strong basal canes after a mild season, is at higher risk simply because there’s more fresh, unsealed pith exposed at once.
What to do now
- Trace the tunnel and cut below it. Follow the wilted or blackened cane down until you reach solid, white, undamaged pith with no visible tunnel. Make the cut just above a healthy outward-facing bud. This removes the larva along with the damaged wood and is usually the only step needed on an established bush.
- Seal the new cut immediately. A dab of white household glue, a pruning sealant, or even clear nail polish on the freshly cut surface blocks the pith from being reopened as an entry point while it calluses over. This costs almost nothing and prevents a repeat infestation on the same cane.
- Bag and trash the removed cane sections. Don’t toss them on the compost pile, since a larva can survive and mature there. Household trash removes it from the garden for good.
- Leave predatory and parasitic insects alone. Several small parasitic wasps attack cane borer larvae inside the stem, and general-purpose garden predators like lacewings and ground beetles help keep populations low without any intervention from you. A broad-spectrum insecticide spray would kill those beneficials along with the borer, and since the borer is inside the cane, a surface spray usually doesn’t reach it anyway.
- Reserve chemical control for repeat, severe cases. If the same bush loses multiple canes season after season despite sealing cuts, a systemic insecticide labeled specifically for boring insects on roses, applied strictly per the label, is the only chemical option with a realistic chance of working, since contact sprays can’t reach a larva already inside the pith. Some active ingredients used for borers carry state-level restrictions on residential use, so check your state’s cooperative extension guidance or the product label before buying anything.
Stopping it coming back
- Seal every pruning cut the same day you make it, not just the ones that look large or exposed.
- Cut at a slight angle just above an outward-facing bud rather than leaving a flat, exposed top on the cane.
- Clean up and remove all pruned material from the bed instead of leaving cut canes lying nearby.
- Avoid leaving broken canes from wind, hail, or accidental damage unattended; treat a broken cane exactly like a fresh cut and seal it as soon as you notice it.
- Keep the plant vigorous with steady watering and a normal feeding schedule, since a stressed rose recovers more slowly from any cane loss, borer-related or not.
- Skip preventive insecticide sprays on a bush that hasn’t had repeat problems; sealing cuts does the same job without the cost or the risk to beneficial insects.
Common questions
Will a cane borer kill my rose bush?
On an established, multi-cane rose, no. It kills the individual cane above the tunnel, but the plant regrows from lower buds or other canes. On a young, single-cane rose or a fresh transplant, losing that one cane can set the plant back significantly for the season.
Do I need to spray my whole rose bed if I find one borer?
No. Cane borers enter through individual cut or broken canes, not through general exposure across the bed. Trace and remove the damaged cane, seal the new cut, and check nearby canes for the same tunnel-and-frass pattern before assuming the problem is widespread.
Can I still use the pruned canes for cuttings if they look otherwise healthy?
Avoid it. Even a section that looks solid near the top can have a larva working its way down from further up the original cut. Bag and discard anything removed because of confirmed borer damage rather than repurposing it.
Is sealing every single pruning cut really necessary, even on minor trims?
For thin, twiggy trims that heal within a day or two, it’s less critical. For any cut on a thick, mature cane, especially during a hard seasonal cutback, sealing takes seconds and removes the entry point borers rely on, so it’s worth doing as a habit rather than deciding case by case.