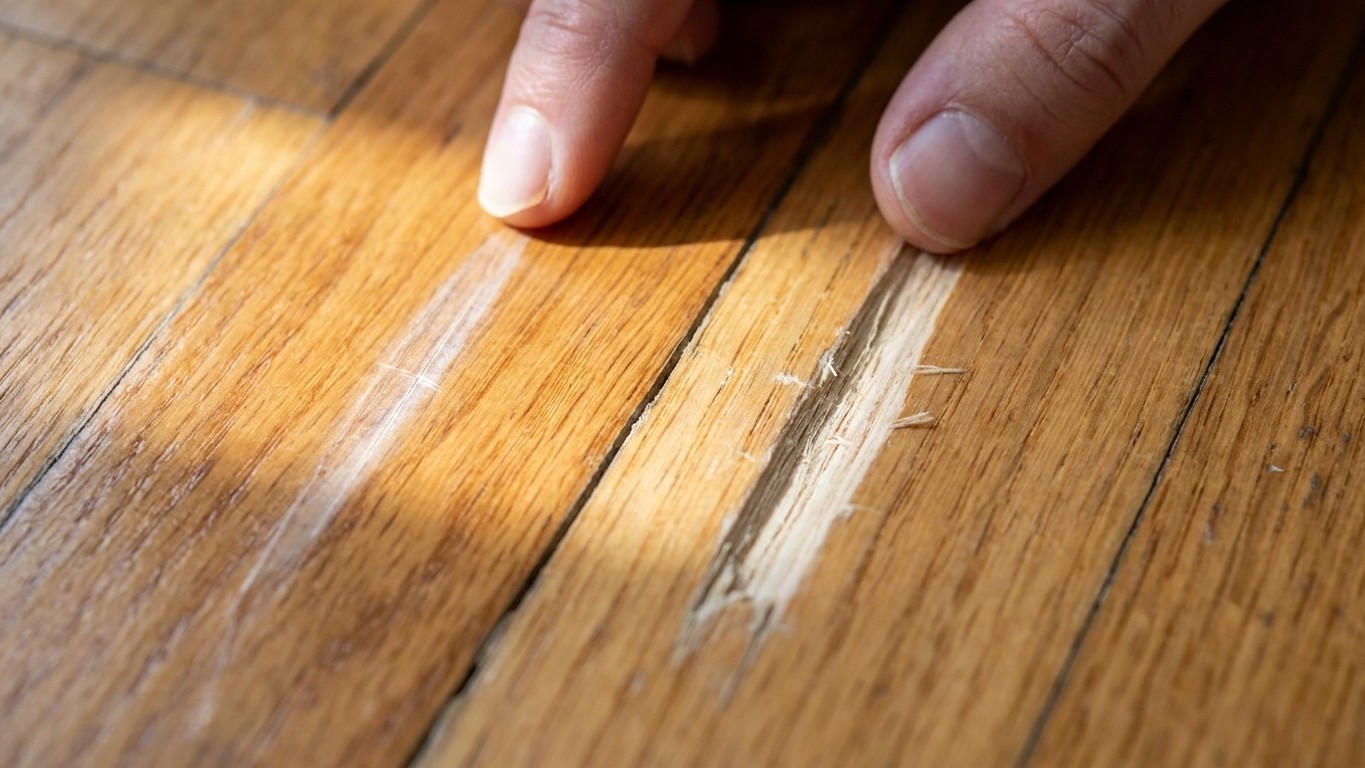

Run a fingernail across the mark. If it catches on smooth clear coating and the color underneath looks the same as the rest of the board, you’re dealing with the finish, not the wood. That’s a wipe-on repair, not a sanding project. If the nail slides into a pale, fuzzy groove that shows raw wood color, the fibers themselves are cut, and no amount of polish fixes that.
What is actually happening

Hardwood floors carry two separate surfaces stacked on top of each other, and a scratch only tells you something useful once you know which one it hit. The top layer is a thin, clear finish, usually a polyurethane or similar coating, applied in a few coats over the bare wood. It sits maybe a few thousandths of an inch deep. Below that is the actual wood, solid or engineered, with its own grain, color, and structure running much deeper.
A scratch that only nicks the finish is cosmetic in the truest sense. The wood underneath was never touched. Light bounces differently off a scuffed clear coat than off wood fibers that have been physically torn, and that’s why finish scratches often look white or hazy rather than raw. Buff them, fill them, or recoat that section, and the mark disappears because you’re only repairing a coating, not the material it protects.
A scratch that reaches the wood is a different animal. Wood fibers don’t heal or blend the way finish does. Once they’re severed, the only way to make that spot level and uniform again is to remove material around it, sand the board (or the room) down past the depth of the cut, and refinish. There’s no touch-up pen that restores torn grain the way a dab of matching finish restores a scuffed topcoat.
This is why the ten-second fingernail test matters more than it seems. Depth is the entire decision tree. A homeowner who assumes every scratch means “sand the floor” ends up doing unnecessary, invasive work on a mark that a rag and some matching finish would have solved in an afternoon. Someone who assumes every scratch is just surface wear ends up ignoring a wood-deep gouge that will keep collecting dirt, darkening, and drawing the eye until it’s finally addressed properly.
Location and pattern add a second layer of information. A single isolated scratch near a chair leg or a dog’s favorite pacing spot tells a very different story than a web of fine scratches spread evenly across an entire room. The first is localized damage. The second is often the finish reaching the end of its usable life across the whole floor, which changes the scope of the fix from “one board” to “recoat the room.”
The covering, or what is under it
Almost every scratch you’ll find on a hardwood floor belongs to the covering, meaning the finish or the top wear layer of the wood itself. It’s rare for a scratch alone to say anything about the subfloor beneath. But the two can intersect, and knowing where that line sits keeps you from over-treating a simple mark or under-treating one that’s actually a symptom of something else.
| What you observe | What it usually means | Which layer it belongs to |
|---|---|---|
| Fine, hazy scratch, no color change | Finish only, surface abrasion | Covering (finish) |
| Scratch pattern across most of the room, dull sheen overall | Finish wearing thin across the whole floor | Covering (finish, whole-room scope) |
| Deep groove, pale or white, raw wood color visible | Cut through finish into the wood fibers | Covering (wood surface, localized) |
| Gouge with splinters lifting or a chunk missing | Physical impact, wood torn or dented | Covering (wood surface, may need board replacement) |
| Scratched area also sits near cupped, crowned, or discolored boards | Scratch is incidental; the real issue is moisture movement under the board | What’s under it (subfloor, moisture) |
That last row is the one worth slowing down for. A scratch, by itself, is almost never a moisture problem. Scratches come from foot traffic, grit, furniture legs, and claws, not from water. But if the scratched board is also cupping at its edges, crowning in the middle, or showing a gray or dark tint that wasn’t there before, the scratch is just the thing your eye noticed first. The actual story is happening underneath, where the subfloor or the wood itself is reacting to moisture it’s picking up from below or behind.
Sanding out a scratch on a board that’s actively cupping is a wasted step. The board will keep moving as the moisture source keeps feeding it, and a freshly sanded, flattened board can end up worse-looking once it cups again, because now there’s less material margin left for a second repair. That’s the practical reason to separate covering from substrate before reaching for sandpaper: a scratch on a flat, stable board is a same-day fix, and a scratch on a board that’s already telling you it’s not flat is a signal to look one layer deeper first.
The related pages in this series on reading what the surface is telling you walk through cupping, crowning, and gapping in more detail, since those patterns are the visual language the subfloor uses when it’s the one causing trouble, not the finish.
What to check, in order
Work from the cheapest, least invasive check to the most involved one, and stop as soon as you have your answer. Most scratches resolve at step one or two.
- The fingernail test. Run a nail across the mark. Catches smooth and shows no color change: finish only. Catches rough or shows lighter wood color: reaches the wood. This single check rules out or confirms the depth question in seconds, and it determines Everything that follows.
- The water drop test. Place a few drops of water directly on and around the scratch. If the water beads up and sits on the surface, the finish is still doing its job in that spot, so a finish-level repair (buffing, filling, spot recoat) will hold. If the water soaks in and darkens the wood quickly, the finish has already worn through in that area, and any repair needs to include reapplying a protective coat, not just filling the visible line.
- Raking light inspection. Get a flashlight low and angled across the floor, almost parallel to the boards. This reveals the true extent of the damage that overhead light hides. It’s often the moment a homeowner realizes one visible scratch is actually part of a wider web of fine surface scratching across the whole finish, which shifts the job from a spot repair to a full recoat.
- Pattern and location check. Note whether the scratch is isolated or repeated, and whether it clusters near doorways, pet paths, or furniture. This doesn’t fix anything by itself, but it tells you, a dog’s nails, grit tracked in from outside) that will just re-scratch the same spot after the repair.
- Board flatness check. Look at the scratched board and its immediate neighbors from a low angle. Flat and level: proceed with the repair matched to what step one found. Cupped, crowned, or visibly uneven: stop here. This is the point where the question stops being about the scratch and starts being about what’s underneath it, and it’s the last check you can do without disturbing anything.
Nothing on this list requires lifting a board, pulling trim, or opening the subfloor. If step five turns up flat, stable wood, you’re clear to repair the scratch at whatever depth the fingernail test found. If it turns up movement in the boards, that’s the handoff point, and it belongs to a different kind of inspection than a homeowner can run with a flashlight and a bottle of water.
When this stops being a flooring job
A scratch is always a flooring job. It stays a flooring job right up until it turns out to be a symptom of one of three things: something structural underneath, water that’s still active, or a subfloor that’s been wet long enough to smell.
Structural issues mean the floor’s movement traces back to the joists or beams supporting it, not the boards themselves. If checking board flatness (step five above) reveals a dip or bounce that runs across several boards or an entire section of room, no amount of sanding or refinishing addresses that, because the wood is only reflecting shape from something below it. That call goes to a structural engineer or a licensed contractor who can inspect the framing, not a flooring installer.
Active water is the second stopping point. If the water drop test or the flatness check leads you to a damp subfloor, a soft spot, or any sign that water is currently getting in, whether from a supply line, a roof leak, or grading outside the house, that source has to be shut off before any flooring repair means anything. Refinishing over an active leak just buys you the same repair again in a few months, with more wood affected each time. That’s a plumbing or roofing question, and the guides on this site covering leaks from above and behind the walls are the right next stop, not another flooring product.
The smell test is the third and most telling boundary. Wood and subfloor material that have been wet for an extended period develop a distinct musty odor that lingers even after the visible moisture is gone. That smell means the wetness has been present long enough to start affecting the material’s integrity, not just its surface appearance. At that point, a professional needs to assess how far the moisture has traveled and whether any structural wood needs replacing, which is a different scope of work than sanding out a scratch or Recoating a Floor.
A flooring fitter can matchboards, blend finishes, and refinish rooms. A plumber traces and stops water at its source. A structural engineer evaluates whether joists and beams are still doing their job. Knowing which one to call, and knowing that a scratch rarely needs any of them, is what keeps a simple surface fix from turning into a guessing game.