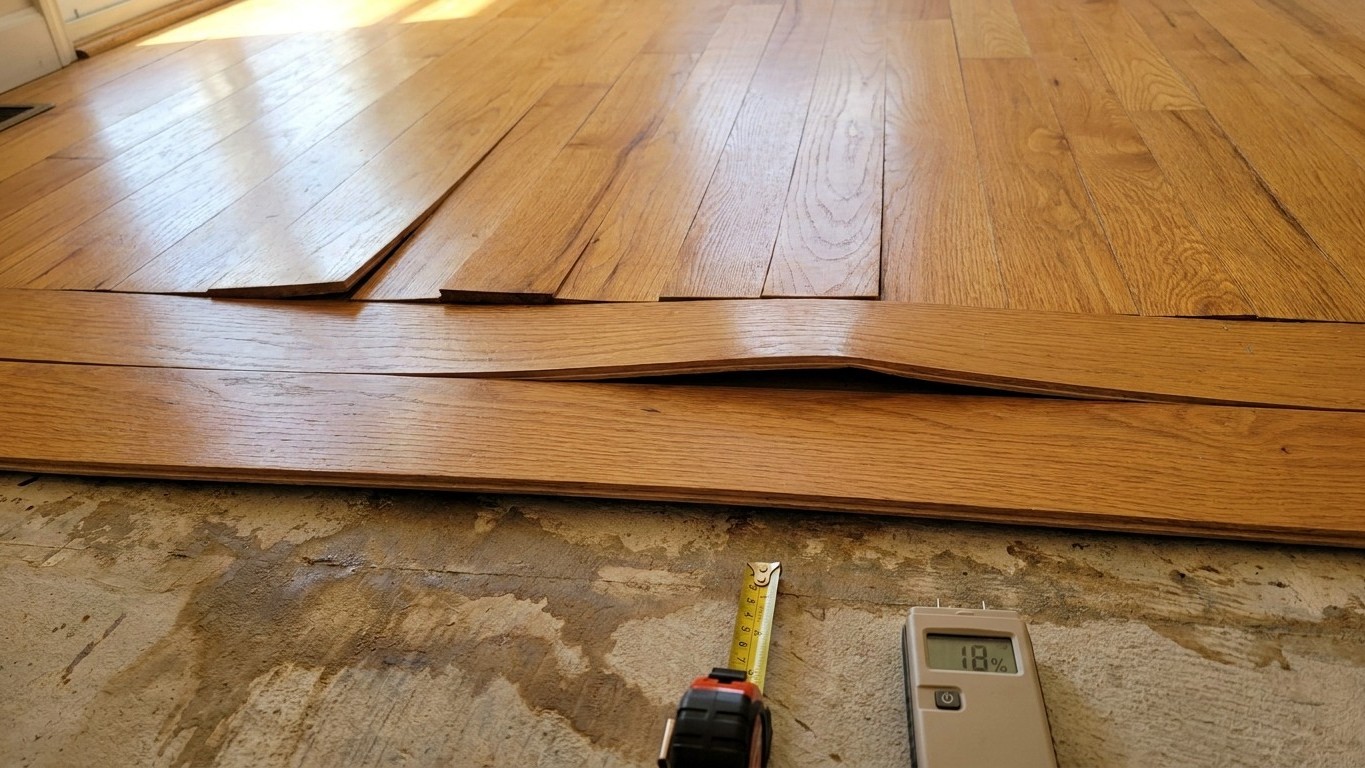

Cupped boards mean moisture is sitting under the wood, not on top of it. Edges lift because the underside of each board is wetter than the surface, and that gap almost always traces back to something below the floor: a slab that never dried, a crawlspace with no vapor barrier, or a leak nobody has found yet. Sanding the cup away before fixing the source just buys a second repair.
What is actually happening
Wood is not one uniform material reacting evenly to moisture. It swells and shrinks almost entirely across the grain, meaning the width of a board changes far more than its length or thickness ever will. When one face of a board picks up more moisture than the other, whichever face is wetter tries to expand more than the drier one. Since the two faces are locked together in the same piece of wood, the board can’t just get wider on one side. Instead it bows, and because the underside is usually the wet one, the edges rise while the center stays pinned. That’s cupping.
This is different from a board that’s simply swollen evenly, which tends to just tighten up against its neighbors without any curl. Cupping specifically tells you the moisture gradient runs through the thickness of the board, from a wetter bottom to a drier top. A flooring contractor reading a cupped floor isn’t just seeing “water damage.” They’re seeing a direction the moisture is traveling from, and that direction almost always points down, not sideways from a spill.
Why timing matters more than most homeowners expect
Wood floors are hygroscopic, they’re constantly trading moisture with the air and whatever is beneath them, and they rarely sit still for long. A board that has been damp for a few days and is actively drying out will often flatten on its own once the source is cut off. A board that has been sitting over a chronically damp subfloor for months has usually reached what flooring pros call equilibrium at that new, cupped shape, and the fibers on the wet side have started to compress permanently. That second case doesn’t self-correct. It needs mechanical flattening, and only after the moisture source is confirmed gone.
This is where a moisture meter earns its keep. The tool itself isn’t diagnosing “how much” water is present in a way a homeowner needs to memorize as a number. It’s there to compare the reading at the cupped area against a reading somewhere unaffected in the same room, on the same species of wood. The gap between those two readings, not either reading alone, is what tells an installer whether the board is still actively wet or just holding onto old moisture that’s slowly leaving. That comparison is also the test that decides whether sanding today is safe or premature.
The covering, or what is under it
Every cupping case splits into two separate questions, and mixing them up is the most common mistake homeowners make. One question belongs to the finished floor you can see and walk on. The other belongs to everything underneath it: the subfloor, the joists, the slab, the crawlspace or basement below. A board can be fixed at the surface and still cup again in six months if the layer underneath was never addressed.
| What you observe | Which layer it belongs to |
|---|---|
| Cupping in one small cluster of boards near an exterior wall, worse in winter | Subfloor / building envelope, likely condensation from a cold slab or poor insulation, not the flooring itself |
| Cupping across an entire room, uniform, following no obvious pattern | What’s under the floor, usually a crawlspace or slab issue affecting the whole area evenly |
| Cupping in a straight line following a wall, a pipe run, or an appliance | Plumbing hidden beneath or behind that line, a covering-level clue pointing to a water-source problem |
| Cupping that appeared suddenly after a spill or appliance overflow and stays localized | Covering-level, a surface event, provided it doesn’t recur once the spill is cleaned and the area dries |
| Cupping that keeps returning in the same spot no matter how many times it’s sanded | What’s under the floor, an unresolved moisture source that sanding will never fix |
The flooring itself, the boards, the finish, the fasteners, is the covering. It’s what shows the symptom. But the wood is essentially a very patient, very sensitive gauge sitting on top of the real problem. A cupped floor over a crawlspace with no ground cover is telling you about soil moisture rising through open framing. A cupped floor over a slab is often telling you the concrete never finished curing, or that a vapor retarder was skipped or damaged during construction, or that ground water is migrating up through the slab from outside grading that slopes toward the house instead of away from it.
None of that gets solved by sanding, refinishing, or even replacing the affected boards. Doing that work first, before finding what’s underneath, treats the messenger like the cause. It also frequently voids the point of the repair entirely, because moisture that was pushing up through cupped boards for months hasn’t gone anywhere just because the surface looks flat again.
What to check, in order
These checks move from cheapest and least invasive toward anything that requires opening up part of the structure. Each one either rules something out or narrows where the water is coming from, and a homeowner can do the first several without any special tools.
- Walk the perimeter outside. Look at how the ground slopes near the affected area of the house. Grading that tilts toward the foundation, gutters that dump water right at the base of a wall, or downspouts with no extension are the single most common source of chronic moisture under a floor. This rules out a plumbing leak if the cupping lines up with an exterior wall on a rainy-season pattern rather than a straight run to a fixture.
- Check the room’s history with humidity, not water directly. Was a rug or heavy furniture covering this spot for a long stretch? Is there a humidifier or an aquarium nearby? This rules out a hidden plumbing leak if the cupping is confined to wherever airflow was blocked, since air trapped under a rug behaves differently than air over open floor.
- Inspect the crawlspace or basement from below, if accessible. Look for a ground vapor barrier that’s missing, torn, or covering only part of the area, standing water, or visible condensation on ductwork and pipes. This rules in or out an environmental source versus a plumbing source, since standing water under a specific section points to a leak while general dampness everywhere points to ventilation or a missing vapor barrier.
- Look for staining or corrosion on any pipe or fitting visible from below or from an accessible utility space. This narrows a suspected plumbing leak to roughly where along its run it’s happening, without opening a wall.
- Use a moisture meter to compare the cupped area against an unaffected area of the same floor. This is the point where a flooring professional gets involved rather than a general inspection, since interpreting that comparison correctly determines whether the floor is safe to refinish yet.
Everything above stops short of removing any flooring or opening a wall. If none of these checks find an obvious source and the cupping is spreading or worsening, that’s the point where the next step involves lifting a board or cutting an inspection opening, and that’s a job for whoever is diagnosing the plumbing or structure, not a DIY continuation of this list.
When this stops being a flooring job
Three things end a flooring repair and start a different one. The first is anything structural: joists that feel spongy or show visible sag when pressed from below, beams with soft spots, or support posts sitting in standing water. That’s a job for a structural engineer or a licensed contractor who evaluates load-bearing framing, not a flooring installer, because refinishing a floor sitting on compromised joists just hides the real risk under a new finish.
The second is any water source that’s still active. A slow supply line drip, a failing shower pan, or ground water actively entering a crawlspace during rain isn’t something sanding or sealing will outlast. That call belongs to a licensed plumber if it’s a fixture or line, or to whoever handles drainage and waterproofing if it’s coming from outside the house through grading or a foundation crack. A flooring contractor can flatten and refinish cupped boards, but they have no tools or license to stop water at its source, and reputable ones will say so rather than proceed.
The third is smell. Once a subfloor or the framing beneath it has been wet long enough to develop a musty odor, that’s usually a sign of mold growth or fungal decay in the wood itself, and that’s a different scope entirely, often requiring remediation before any new flooring goes down at all. A flooring installer who ignores that smell and refinishes anyway is sealing a problem under a floor, not solving it.
If the water is arriving from above, through a roof or an exterior wall, or from behind, through plumbing hidden in a wall cavity, this page isn’t the one that traces that source. The related guides on roof leak signs and hidden plumbing leaks in this same collection on floors and what’s under them walk through how to find water before it ever reaches the boards you’re standing on.