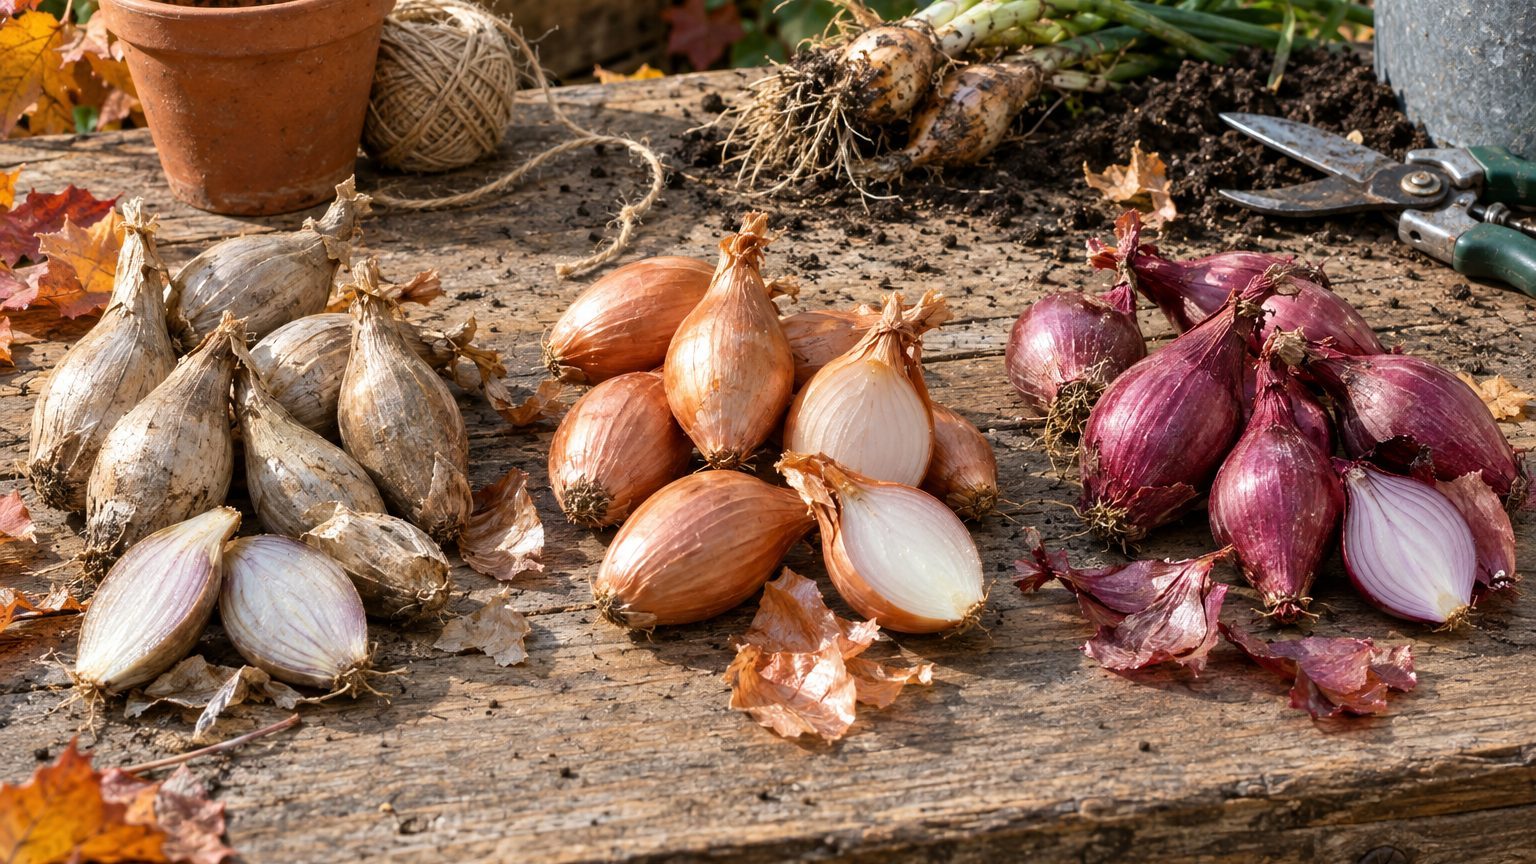

Three colors, three personalities. Brown shallots are the dependable all-rounder and the easiest to find as planting stock. Red shallots are milder and prettier, and they shine raw or pickled. Grey shallots are the connoisseur’s pick, with a hard shell, a sharper flavor and a very long shelf life, but they sulk in humid summers. If you only have room for one type, brown is the safe bet. If you have room for two, add red and keep grey for a dry bed with good drainage.
Skin color is a shortcut, not a strict botanical category. Most shallots you will meet in US catalogs belong to Allium cepa var. aggregatum, the multiplying onion that makes a cluster from a single planted bulb. (The one big exception, the true grey shallot, comes up below.) Within that group, color hints at flavor, storage and how fussy the plant will be. The details are worth knowing before you spend money on planting stock, because each type has its own habits. For the full growing routine, start with Growing Shallots: One Bulb In, a Handful Out.
Grey shallots: the old French standard
Grey shallots look the least appealing at first glance. The skin is thick, dull, grey-brown and almost woody, and you often need a paring knife to break into it. Inside, the flesh is pale with a faint grey-violet tint, dense and crisp. That armor is the point. A properly cured grey shallot can sit in a cool, dry pantry for the better part of a year, and many cooks say it holds its flavor longer than other types.
The flavor is the main draw. Grey shallots taste sharper and more complex than brown or red ones, with a pungent edge that mellows into something almost garlicky-sweet when cooked. French cooks reach for them in beurre blanc, vinaigrettes and pan sauces, where the shallot has to stand up to wine and vinegar. In the culinary world, “French grey” has a reputation similar to what “San Marzano” has for tomatoes.
Botanists argue about what a grey shallot even is. Many sources treat the classic French grey as a separate species, Allium oschaninii, rather than a color form of the common shallot. It rarely flowers and almost never sets true seed, so it is grown from bulbs. A grey cultivar such as Griselle is the name you will most often see offered to US gardeners, though availability varies by seller and by year.
Here is the catch. Grey shallots evolved for drier conditions than a muggy Georgia or Louisiana summer provides. Wet soil in late spring invites rot, and the dense bulbs struggle to cure if it keeps raining at harvest. They also tend to produce fewer and smaller offsets than the round brown types, so the multiplication rate is lower. Gardeners in the Pacific Northwest interior, the Mountain West and much of California tend to have the easiest time. Elsewhere, raised beds, gritty soil and a spot with full sun and good air movement make the difference.
Brown shallots: the workhorse
When you buy a mesh bag of shallots at a US grocery store, you are almost certainly holding brown ones. The skin runs from golden yellow to coppery brown, papery and easy to peel. The flesh is creamy white with a light green or violet blush, and the flavor is a balanced, mild-to-medium onion sweetness with a faint garlic note. They caramelize beautifully, which is why they turn up in everything from pan sauces to roasted vegetable trays.
For the gardener, brown shallots are the least demanding of the three. Most of the classic “yellow” and “brown” selections multiply generously, often producing around five to ten bulbs from one planted set under decent conditions, with more in rich soil. They tolerate a wider range of climates than grey shallots, they cure reliably, and they store well for several months. Dutch Yellow is a long-standing example you will see in many catalogs, usually sold as sets.
Brown shallots are also where the seed-grown options cluster. Several modern hybrids are sold as seed and produce round to slightly oval brown bulbs in a single season, which can cut costs and sidestep some of the disease issues that travel on bulbs. Whether seed or sets suits your garden depends on your season length and budget, and that decision gets its own treatment in Planting Shallot Sets, or Growing From Seed.
Round or banana-shaped?
Shape matters almost as much as color. Round and oval shallots, the traditional kind, divide into tight clusters of small bulbs. Banana or long shallots (sometimes sold as echalions, and genetically closer to onions) form fewer, larger, elongated bulbs, often just two or three per plant. They are easier to peel and slice into neat rings, which cooks like, but you give up some of the multiplication that makes shallots feel like a bargain. For a first planting where you want plenty of bulbs to save for next year, stay with round.
Red shallots: sweet, mild and good-looking
Red shallots wear a skin that ranges from rosy copper to deep burgundy, and the flesh inside is streaked with magenta or purple. Cut one in half and it looks like a small work of art. The flavor is milder and a touch sweeter than brown, with less of the sulfur bite. That makes them the favorite for eating raw: sliced thin over a salad, folded into a mignonette for oysters, or quick-pickled in vinegar, where they turn a vivid pink within an hour or so.
In the kitchen, red shallots are a little less forgiving when cooked long and slow. They can go soft and lose some of their color, and the flavor does not deepen as dramatically as it does with brown or grey. They work fine in sautés, but if your cooking leans toward braises and caramelized onions, brown has the edge. French Red is one commonly sold name, and you will see red types listed under various other cultivar names depending on the supplier.
In the garden, red shallots behave much like brown ones. They multiply well, they like the same loose, fertile soil, and they can be planted in fall in mild-winter regions or in early spring where the ground freezes hard. Storage is where they sometimes fall short. Many red types keep fewer months than brown or grey, so plan to use them first and save the long-keepers for winter.
Choosing for your garden and your kitchen
Climate should come first, flavor second. A shallot you love but cannot keep alive is a wasted bed. Humid, rainy summers (the Southeast, the Gulf Coast, much of the Midwest in a wet year) favor brown and red types, which cure more reliably and shrug off a little moisture better than grey. Dry-summer regions open up the whole range, and that is where grey shallots earn their reputation.
A practical way to decide is to ask what you actually cook. A few general guidelines hold up:
- Cook with shallots most nights and want one dependable type: brown.
- Eat them raw, pickled or in salads: red.
- Make French-style sauces and vinaigrettes, and want to store them into late winter: grey, if your climate allows.
- Want the most bulbs from the least planting stock: round brown or red, not banana types.
Storage plans matter too. Shallots grown for the pantry need to be cured properly: pull them when the tops yellow and flop over, usually between late June and August depending on region and planting date, then dry them in a shaded, airy spot for two to three weeks until the necks are tight and the skins rustle. A grey shallot that is cured badly will rot as readily as any other. A well-cured brown one will outlast a sloppy grey one every time.
A word on grocery-store shallots
It is tempting to plant a bag of supermarket shallots, and sometimes it works. The risks are real, though. Store bulbs may carry soil-borne diseases such as white rot, and some commercial alluim crops are treated with sprout inhibitors that can keep bulbs from growing at all. You also rarely know the variety, so you cannot predict the color, size or storage life. Certified disease-free sets from a garden supplier cost a bit more and remove much of the guesswork. If you do experiment with grocery bulbs, plant them in a separate bed from your main crop and rotate away from any allium for at least three to four years.
Mixing types is a smart way to learn what your own soil prefers. A modest trial of one brown, one red and, if your climate is dry enough, a small patch of grey costs little and teaches a lot. Keep the lots labeled, since the bulbs look nearly identical in the ground, and note which ones sprout first, which cure cleanly and which are still firm in February. Once a cluster is established, you will also want to know When and How the Cluster Divides, because dividing and replanting the best performers is how a small starter purchase becomes a permanent supply.
One last nuance worth keeping in mind: saved bulbs adapt. Grow the same shallot in your own bed for a few seasons, replant the largest, healthiest bulbs each year, and you end up with a strain that is a little better suited to your soil and weather than the stock you started with. That is how many “heirloom” shallot lines got their names in the first place.