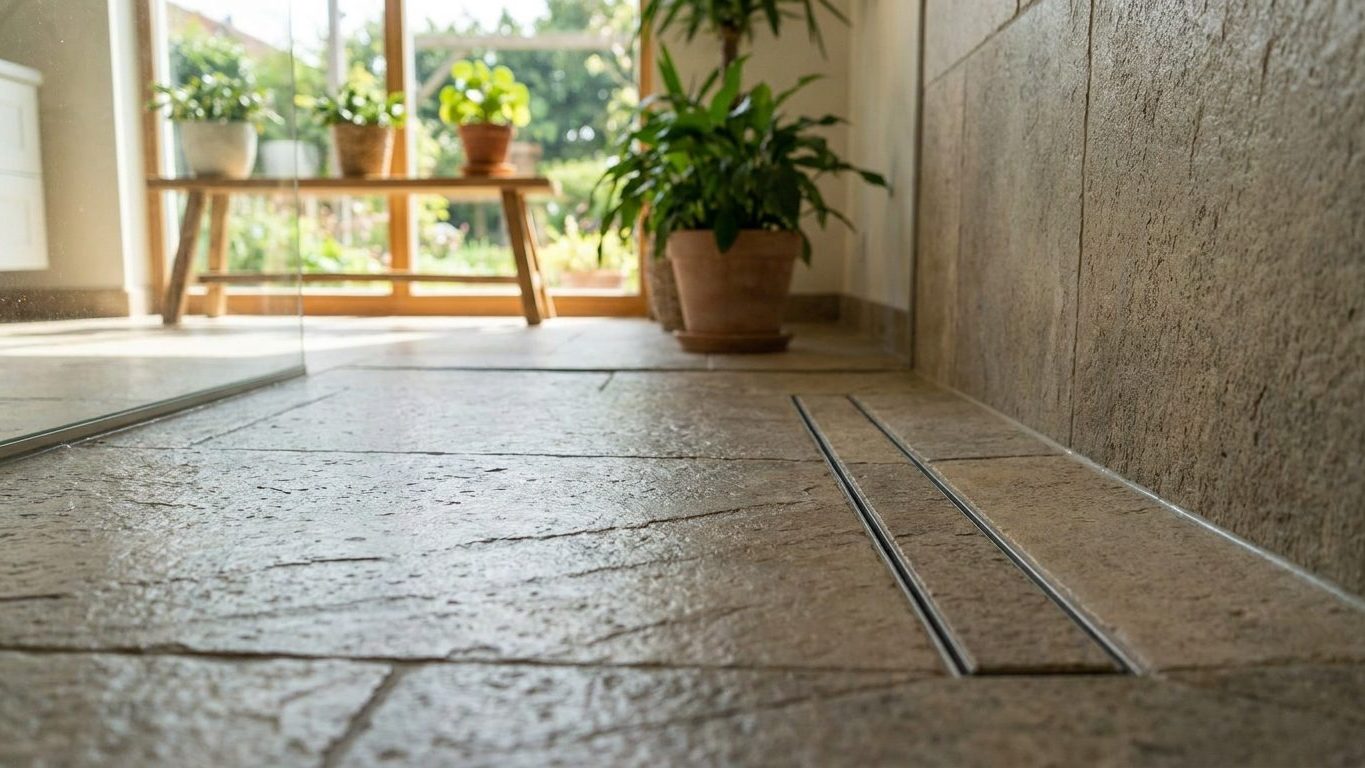

Curbless shower floors look dead level once they’re tiled, which is exactly why people forget there’s a slope hiding under there at all. The floor drops ¼ inch for every foot it runs toward the drain. That fall is the only thing moving water away, since there’s no curb to hold it back. Before tile goes down, get the subfloor recessed enough to build that pitch in and still meet the hallway floor without a step, because pulling tile up later to fix a flat spot costs a lot more than checking it now.
The slope, and the range the code allows

A curbless shower floor has to slope ¼ inch per foot toward the drain, and it cannot exceed ½ inch per foot, under the 2021 International Residential Code, section P2708.1, and the Tile Council of North America’s TCNA B421 shower detail. That’s the entire range the model code allows. Not a suggestion, not a starting point. The finished floor has to fall somewhere inside those two numbers.
Both figures measure the same thing: how much the finished floor surface drops per foot of travel between the highest point of the shower floor and the drain body. Not the subfloor, and not the mortar bed by itself, since the membrane and the tile both add thickness that can bury or exaggerate a pitch nobody double-checked at the end. A mortar bed can be screeded at exactly ¼ inch per foot and still read differently once tile and thinset sit on top of it, because tile has its own thickness and grout lines are never perfectly uniform. The number that counts for code is the one you’d measure standing in the finished shower, tile and all, not the one on the pitch gauge during the mud job.
People also measure from the wrong starting point. The slope runs from the shower floor’s highest edge, not from the glass panel or the edge of a tile pattern. With a center drain, that means checking the fall from several directions, since a floor can pass at the front wall and fail at a side wall if the bed wasn’t screeded evenly all around. With a linear drain set against one wall, the fall usually runs a single direction, and the wall farthest from the drain is the spot most likely to come in flat.
Why the floor has to drop before anything else happens
The subfloor under a curbless shower gets recessed roughly 1½ to 2 inches below the surrounding bathroom floor, per the TCNA B421 detail, and that recess has to be right before framing closes up, before waterproofing goes on, before anyone talks tile. Get it wrong and everything built on top of it, the slope, the membrane, the finished floor height, is wrong too.
The reason is plain geometry. A curbless shower has no raised curb to hide a thick mortar bed or a jump in floor height. The finished shower floor has to meet the finished bathroom floor at the same elevation, no step, no lip, nothing to catch a foot or a wheel. But the shower floor still needs room underneath for the pitched mortar bed that builds the ¼ inch per foot slope, for the waterproofing membrane, and often for a layer of rigid insulation or a pre-sloped foam pan. That stacks up to somewhere between 1½ and 2 inches of buildup. Shortchange the recess and the shower floor either sits proud of the bathroom floor or the slope gets shorted to make the numbers work.
Where the recess gets tight
The recess matters most in small stalls, close to the practical minimum footprint covered on our page about minimum shower size and why 30 by 30 feels small. A shower with more floor area spreads the pitch over a longer run and lands inside the recess with room to spare. A small one has almost no margin for a mortar bed that runs thick in one corner.
This is also why the recess gets built into framing, sometimes by dropping the joists, sometimes by framing a plywood pocket, rather than left for the tile crew to solve later with extra mud. A tile setter can adjust a slope. Nobody can add depth to a subfloor that was never framed low enough to begin with, short of tearing it back out.
Waterproofing a floor with no curb to contain it
The waterproofing membrane in a curbless shower has to extend past the shower’s edges and turn up the wall at the perimeter, under ANSI A118.10. There’s no curb to act as a dam, so the membrane alone keeps water inside the wet area, across the floor and up any vertical surface where it could otherwise track sideways under the tile.
That upturn is the detail worth checking, because it’s invisible once tile is set. It needs to run up the wall far enough to stay above the water line even with the door open and no curb catching splash-out. How high shower waterproofing has to go is a separate question from how far the membrane has to spread across the floor, and a curbless design pushes both, since the whole bathroom floor around the shower effectively joins the wet area.
Model code versus local adoption
The 2021 International Residential Code and ANSI A118.10 are model standards. They apply only where a city or county has adopted that edition, and many jurisdictions amend the plumbing and waterproofing sections when they do, tightening some details and leaving older editions in force for others. The code sets the rule. The permit and the inspection come from the local building department, not from the document itself.
Nothing in the model waterproofing rule carves out an exception for curbless design, no reduced membrane height and no shortened perimeter for a zero-threshold shower. If a contractor claims the perimeter turn-up isn’t needed because the shower is curbless, that’s backwards. Removing the curb is exactly what makes the membrane’s job harder, not optional. Check with the local building department before assuming any variation applies to your project.
Checking the fall of a finished shower with a level

To check the pitch of a finished floor, set a level, a long one rather than a torpedo level, from the shower floor’s highest point to the drain, and read the gap under the level’s low end. Over a one-foot run, that gap should read somewhere between ¼ inch and ½ inch, the same range the 2021 IRC and TCNA B421 set for construction. Over a two-foot run, expect roughly double that gap, since the slope runs in a straight line to the drain.
The most common measuring mistake is checking one line across the floor and assuming the rest of the pan matches it. A floor pitched correctly toward the drain from the front can still run flat, or even backward, along a side wall if the bed wasn’t screeded evenly in every direction.
- Set the level from the floor’s highest point straight to the drain and note the gap under the low end.
- Repeat from at least two more points around the perimeter, not just the one easiest to reach.
- Measure at the finished tile surface, not on top of a bath mat, drain cover, or shower base insert.
- Flag any point that reads flat or reversed. That detail matters more than the overall average.
None of this tells you, on its own, whether the shower meets code where you live. It tells you what the floor is actually doing. Bring those numbers to the plumber or tile contractor who built it, or to the local building department, and let them judge the reading against the standard that applies in your jurisdiction.
The curbless shower that wets the hallway
A curbless shower floor that falls short of ¼ inch per foot doesn’t fail all at once. Water sits near the perimeter instead of running to the drain, and with no curb to hold it in, it finds the lowest point available, which on a curbless design is often the transition into the bathroom floor itself. Over months, that means water tracking past the edge every shower, soaking grout lines and eventually reaching the membrane’s perimeter turn-up if that detail wasn’t built tall enough to start with.
At inspection, a building official checking pitch with a level can catch a flat or reversed floor before tile ever goes down, which is the cheap point to catch it. Caught after tile and grout are set, the fix usually means demolishing back to the subfloor and rebuilding the mortar bed and membrane from scratch, since there’s no way to add slope from the top without tearing out what’s already there. A floor that runs past ½ inch per foot creates a different problem: it feels like a ramp underfoot, which matters more in a curbless design built for level, easy access than it would behind a curb where nobody expects the floor to feel flat anyway.
If you’re planning a curbless shower, or checking one that’s already built, the figures in this article come from model code documents, not from your local amendments. Before tile goes down, or before you sign off on finished work, take your measurements to the local building department, a licensed plumber, or a structural engineer if the recess involves cutting into a concrete slab, and let them confirm what applies where you live.
Common questions
Can a curbless shower use a linear drain along one wall instead of a center drain?
Yes, and it’s common in curbless designs since a linear drain lets the floor slope in a single direction rather than pitching toward a center point from every side. The ¼ inch per foot to ½ inch per foot range from the 2021 IRC and TCNA B421 still applies, no matter which direction the water actually travels to reach the drain.
Does the bathroom floor outside the shower need to slope too?
No. The sloped floor is a shower feature, not a bathroom-wide one. Only the waterproofed shower area, from its edge to the drain, carries the ¼ inch per foot pitch. The surrounding bathroom floor stays flat, which is exactly why the recess and the perimeter waterproofing detail matter so much at that transition line.
Can I use a prefabricated sloped shower pan instead of building the mortar bed slope by hand?
Many curbless installations use a preformed foam or PVC pan already sloped to the drain at the manufacturer’s stated pitch. The subfloor recess still has to account for the pan’s thickness plus the membrane and tile above it, so the 1½ to 2 inch recess figure from the TCNA B421 detail is still the number to plan framing around. That holds for a mortar-bed slope and for a factory-sloped pan alike.
What if my subfloor is a concrete slab and I can’t just drop the joists?
Recessing a slab means saw-cutting and removing concrete rather than framing it low, and that’s more disruptive, usually calling for a contractor or structural engineer to confirm how much can be cut without hitting reinforcing steel or compromising the slab. The target depth is still the 1½ to 2 inches the TCNA detail describes. Getting there just looks different with a slab underfoot.