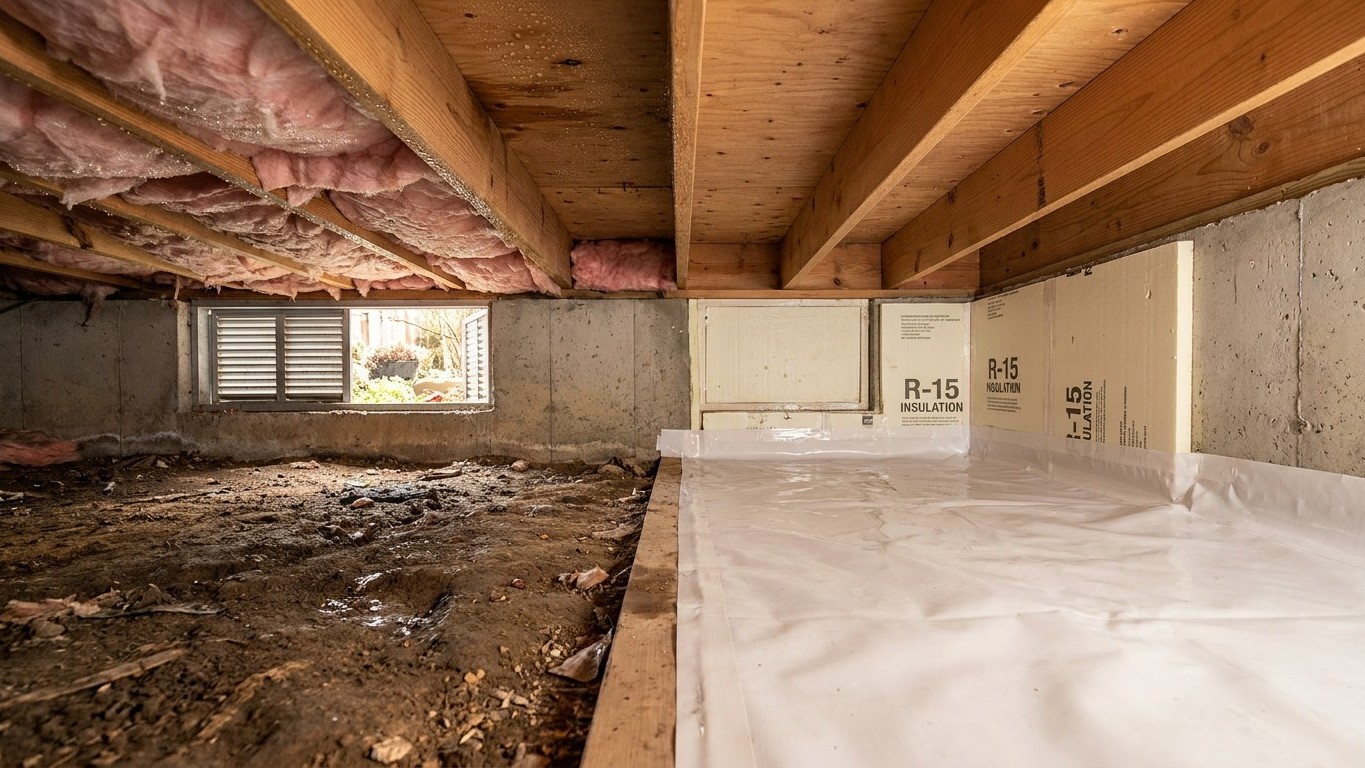

The floor or the walls, not both. If a crawlspace is vented and treated as part of the outdoors, Insulation goes in the floor above it. If it’s sealed and treated as part of the conditioned house, insulation goes on its walls instead. Mixing the two, floor insulation plus closed vents, is a common way crawlspaces end up damp, moldy, or rotting from the inside. Which approach fits depends on your climate and your local code.
Two approaches that are not compatible

Every crawlspace insulation job starts with a decision that determines everything downstream: is this space going to keep behaving like outdoor air, or is it going to join the conditioned envelope of the house?
The vented crawlspace is the traditional setup. Foundation vents stay open, outside air moves through freely, and the floor system above the crawlspace becomes the thermal boundary. In this model, insulation goes between the floor joists, against the underside of the subfloor. The crawlspace itself stays cold in winter and humid in summer, because it’s functionally outside.
The sealed crawlspace flips that logic. Vents get closed off, a ground cover goes down, and the walls of the crawlspace become the thermal and air boundary instead of the floor above. The space is now inside the building envelope, conditioned or at least buffered, and insulation moves from the floor joists to the foundation walls.
Here’s where a lot of crawlspaces go wrong: someone insulates the floor above and closes up the vents, thinking more insulation and less airflow is simply better. It isn’t. Close the vents on a space that still has cold, insulated floor joists above it, and you’ve created a chamber with no ventilation and no heating, where moisture from the soil has nowhere to go and nothing to dry it out. That combination is behind a large share of the crawlspace mold and wood-rot calls that pest and remediation companies get every year.
Which of the two approaches is right for a given house depends on regional climate patterns, soil moisture conditions, and what the local building code specifies for crawlspace construction in that jurisdiction. Some regions default to sealed crawlspaces now precisely because of moisture problems with the vented model in humid climates; others still build and code for vented crawlspaces as standard practice. This page can’t tell you which category your address falls into. That’s a conversation for local code officials or a qualified home performance contractor who knows the building science of your specific region, not a national guide.
What this page can do is lay out what each approach actually involves, so that whichever one applies to your house, you know what “done correctly” looks like.
Insulating the floor above
If your crawlspace stays vented, the insulation job happens overhead, in the floor system that separates the crawlspace from the living space above it. The amount of insulation recommended there is tied to climate zone, and it comes from the same U.S. ENERGY STAR retrofit guidance used for attics, just read from a different column of the table.
| Climate zone | Attic (if uninsulated) | Attic (if you already have 3-4 inches) | Floor (over crawlspace) |
|---|---|---|---|
| Zone 1 | R30 | R25 | R13 |
| Zone 2 | R49 | R38 | R13 |
| Zone 3 | R49 | R38 | R19 |
| Zones 4A and 4B | R60 | R49 | R19 |
| Zones 6, 5, and 4C | R60 | R49 | R30 |
| Zones 7 and 8 | R60 | R49 | R38 |
The zone in that table comes from an ENERGY STAR climate map, an image-based map of the country divided into numbered zones, not from a state name or a ZIP code you could look up here. Checking that map before buying material is the step that keeps you from installing the wrong R-value.
Getting the installation right
The floor-insulation job has three parts that matter more than the R-value on the bag:
- Install the insulation so it stays in direct contact with the underside of the subfloor, with no air gap between the insulation and the floor above it.
- Support the material mechanically, with wire mesh, netting, or rigid rods designed for the purpose, rather than relying on friction-fit alone to hold it in place.
- Insulate the water pipes and any ductwork running through the crawlspace, since once the floor above is insulated, those pipes and ducts are effectively outside the conditioned envelope and exposed to unconditioned, sometimes freezing, air.
That gap between sagging insulation and the floor above is the single most common failure in this kind of job. When batts lose contact with the subfloor, whether from poor initial fastening or from gravity working on them over a few winters, cold air fills the space that opened up. Heat from the house above moves down through that air gap by convection, and the insulation below the gap is doing almost nothing useful anymore. A batt that looks intact from below can still be failing if it isn’t pressed tight against the wood.
Sealing and Insulating the walls
The alternative treats the crawlspace as conditioned space, and moves the insulation from the joists overhead to the foundation walls around the perimeter. ENERGY STAR’s guidance for basement and crawlspace walls, again organized by climate zone, looks like this:
| Climate zone | Insulation option |
|---|---|
| Zone 3 | R5 insulative sheathing, or R13 batt insulation |
| Zones 4A and 4B | R10 sheathing, or R13 batt insulation |
| Zones 4C and 5-8 | R15 sheathing, or R19 batt insulation |
This same guidance also covers exterior walls whenever siding is being removed anyway, with different R-values for uninsulated versus already-insulated 2×4 framing. It’s a recommendation for that moment, not a reason to strip perfectly good siding off a house just to add wall insulation.
Sealing is more than insulation
Insulating the crawlspace walls only works as part of a complete sealed-crawlspace job. Three other pieces have to happen alongside it:
- A ground cover, typically a heavy plastic or vinyl vapor barrier, laid across the entire dirt floor and sealed at the seams and edges, to stop soil moisture from evaporating into the space.
- The foundation vents get closed or mechanically sealed, since the whole point of this approach is stopping outside air, and the moisture it carries, from entering.
- Any combustion appliance located in the crawlspace, a water heater or furnace with a standing pilot or open combustion, needs to be assessed before the space gets sealed.
That last point isn’t a minor detail. A sealed, unvented space that also contains a combustion appliance changes how that appliance draws combustion air and where its exhaust gases can end up. This is a genuine safety question, not a finishing touch, and it calls for evaluation by someone qualified to look at both the appliance and the space, not a DIY judgment call. If there’s any gas or oil-burning equipment down there, read through this site’s carbon monoxide guide before you close anything up, and get the appliance checked as part of the sealing project rather than after the fact.
Water comes before insulation
Neither approach works over a wet crawlspace. Standing water, a drainage problem outside the foundation, or a persistent damp smell means the space needs to dry out and stay dry before any insulation goes in, floor or walls. Insulation installed over an unresolved moisture problem doesn’t fix it. It traps it, holding water against wood framing and insulation material where it can’t evaporate, which is how a manageable damp spot becomes structural rot a few years later.
What to check before you insulate
- Look for standing water or wet soil on the crawlspace floor, especially after rain, and note whether it drains away within a day or two or lingers.
- Check the grading outside the foundation. Ground that slopes toward the house, rather than away from it, will keep feeding water into the crawlspace no matter what happens inside.
- Inspect gutters and downspouts. Downspouts that dump water right next to the foundation are one of the most common, and most fixable, sources of crawlspace moisture.
- Look at exposed wood framing for soft spots, discoloration, or a musty smell, all signs that moisture has already been a problem for a while.
- If the crawlspace already has vermiculite insulation or any material you suspect could contain vermiculite or asbestos, don’t disturb it while doing these checks. Get it evaluated first.
Once the water issue is actually resolved, not just insulated over, the payoff for doing this work is measurable. U.S. ENERGY STAR states: “EPA estimates that homeowners can save an average of 15% on heating and cooling costs (or an average of 11% on total energy costs) by air sealing their homes and adding insulation in attics, floors over crawl spaces, and accessible basement rim joists.” That figure is an average from energy modeling of a typical existing U.S. home, and it specifically names floors over crawlspaces as one of the three areas the estimate covers, alongside attics and accessible basement rim joists, not walls or windows.
Common questions
Do I need a vapor barrier on the ground either way?
A ground cover over bare soil is part of sealing a crawlspace and treating it as conditioned space. If you’re keeping the crawlspace vented and insulating the floor above instead, the ground cover question is separate from the insulation decision, and which surfaces need a vapor barrier and which side it faces depends on your climate and assembly. There’s no single rule that applies everywhere, and installing a vapor barrier facing the wrong direction can trap moisture inside a wall or floor assembly rather than keeping it out. That’s a detail worth confirming locally rather than guessing.
Can I insulate the floor and just crack the vents open a little instead of closing them fully?
Partially open vents don’t solve the mismatch. The floor insulation is still creating a cold, humid, unconditioned space below it, and any amount of outside air moving through that space still carries moisture with it. The two approaches, vented-with-floor-insulation and sealed-with-wall-insulation, are designed as complete systems, not a spectrum you can dial in between.
Is it safe to work in a crawlspace myself?
Walking on floor joists rather than the material between them is basic safety in any crawlspace, since stepping through insulation or drywall below can mean a fall onto whatever’s underneath. Keep clear of any material that might contain vermiculite or asbestos rather than disturbing it, and remember that clearances around flues, chimneys, and certain recessed lighting fixtures are set by the appliance or fixture manufacturer, not by a general rule of thumb.
How do I find my climate zone for the R-value tables?
ENERGY STAR publishes the climate zone map as an image on its website, dividing the country into numbered zones that don’t align neatly with state lines. Checking that map directly, rather than assuming a zone based on your state or region, is the only reliable way to pick the right R-value from either table on this page.