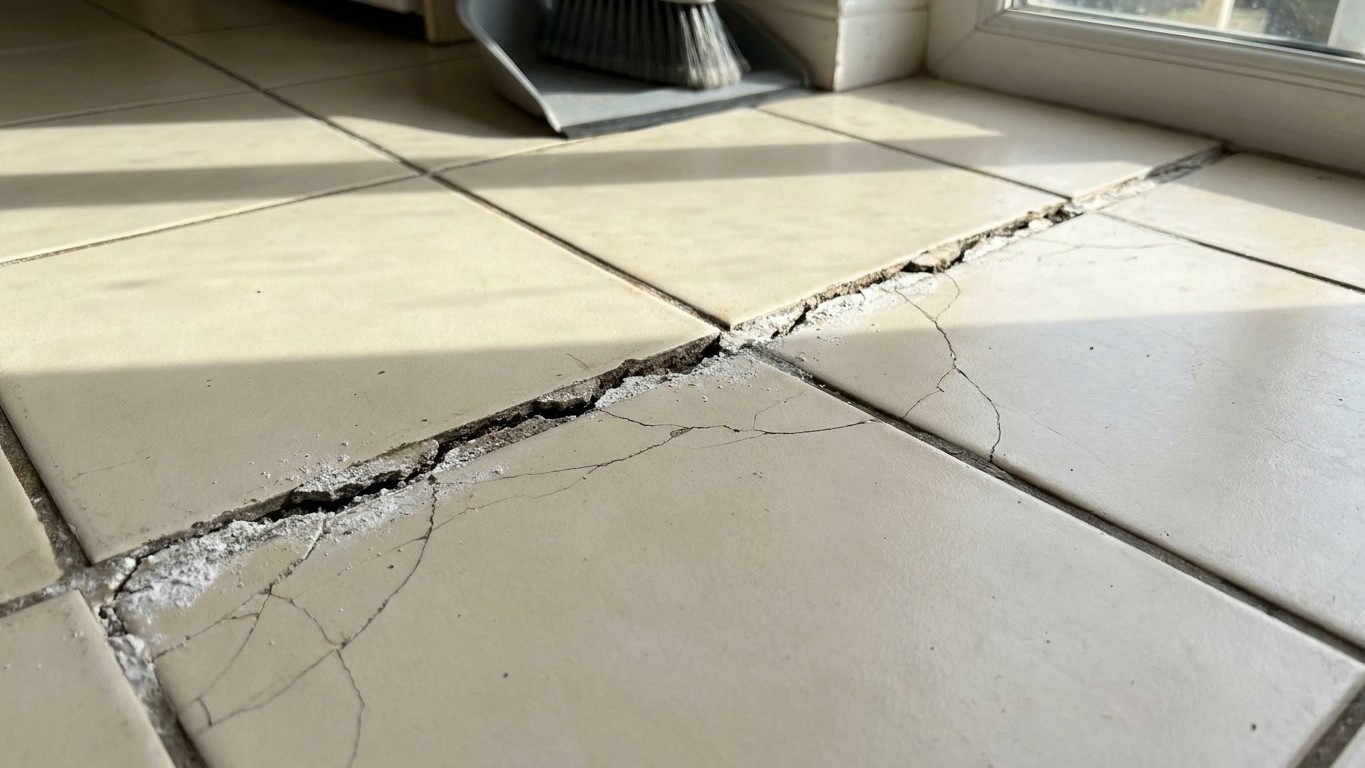

Cracked or missing grout is rarely about the grout itself. It’s a symptom: something beneath the tile is moving, flexing, or has moved once and left a permanent gap. Regrouting fixes the look. It does nothing for the cause, which is why the same lines crack again within a season if nobody checks what’s underneath.
What is actually happening
Grout is a filler, not a glue. It sits in the joint between tiles and takes whatever stress the assembly passes to it, but it has almost no ability to stretch or compress. Tile itself is rigid too. The only layer in a typical floor with any give is the thinset or mortar bed underneath, and below that, the subfloor. When that combination flexes, even slightly, the grout is the first thing to show it because it’s the weakest, most brittle material in the stack.
That’s why cracks in grout tend to follow straight, repeatable lines rather than appearing at random. A line that runs the same path every time, along a wall, across a doorway, or down the center of a room, is usually marking a seam in the plywood or a joist below. The floor moves a fraction of an inch under foot traffic or seasonal humidity, the tile can’t absorb it, and the grout line becomes the release valve. Over months, that flexing point loosens, crumbles, and eventually the piece falls out entirely.
Not every failure follows a straight line, though. Grout that crumbles in patches scattered across a room, with no clear pattern, points somewhere else: the mix itself. Grout that wasn’t given the recommended cure time, was mixed too wet, or was installed over a substrate that wasn’t properly prepped can fail on its own, independent of what’s happening underneath. This kind of failure tends to be shallow and dusty rather than cracked clean through, and it usually shows up within the first year or two rather than after a decade of normal use.
There’s a third pattern worth knowing, because it changes the whole conversation: grout that’s failing right at a wall, a cabinet base, or where two different flooring materials meet. Manufacturers leave, or should leave, a small gap at these transition points specifically so the floor has somewhere to expand without pushing on the tile. If that gap was filled solid with grout or mortar during installation, the floor has nowhere to go, and the stress concentrates exactly there. That’s an installation detail, not a structural problem, and it’s one of the few failures on this list that doesn’t require checking anything beneath the surface at all.
The covering, or what is under it
The distinction that matters most here is simple to state and easy to skip: a cracked grout line can belong to the tile job itself, or it can belong to the frame of the house. Regrouting solves the first. It does nothing for the second, and doing it anyway just buys a few more months before the same crack reappears.
| What you observe | What it usually means | Which layer it belongs to |
|---|---|---|
| Hairline cracks along the same line every time, room after room | A seam or joint in the subfloor panels flexing under the tile | Subfloor |
| Cracking that follows the exact path of a wall or a run of cabinets | The wall plate or cabinet base moving slightly, often with seasonal humidity | Framing / subfloor |
| A single tile that rocks or feels hollow when pressed, with grout crumbling only around it | Poor bond between that tile and the mortar bed, isolated to that spot | Covering (installation) |
| Grout crumbling in scattered patches, dusty rather than cracked, no clear line | Mix or cure issue at the time of installation | Covering (installation) |
| Cracking concentrated at a threshold, wall edge, or where two floor types meet | Missing expansion gap; the floor has nowhere to move | Covering (installation detail) |
| Cracks that widen, then narrow, with the seasons, and tiles that lift slightly at the edges | The subfloor itself is swelling and shrinking, usually from moisture cycling | Subfloor / moisture |
| A soft, springy feel underfoot near the cracked area, sometimes with a faint musty smell | The subfloor has been wet long enough to lose structural stiffness | Subfloor / joists |
The pattern to notice: anything confined to one tile or one small area is almost always the covering, the original installation. Anything that repeats in a straight, predictable line across a whole room, or that comes with a soft or springy feel underfoot, is the frame of the house talking through the tile. That second category is the one worth slowing down for, because sanding, regrouting, or replacing tile over an unresolved subfloor issue is work that has to be redone once the real cause is found. See the parent guide on reading what the surface is telling you for how this same logic applies to cupping, gapping, and other floor complaints beyond grout.
What to check, in order
- Walk the room slowly, in socks. Note every spot that feels soft, springy, or slightly lower than the surrounding floor. This rules nothing out on its own, but it tells you where to focus the rest of the checks. A floor that feels uniformly solid everywhere except right at the cracked grout points toward an installation issue, not a structural one.
- Press on individual tiles near the cracks. A tile that rocks or sounds hollow when tapped with a knuckle has a bond failure with the mortar underneath, isolated to that tile. This rules out a subfloor problem for that specific spot, though it doesn’t clear the rest of the room.
- Check the crack pattern against the room layout. Get low and sight down the line. If it lines up with a wall, a cabinet run, or where you know two sheets of subfloor meet (often visible from a basement or crawlspace below, if accessible), that’s a structural signature. If it doesn’t line up with anything and looks scattered instead, that points back to the grout mix or installation.
- Look underneath, if there’s a basement or crawlspace. Check the joists and the underside of the subfloor directly below the cracked area for staining, sagging, or a chalky white residue on any concrete nearby. This is the point where you’re looking for signs of past or ongoing moisture, not measuring anything with a meter yet.
- Bring in a moisture test if the visual signs point to water. A flooring contractor or inspector uses a moisture meter to compare the suspect area against a known-dry reference point in the same house. That test exists to confirm or rule out moisture as the driver, and it’s the last check before deciding whether this stays a flooring repair or becomes something bigger.
Everything through step four can be done in an afternoon, without tools beyond a flashlight and a willingness to get on your knees near the baseboards. Step five is where you either close the book on moisture as a cause, or you confirm it and move to the next section.
When this stops being a flooring job
Three things end this page and hand the problem to a different trade entirely.
The first is anything structural: joists that sag, a beam that’s visibly deflected, support posts that have shifted or rotted at the base. No amount of regrouting, releveling, or new tile addresses a frame that’s failing to hold its shape. That call goes to a structural engineer or a qualified contractor who can evaluate load paths, not a flooring installer, because the fix involves sistering joists, adding support, or in some cases jacking and leveling the framing before any floor covering goes back down.
The second is active water. If the moisture check in the previous section turns up a source that’s still wet, still coming from somewhere, that’s a plumbing or building envelope problem first. A slow leak under a slab, a failed supply line, water intruding from outside through a foundation crack or poor grading, none of that gets solved by better grout. It gets solved by finding and stopping the source, which is a plumber’s job if it’s a pipe, or work tied to drainage and roofing if the water is coming from above or from outside the walls. If you suspect the source is a roof, gutter, or flashing issue rather than plumbing, that’s a separate track worth checking before any floor work resumes.
The third is smell. A musty, damp odor coming from under a floor usually means wood that’s been wet long enough to start breaking down, and often long enough for mold to take hold in the subfloor or joist bays. That’s not a cosmetic problem and it’s not something a homeowner should sand, seal, or cover over. It calls for someone qualified to assess both the moisture source and the condition of the wood itself before any new covering goes down, because sealing a floor over an active mold or rot issue traps the problem rather than solving it.
Short of those three, most grout failures stay squarely in flooring-repair territory: a bad mix, a missing expansion gap, an isolated bond failure. The difference is worth the twenty minutes it takes to check, because the alternative is redoing the same regrout job every year for reasons that were never about the grout at all.