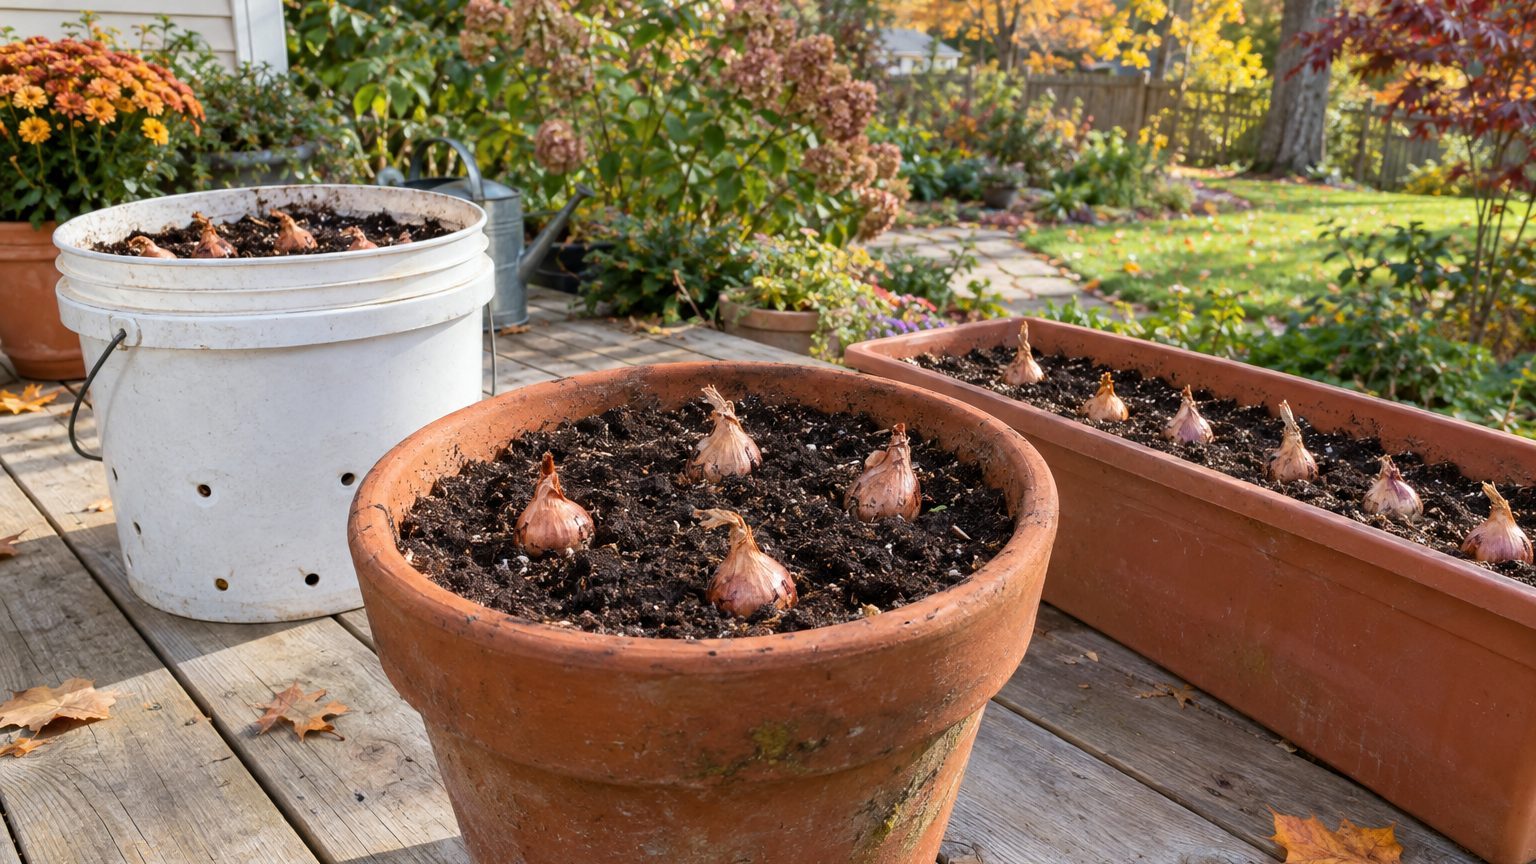

Yes, shallots grow well in containers, and they are one of the easier alliums to keep in a pot. A container at least 8 inches deep and 12 inches across will hold five or six bulbs. Fill it with fresh potting mix, set it where it gets six or more hours of direct sun, and keep the mix evenly moist until the tops start to flop. A single planted bulb typically divides into a cluster of several, so a pot the size of a dinner plate can return a respectable pile of shallots.
The catch is that containers change the rules a little. Pots dry out faster than beds, heat up faster, and freeze harder. Get those three things right and the rest is simple. For the bigger picture on varieties, bulb sizes, and in-ground planting, start with Growing Shallots: One Bulb In, a Handful Out. This page covers what changes once the whole crop lives in a pot.
Choosing the Right Container
Shallot roots stay shallow. Most of the feeding happens in the top 6 to 8 inches of soil, which is why a pot doesn’t need to be huge. Depth matters less than surface area, because every bulb you plant needs elbow room to split into its cluster.
A workable rule: give each bulb a patch of roughly 4 to 6 inches of space in every direction. A 12-inch round pot fits five or six bulbs. A 5-gallon bucket (with holes drilled in the bottom, plenty of them) fits about the same. A long window-box style planter, 8 inches deep and 24 to 30 inches long, can take a single staggered row of five or six with the bulbs spaced 4 to 5 inches apart. Pack them tighter and you get a crop of marbles instead of bulbs. Crowded shallots still grow, but they stay small and the clusters tangle.
Material and color
Drainage holes are non-negotiable. A shallot sitting in soggy mix rots from the base plate up, and no amount of careful watering fixes a pot that can’t drain. If a decorative pot has no holes, use it as a sleeve and set a plastic nursery pot inside.
Beyond that, the material is a trade-off:
- Plastic and glazed ceramic hold moisture well but can cook roots when a dark pot sits against a sunny wall in July.
- Unglazed terracotta breathes and runs cooler, but it dries out quickly and may need water every day in a hot spell.
- Fabric grow bags drain freely, resist overwatering, and stay cooler, though they also dry faster than plastic.
- Wooden boxes insulate roots from both heat and cold. Untreated cedar is a common pick.
In the Southwest and the Gulf states, where afternoon sun can push container temperatures well past what roots like, lighter colors and a bit of afternoon shade help. In the northern tier, a dark pot that warms early in spring is an advantage.
Mix, Bulbs, and Timing
Skip garden soil. It compacts in a pot, drains poorly, and carries whatever disease and weed seeds are living in your yard. A quality bagged potting mix, ideally blended with a few handfuls of finished compost, gives shallots the loose, fertile structure they want. Aim for a pH somewhere between 6.0 and 7.0, which most general-purpose mixes already hit. Stir in a slow-release, balanced fertilizer at planting if the mix doesn’t already contain one (check the bag).
Fresh mix each season matters more than most people realize. Onion-family diseases such as white rot can persist in soil for years, and containers filled with last year’s allium-heavy mix invite trouble. Starting clean is the container gardener’s version of crop rotation, and it’s far simpler than the bed-by-bed planning described in Rotating Shallots With the Other Alliums. Dump the old mix on a non-allium bed or in the compost, scrub the pot, and refill.
What to plant
Buy bulbs sold for planting from a seed company or garden center. Grocery store shallots sometimes sprout, but they may have been treated or stored in ways that hurt performance, and you can’t know which variety you have. Seed-grown shallots, started from true seed, are another route. They suit containers well because they tend to produce a single round bulb rather than a cluster, so they can be spaced slightly closer. Bulb-grown types give the classic multiplication.
Plant each bulb pointy end up, with the tip just level with or barely peeking above the mix. Burying them deeply slows emergence and invites rot. Firm the mix gently, then water until it runs from the bottom holes.
When to plant
Timing depends on winter severity. Today is October 7, so the fall window is open or opening for gardeners in USDA zones 7 through 10. Planting in October or November lets roots establish before cold weather, and the bulbs resume growth in late winter for a harvest in late spring or early summer. Spring planting, as soon as the mix is workable (March or April in much of the country), suits everyone else.
Gardeners in zone 6 and colder should think twice about fall-planted pots. A container has no surrounding earth to buffer it, so the mix can freeze solid, thaw, and refreeze, which heaves bulbs upward and snaps roots. If you want a fall start in the cold-winter states, move the pots against a house wall or into an unheated garage, where temperatures stay lower than summer but swing less. Otherwise, wait for spring. The harvest comes a few weeks later, and nothing is at risk.
Water, Food, and Daily Care
Water is where container shallots most often go wrong. A bed of shallots might need about an inch of water per week. A pot in full sun can dry out in a day or two once the weather warms, and a fabric bag even faster. Poke a finger an inch or two into the mix: if it’s dry at that depth, water. If it’s damp, wait. In midsummer heat, daily watering is normal. In cool spring weather, every three or four days may be plenty.
Aim for consistent moisture rather than a cycle of drought and flood. Wide swings stress the plants and can leave bulbs misshapen or poorly sized. A one-inch layer of shredded leaves, straw, or untreated grass clippings on top of the mix slows evaporation and keeps the surface from crusting. It also blocks most weed seeds.
Weeds are, in fact, one of the quiet advantages of pots. Shallots have thin, upright leaves that cast almost no shade and compete poorly, which is why in-ground beds turn into a weeding chore (see Why Shallots Lose to Weeds). In a container filled with sterile mix, the problem mostly disappears. Pull the odd airborne seedling and move on.
Feeding on a schedule
Shallots are light-to-moderate feeders, but pots leach nutrients with every watering. If the mix started with slow-release fertilizer, a liquid feed with nitrogen every three to four weeks during leafy growth is usually enough. Stop feeding once the bulbs begin swelling and the tops start to slow, which is typically late spring or early summer depending on when you planted. Pushing nitrogen late produces lush green tops, thick necks, and bulbs that store poorly.
Sun, pests, and problems
Six hours of direct sun is the floor. Eight is better. Shallots on a shaded balcony produce plenty of greens but disappointing bulbs. Rotate the pot a quarter turn weekly if light comes from one side, so the leaves don’t all lean.
Pests are fewer in containers but not absent. Onion thrips leave silvery streaks on leaves and thrive in hot, dry weather. A strong spray of water knocks them back. Onion maggots, which lay eggs near the base of plants in spring, can be blocked with a lightweight row cover draped over the pot. Yellow tips that appear early, a gray-purple fuzz on leaves in humid weather (downy mildew), or a base that feels soft usually point to too much water, too little airflow, or both. Space pots so air moves between them, and water the mix rather than the foliage.
Harvest, Curing, and the Pot Afterward
The plants announce the harvest themselves. When the tops yellow and fall over, usually in early to mid summer for a spring planting and late spring to early summer for a fall one, the bulbs are done growing. Cut back on watering for the final week or two to let the outer skins start drying, then tip the pot out or loosen the mix and lift the clusters.
Containers make this easy. No digging fork, no stabbed bulbs, no wrestling with clay. Tip the pot onto a tarp, break apart the root mass, and separate the clusters.
Curing decides how long the crop keeps. Lay the bulbs in a single layer, tops still attached, in a warm, dry, shaded spot with good airflow, such as a covered porch or garage with a fan. After two to four weeks, the necks should be fully dry and the skins papery. Trim the roots and tops, brush off the loose dirt (don’t wash them), and store in mesh bags or open baskets somewhere cool and dry. Properly cured shallots commonly keep for several months, outlasting most yellow onions.
Count the yield, then save the best. Pick the firm, medium-sized bulbs with intact skins and hold them back for next season’s planting. Shallot growers have done this for generations, and it’s the reason a single bag of starter bulbs can supply a garden for years. One caution: if any bulbs showed rot, soft spots, or unusual mottling, leave those out of your seed stock.
The pot itself gets a reset. Empty the old mix, rinse the container, and let it dry before refilling. Used shallot mix can go into the compost pile or onto a bed that will hold something unrelated, like tomatoes or beans. A shallot pot also makes a handy second-season container. Fill it with lettuce in late summer, and it earns a second harvest before frost.
Small detail worth knowing: the green tops are edible. If a few plants get crowded or a cluster looks too dense in spring, snip some greens and use them like chives. Taking a few leaves from each plant won’t hurt bulb size, as long as the plants keep most of their foliage.