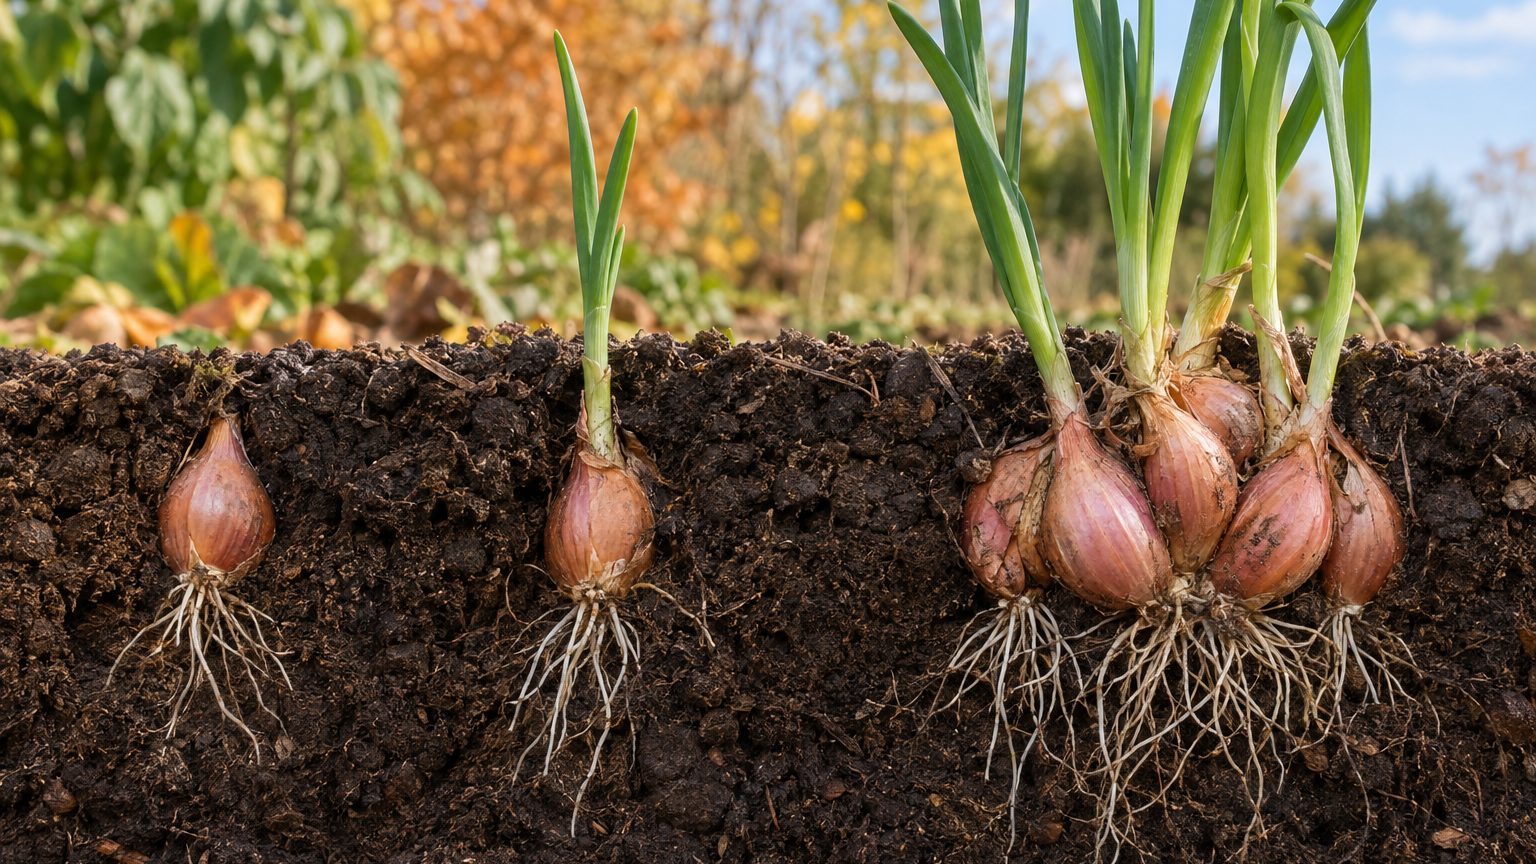

A single shallot bulb divides underground over one growing season. Roots and green shoots appear within two to four weeks of planting, side shoots start forming at the base once the plant has a few leaves, and the new bulbs swell in late spring and early summer as days lengthen. By harvest, one planted bulb has usually become a cluster of three to eight (sometimes ten or more). The exact count depends on the variety, the size of the seed bulb, spacing, soil and weather.
The sections below walk through what happens in the soil, how the calendar changes by region, what you can do to improve the split, and how to handle the cluster once it comes out of the ground. For the full picture of the crop, start with Growing Shallots: One Bulb In, a Handful Out.
What actually happens underground
A shallot is a multiplier onion, which is why it behaves so differently from the bulb onions at the grocery store. A bulb onion grows one bulb from one plant. A shallot grown from a clove-sized bulb (called a “set” or “seed bulb”) forms several growing points, and each one builds its own bulb.
The sequence goes roughly like this. After planting, the bulb pushes out roots from its flat base, the basal plate, and sends up a green shoot. As the plant matures, the base produces side shoots, called offsets or daughter bulbs, that sit tightly against the mother. Each offset has its own roots and its own leaves. You can see this above ground: a young shallot plant that started as one green spike turns into a small fan of spikes.
The mother bulb doesn’t survive as a bulb. Its stored energy goes into the new growth, and by midsummer it is typically a papery, shrunken remnant at the center of the cluster. The new bulbs, still joined at the base, are the crop.
Day length sets the clock for the final stage. Shallots are long-day plants, so as daylight stretches past roughly 13 to 14 hours in late spring, the plant stops building leaves and starts filling bulbs. This is why planting very late in spring costs you. A plant with only a few weeks of leaf growth before bulbing begins has little to divide with and ends up with a smaller cluster of smaller bulbs.
Variety matters too. Some types naturally throw large clusters of small bulbs, while others make fewer, plumper ones. If you haven’t settled on one yet, Which Shallots to Grow: Gray, Brown and Red covers how the main groups differ in bulb size and storage. One caution: shallots grown from true seed, rather than from bulbs, tend to form fewer, more onion-like bulbs, so the cluster behavior described here applies mainly to bulb-grown crops.
The timeline, season by season
Planting date shapes when the cluster divides, because it determines how much cool weather the plant gets for root and leaf growth before bulbing is triggered.
Fall planting
In USDA zones 7 and warmer, fall planting is the easy path. Plant in October or November, when the soil has cooled. The bulb roots in, may push a few inches of green, and then idles through winter. Division picks up in late winter and early spring, and the cluster is fully formed by the time bulbs begin swelling in May. Harvest typically falls in June or July in these regions.
Colder regions can fall-plant as well, with a tighter window. In zones 5 and 6, which cover much of the Midwest and Northeast, the aim is to get bulbs in about four to six weeks before the ground freezes, so they root but don’t send up much top growth. A mulch of 3 to 4 inches of straw or shredded leaves, applied after the ground begins to freeze, protects against heaving. Pull it back in early spring so the soil warms. Gardeners in zone 4 and colder (northern Minnesota, Wisconsin, Maine, the northern Rockies) often skip the gamble and plant in spring.
Spring planting
Spring-planted shallots need to go in as soon as the soil is workable, which in many northern states means April, or even late March in a mild year. Shallots tolerate frost on their tops. Sprouting happens within a couple of weeks, offsets form through May, and bulbs size up in June and July. Expect harvest roughly 90 to 120 days after planting, with the exact date depending on the weather. When to Lift Shallots explains the signals to watch, mainly the tops yellowing and flopping over.
Fall-planted shallots often finish with larger clusters than spring-planted ones, simply because they have a head start. Spring planting still works well, but the later you go, the fewer bulbs per cluster you should expect.
Getting a good split: spacing, depth, and feeding
The cluster is mostly decided in the first few weeks, but a handful of choices in the garden can tilt the result.
Spacing. Six inches between bulbs, in rows 12 to 18 inches apart, is the standard recommendation. Plant them closer and the offsets compete for room, which produces more bulbs but smaller ones. Plant them farther apart, say 8 inches, and you get larger individual bulbs. Which result is better depends on what you cook with. Small, uniform bulbs suit pickling and roasting whole, while larger ones are easier to peel and chop.
Depth is the part people overdo. Set each bulb pointed end up, with the tip right at the soil surface or just under it (no more than an inch down in loose soil). Burying a shallot deep tends to produce a longer, whiter neck and slows the early flush of growth. A bulb pushed in with its shoulder still visible is fine, though birds and frost heaving can pull loose plantings out, so check them after the first few weeks and press back any that have lifted.
Soil should be loose and well drained, with a pH somewhere between 6.0 and 7.0. Heavy clay is a common problem across parts of Ohio, Georgia, and Texas. It holds water around bulbs and invites rot, so mixing in compost or planting in a raised row or bed helps. Shallots have shallow roots and need steady moisture, about an inch of water per week from rain or irrigation during active growth.
Nitrogen deserves some discipline. Early in the season, a modest feeding supports leaf growth, and leaves are the factory for the bulbs. Once bulbs begin swelling in late spring or early summer, stop. Late nitrogen keeps the plant making foliage, delays maturity, and leaves thick necks that cure poorly and store badly.
Weeding matters more than it sounds. Shallots have thin, upright leaves that cast little shade, so weeds take hold fast and compete with those shallow roots. Hand-weed or hoe carefully near the clusters, since a stray hoe blade can nick bulbs as they surface.
Should you pull soil back from the cluster?
Some growers gently move soil or mulch away from the swelling bulbs in early summer, so the tops of the bulbs sit at the surface and get sun and air. It reduces moisture around the bulb and helps the outer skins start to dry. It’s optional, but in wet climates, such as the Pacific Northwest or the Southeast, it can help protect against rot. Keep the roots covered and don’t dig into the cluster.
When the cluster doesn’t divide as expected
Not every planting turns out well. Most problems trace back to a few causes.
If you end up with one big bulb instead of a cluster, the planting was probably too late, or the seed bulb was too small to support much offset production. Weak early growth from cold, dry or compacted soil can do the same. A very large seed bulb sometimes produces fewer, bigger offsets, while a very small one (under about half an inch) may give a small, thin cluster. Many growers aim for seed bulbs around 1 to 1.5 inches across, though the right size varies by variety.
Lots of tiny bulbs usually points to crowding or hungry soil. Even so, small shallots are far from useless. They’re good for whole roasting, and they store well.
Bolting, where a flower stalk shoots up from the center, can happen when plants experience a long cold spell after growth has started. Large bulbs planted in fall are the usual victims. Snap the stalk off at the base. The plant puts its energy back into bulbing, though that bulb will be smaller and shouldn’t be stored for long. Rot is the third common failure and usually follows waterlogged soil. Yellow leaves early in the season, well before the natural dieback, are the warning sign.
After harvest: separating the cluster
Once the tops have fallen over and yellowed, lift the clusters with a garden fork rather than pulling by the tops, which can snap the necks. Cure them in a warm, shaded, airy spot (a covered porch or a garage with good airflow works) for two to three weeks, until the outer skins are papery and the necks are dry.
Then comes the actual dividing. Break each cluster apart by hand. The bulbs usually separate with a gentle twist, though some stay joined at the base and may need a gentle tug. Trim the roots and brush off loose dirt, but leave the skins on. Sort them into piles: the biggest for the kitchen, the medium ones (around 1 to 1.5 inches) set aside as next season’s seed, and the smallest for early eating. Save seed bulbs from healthy, disease-free plants only.
Store cured shallots in mesh bags or shallow crates at cool room temperature with decent airflow. Many keep for several months, and some gray and brown types keep longer than red ones. Keep your saved seed bulbs separate from the eating pile so they don’t get used by mistake.
One last nuance on saved seed: replanting your own bulbs year after year works well, but viruses can build up in stock over time. If yields start dropping or plants look stunted or streaky, the usual fix is to buy fresh, certified disease-free bulbs and start the cycle again.