
Replacing a Thermostat is a manageable DIY project if you follow the sequence in order: kill the power at the breaker, label every wire before it comes loose, mount the new backplate level and sealed against the wall cavity, match each wire to its lettered terminal (not its color), then restore power and test heating, cooling, and fan modes separately before touching the schedule. Skipping the labeling step is what turns a 20-minute job into a service call.
Before anything comes off the wall
The old Thermostat is not just a dial or a screen. Behind it is a bundle of low-voltage wires connected to a transformer, and if you pull them loose without a plan, you end up staring at a hole with four or five identical wires and no idea which one goes where. This is where the job either stays simple or turns into an afternoon of guesswork with a multimeter.
Work through these steps in order, and don’t skip any of them even if the old unit looks straightforward:
- Turn the system off using its own Thermostat switch or the furnace/air handler switch first, so nothing tries to cycle on while you’re working.
- Go to the breaker panel and shut off the breaker feeding the HVAC system. Low-voltage wiring won’t shock you, but the transformer it connects to is on a standard circuit, and you don’t want that live while your hands are in the wall box.
- Confirm the system is dead. Try turning the fan on manually at the old thermostat before you open it up. If nothing happens, you’re clear to proceed.
- Take a clear photo of the terminal block before disconnecting anything. Get the labels and the wire colors in the same frame. This photo is your backup if a label falls off or smudges later.
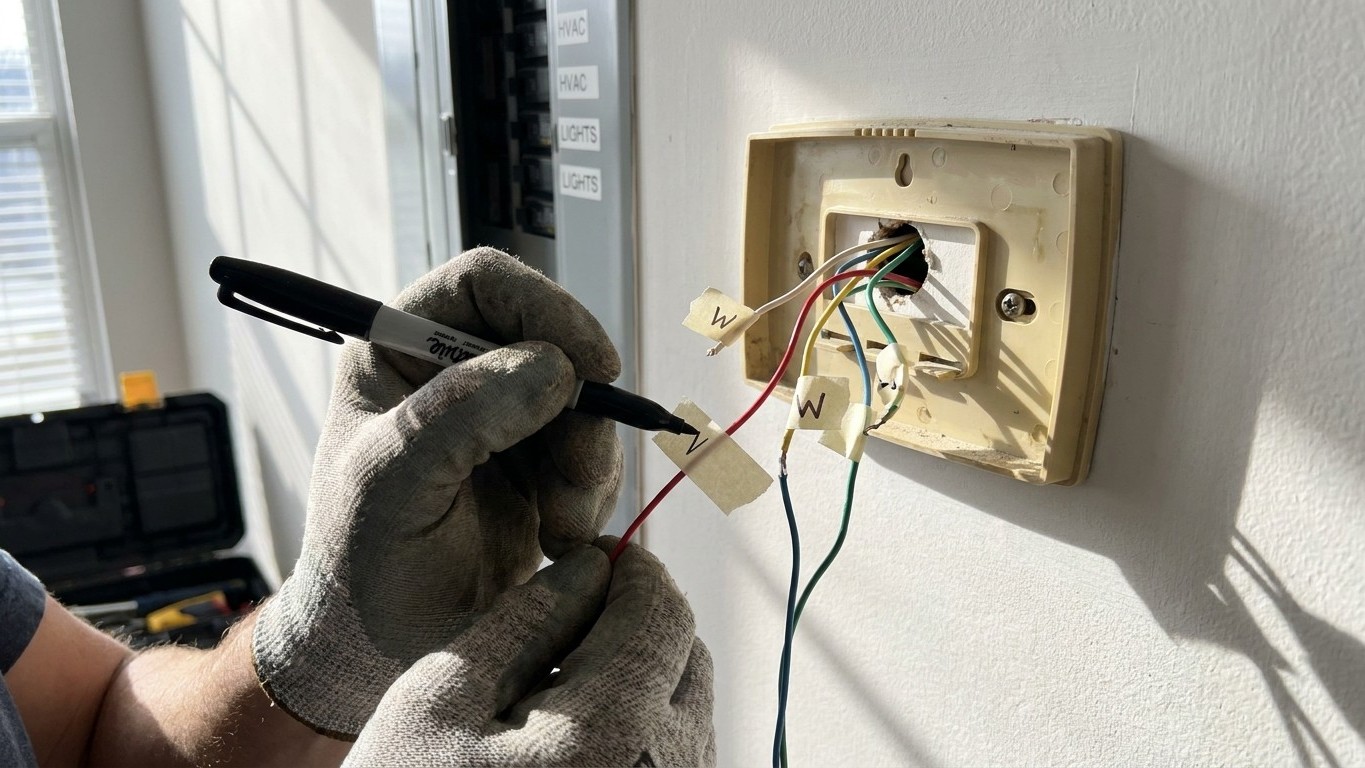
- Label each wire individually as you remove it, using tape flags or a marker, matching the letter printed next to the terminal it came from. Do this one wire at a time rather than pulling the whole bundle loose at once.
Once every wire is labeled, tape the bundle together and secure it to something outside the wall opening, like the edge of the electrical box or a piece of tape stuck to the wall itself. This single step prevents the most common way this job goes sideways: a wire slipping back into the wall cavity. Once that happens, you’re not swapping a thermostat anymore, you’re fishing a wire out of a wall, and that can mean pulling drywall or running a new wire from the furnace. A few inches of tape at this stage saves that entire headache.
Mounting the new backplate
New thermostats almost never share a mounting pattern with the old one. Different manufacturers use different hole spacing, and even models from the same brand change their backplate design across product generations. Expect to patch at least one old screw hole, and expect the wall opening behind the old plate to be larger than the new one needs, since older mounting plates were often bigger to hide gaps in the drywall cutout.
Getting the plate level and secure
A crooked thermostat is mostly cosmetic, but it’s the kind of small detail that bothers you every time you walk past it, so use a level rather than eyeballing it. Mark your screw locations with the level held against the plate, not against the wall opening. If the existing holes don’t line up with the new plate’s screw pattern, that’s normal. Patch the old holes with a bit of spackle if they’ll be visible, and drill fresh ones.
Most interior walls in the areas where thermostats get mounted are hollow drywall rather than solid framing, so plastic anchors are usually necessary to get a secure mount. Screwing directly into drywall without an anchor is how thermostats end up wobbly or eventually pull loose from the wall.
Why the cable hole needs to be sealed
This part gets skipped more than any other, and it shouldn’t be. The hole where the wire bundle passes through the wall connects your living space to the inside of the wall cavity, which is often colder or warmer than the room depending on the season. If that gap stays open, a small draft moves across the thermostat’s internal sensor every time air pressure shifts in the house, whether from a furnace blower kicking on, a door closing, or just wind pressure on the exterior. That draft skews the temperature reading, sometimes enough that the thermostat calls for heat or cooling when the room is already comfortable. A small dab of caulk or a foam gasket around the wire opening, available with most new thermostat kits or at any hardware store, closes that gap and keeps the sensor reading the room instead of the wall cavity.
Connecting the wires
This is the step where the labeling work from earlier pays off. Every terminal on a thermostat is marked with a letter, and that letter is a functional designation, not a decoration. Wire color is a convention that most electricians follow, but it’s only a convention. Older systems, DIY rewiring jobs, or simply a different installer’s habits can mean the wire colors don’t match what you’d expect. Connect wires by letter to letter, using your photo and labels from the old unit, and ignore the color entirely unless the letter is missing or illegible.
| Terminal letter | What it controls |
|---|---|
| R (or Rc/Rh) | 24-volt power from the transformer |
| C | Common wire, completes the circuit for constant low-voltage power to the thermostat |
| W | Calls for heat from the furnace |
| Y | Calls for cooling, engages the compressor |
| G | Runs the blower fan |
| O/B | Controls the reversing valve on a heat pump |
If the old thermostat had a small metal jumper wire strapped between two terminals, usually R and Rc, that jumper was tying the heating and cooling power circuits together into a single transformer feed. Some systems use two separate transformers, one for heat and one for cooling, and in that case the jumper should not be there at all. Before removing it, understand what it was doing on your specific system rather than assuming it’s leftover clutter. If you’re not certain, take a photo of it in place before you touch it, the same as with the other wires.
A heat pump system is a different animal from a standard furnace and air conditioner setup. It uses additional terminals, most commonly O and B, to control the reversing valve that switches the unit between heating and cooling modes, and it may also use different auxiliary heat terminals labeled E or AUX. A generic four-wire connection sequence doesn’t apply here. If your old system had wires connected to O, B, E, or AUX, treat this as a heat pump installation and follow the wiring diagram that comes with the new thermostat specifically for heat pump systems, rather than the standard furnace/AC diagram.
The first run, and what to watch
Once the wires are connected and the backplate is secured, resist the urge to flip everything back on at once and start pressing buttons. Test each function deliberately, in order, so that if something doesn’t work, you know exactly which connection to check.
- Restore power at the breaker, then power the system on at its own switch.
- Set the thermostat to heat mode first.
- Call for heat and confirm the furnace actually starts, listen for the blower and check for warm air at a nearby vent.
- Switch to cooling mode and call for cooling, confirming the outdoor condenser unit and indoor blower both start.
- Check the fan setting in both AUTO and ON positions, confirming it runs continuously in ON and only during heating/cooling calls in AUTO.
- Set the clock and any schedule programming last, after every function has been confirmed working.
Some systems, particularly those with heat pumps or certain communicating thermostat setups, build in a compressor protection delay. This can hold the system idle for several minutes after a mode change or a power cycle before anything actually starts. That delay is normal, not a sign something’s wrong. The mistake to avoid is switching the system between heat, cool, and off repeatedly while waiting to see what happens. Rapid mode switching during that startup window is one of the more common ways a compressor gets damaged, since it can force the unit to short-cycle before its internal protections have reset. Set the mode once, then wait it out.
Common questions
Do I need to turn off the breaker if the wires are low-voltage?
Yes. The wires at the thermostat itself run on 24 volts and won’t shock you, but they connect to a transformer that’s wired into your home’s standard electrical panel. Shutting off the breaker protects you while you’re working inside the wall box and transformer housing.
What if I only have four wires and the new thermostat wants a C wire?
Many older systems were wired without a dedicated common wire because older mechanical thermostats didn’t need constant power. Some newer thermostats include a workaround for this, but the more reliable fix is running a C wire from the furnace, which may require a technician if there’s no existing conduit path.
Can I reuse the old mounting holes for the new backplate?
Only if they happen to line up, which is uncommon across different thermostat models. Plan to patch at least one or two old holes and drill new ones positioned with a level, rather than forcing the new plate to match the old screw pattern.
Is it normal for the system to not respond immediately after I finish the install?
Yes, especially on heat pump systems or units with compressor protection logic. A delay of several minutes before the system responds to a call for heat or cooling is normal. Avoid switching modes repeatedly during that wait.