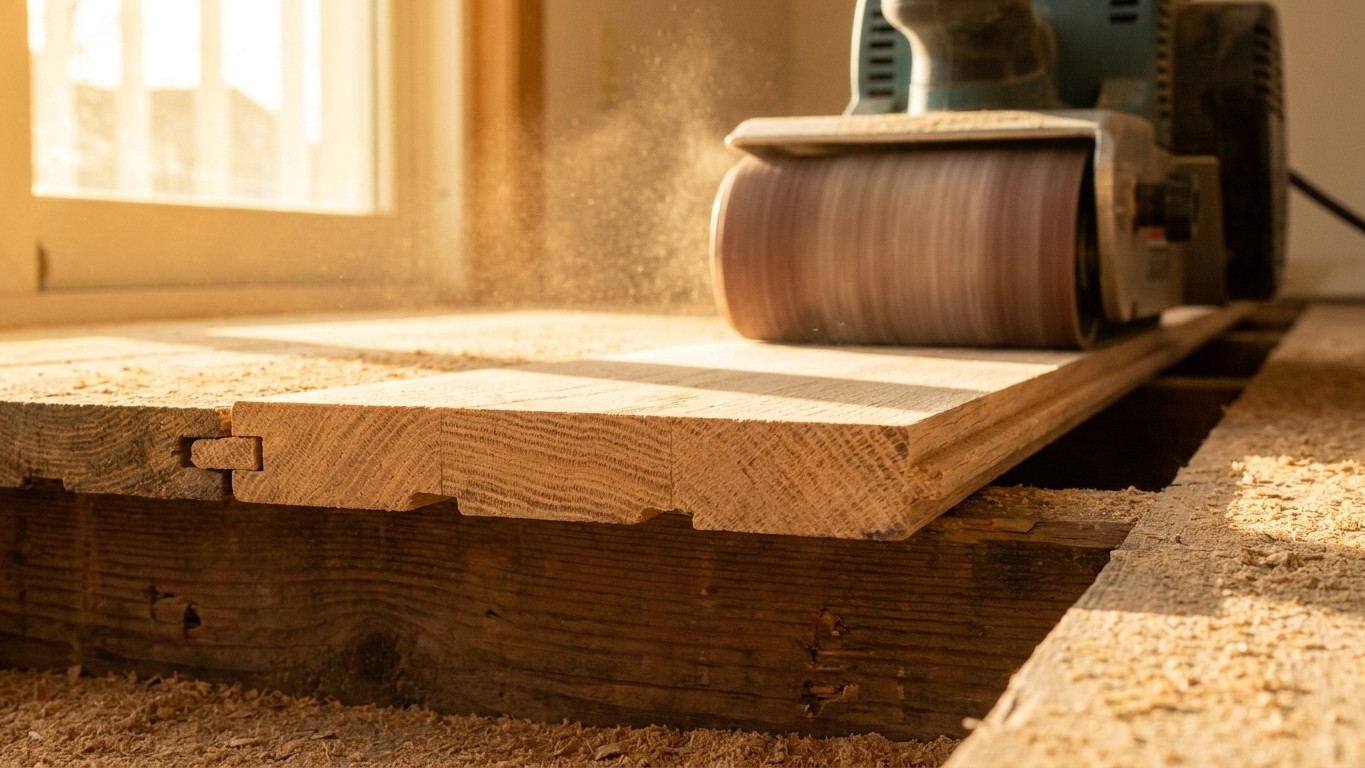

Refinishing doesn’t cost you money the floor can’t afford back, it costs the floor itself: a thin layer of wood, gone for good, every time a drum sander passes over it. The real question isn’t whether you can refinish a floor. It’s how many times that floor has left before there’s nothing left to sand.
What is actually happening

Solid wood flooring is milled with a tongue on one edge and a groove on the other, and that tongue sits below the surface you walk on. The thing to understand here is that Everything above the tongue is usable wood. Everything at or below it is Structural connection, the part that locks one board to the next. A full sand doesn’t skim dust off the finish. It removes a layer of that usable wood, flattening scratches, cupping, and old stain by literally taking the surface down to a fresh, unmarked layer underneath.
That’s why refinishing has a ceiling. Each pass of a drum sander or a large orbital machine removes a slice of the board, and a full refinish usually needs more than one pass, first with a coarser grit to level the floor, then progressively finer grits to prepare it for stain and finish. Do that enough times across the life of a floor and the usable layer gets thinner with every round. At some point the sander starts hitting the tongue, or worse, the heads of the nails or staples holding the board down. When that happens, sanding doesn’t restore the floor anymore. It damages it.
This is why a flooring professional will often check the floor’s history before agreeing to a job. Not the finish, the wood itself. A board that’s been refinished three or four times over several decades may already be down to a sliver of usable material, even if the surface looks fine today. A board that’s never been refinished, or was refinished once a long time ago, has room to spare. The surface tells you almost nothing about this. Two floors that look identical after a fresh coat of polyurethane can be in completely different positions in their lifespan, and only a look at the edge of a board, where the tongue and groove are visible, or a small test area, tells the real story.
None of this shows up as a number you can look up. There’s no federal chart that says how many sands a given floor gets, because it depends on how thick the original board was milled, how aggressively past refinishing jobs cut, and how the floor was installed. What matters practically is a simple mental model: every sand spends wood. The floor either has enough left to spend, or it doesn’t, and figuring out which one you’re dealing with is the actual job before any refinishing starts.
The covering, or what is under it
Not every problem on a wood floor is a wood problem. Some of what looks like it needs a full sand is actually the floor reacting to something happening underneath it, in the subfloor or the framing, and no amount of sanding fixes that. Separating the two is the difference between a job that solves the issue and one that just repeats it in a year.
| What you see | What it usually means | Where the problem lives |
|---|---|---|
| Scratches, dullness, worn traffic patterns, light color fading | Surface finish has worn through in high-use areas | The covering (finish layer) |
| Boards cupping, edges higher than centers | Wood absorbing uneven moisture, often from below | Likely the subfloor or crawlspace/slab beneath it |
| Boards crowning, centers higher than edges, especially after a recent sand | Wood was sanded while still wet from a cupping event, then dried and reversed | Started as subfloor moisture, made worse by refinishing timing |
| Gaps opening between boards seasonally | Normal wood movement with humidity changes | The covering, usually not a structural concern |
| Dark staining, especially near a wall, appliance, or exterior door | Water has been sitting against the wood repeatedly | A source below or behind the floor, not the finish |
| Soft, spongy feel underfoot in one spot | Wood fiber has broken down from sustained moisture | The subfloor or the framing under it |
The pattern in that list is consistent. Anything cosmetic and evenly spread across the whole floor, dullness, light scratching, minor color change, is almost always the covering wearing out on schedule. Anything localized, anything shaped like a boundary (near a wall, under a window, around a fixture), or anything that comes with a texture change like softness or cupping, is the floor reporting on conditions underneath it that a sander cannot touch.
This is where a lot of refinishing jobs go wrong. A homeowner sees cupped boards, assumes the fix is cosmetic, and has the floor sanded flat. If the moisture source underneath hasn’t been found and addressed, the boards absorb water again, cup again, and now there’s less usable wood than before because a sanding pass was spent chasing a symptom instead of the cause. The stain or dark discoloration pattern is the most reliable warning sign of this, because finish wear doesn’t produce color changes shaped like a leak. Water does.
What to check, in order
Before scheduling any refinishing work, there’s a sequence worth running through, cheapest and least invasive first. Each step either clears the floor for a straightforward job or points toward something that needs attention before sanding makes sense.
- Look at the whole floor in raking light. A flashlight held low and angled across the boards, rather than straight down, shows cupping, crowning, and unevenness that overhead light hides. This rules nothing in or out on its own, but it tells you where to focus the rest of the checks.
- Check whether the wear is even or localized. Walk the floor and note where scratches, dullness, or color changes cluster. Even wear across traffic lanes points toward a finish that’s simply run its course. A cluster near one wall or fixture rules out ordinary wear and points toward a local source instead.
- Press on any soft or spongy areas. A gentle push with a knuckle or the heel of a hand tells you if the wood has any give. Firm wood under a stained or dull surface usually means the damage is cosmetic. Soft wood rules out a simple refinish and moves the question toward what’s happening below.
- Look underneath, if access exists. A crawlspace or basement ceiling under the affected area can show staining, dampness, or daylight where it shouldn’t be. This step isn’t invasive, since it doesn’t touch the floor itself, but it does require the access to already exist.
- Bring in a moisture meter reading, done by someone who knows how to interpret it. This test exists to compare the wood flooring’s moisture condition against the subfloor beneath it, and a mismatch between the two is what flags a hidden water issue rather than normal seasonal movement. It’s a diagnostic tool, not a pass or fail number to chase, and it’s usually the point where a professional gets involved rather than a homeowner running the check solo.
- Only then, consider lifting a board. If everything above points to a moisture problem and there’s no crawlspace or basement access to confirm it, pulling a single board for a direct look at the subfloor is the next step, and it’s also where this stops being a five-minute check and starts being a small project of its own.
Every one of these checks, except the last, can be done without any demolition. That’s intentional. A refinishing quote based only on the first two steps is a guess. A refinishing quote based on all five is a real assessment.
When this stops being a flooring job
Three things take a project out of flooring territory entirely, and recognizing them early saves both time and wood. The first is anything structural, meaning the joists, beams, or support posts underneath the subfloor. Sagging, bouncy floors, or visibly deflected framing aren’t something a flooring contractor is trained or licensed to evaluate. That call goes to a structural engineer, and no amount of sanding or refinishing addresses a framing problem, because the floor above is simply following what’s happening below it.
The second is active water. A moisture reading that keeps climbing, a stain that keeps spreading, or a musty smell that gets stronger rather than fading points to an ongoing leak, not a past event. Refinishing over an active leak is a guaranteed repeat job, because new finish and fresh wood do nothing to stop water that’s still arriving. Finding that source, whether it’s a supply line, a roof penetration, or grading that pushes water toward the foundation, is a plumbing or roofing question, and this site’s guides on plumbing leaks and roof and exterior water intrusion are the better starting point than any flooring resource.
The third is wood that’s been wet long enough to smell. A musty, earthy odor coming from under a floor usually means fungal growth has already established itself in the subfloor or framing, not just surface dampness. That’s a remediation question before it’s a flooring question, and sanding a floor that sits above active mold does nothing to solve the underlying issue, it just puts a new finish on top of a problem that keeps growing where nobody can see it.
A flooring professional handles the sanding, the finish, and the assessment of how much usable wood a board has left. A plumber traces where water is entering a system it shouldn’t be in. A structural engineer evaluates whether the frame under the floor is doing its job. Knowing which one to call, before work starts rather than after a floor has been sanded twice for the same problem, is what actually protects the wood that’s left.