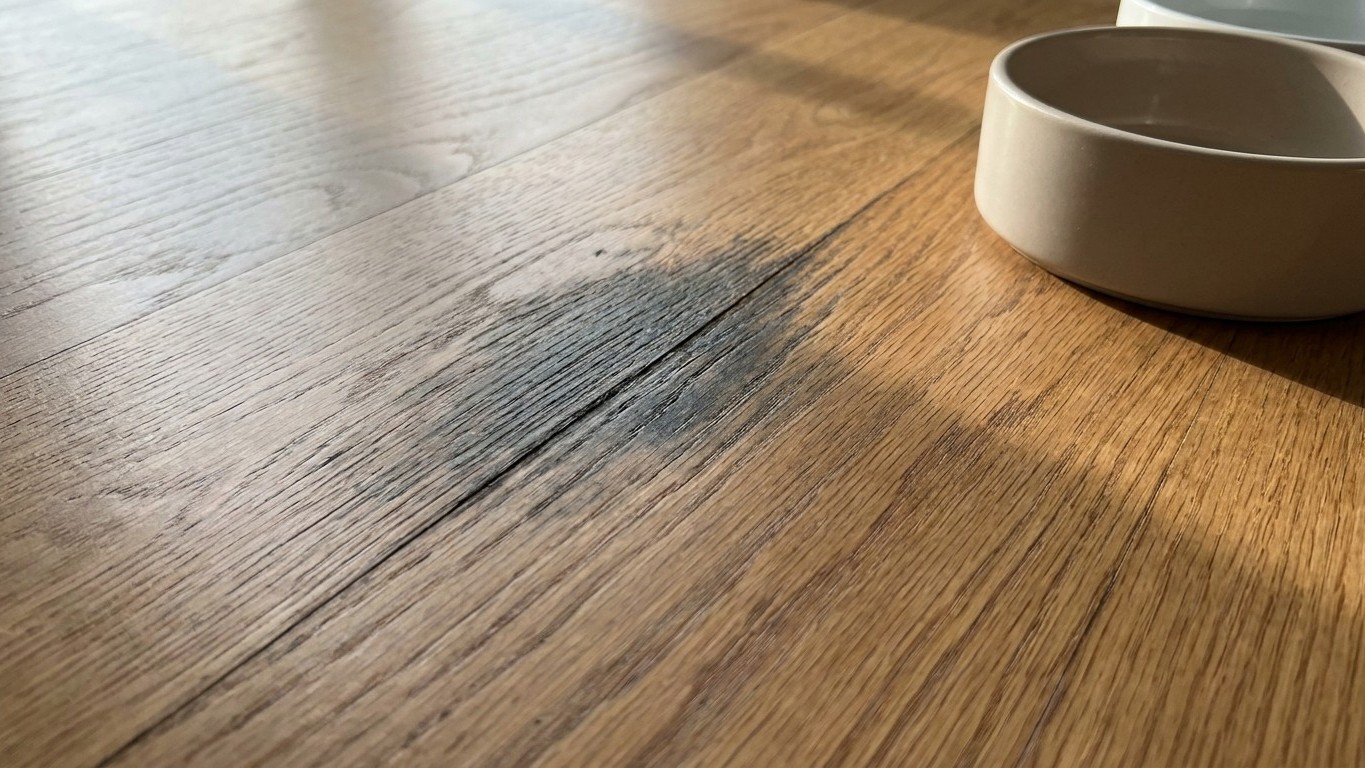

A dark stain under a pet bowl or in a corner where an animal used to relieve itself rarely comes out with cleaning products, because by the time you notice it, the discoloration has already moved past the finish and into the wood fibers themselves. At that point you’re not cleaning a stain anymore, you’re looking at wood that has chemically changed color, and no amount of scrubbing reverses that.
What Is Actually happening
The thing to understand here is penetration. A fresh puddle of pet urine sits on top of a finished floor for a while, and if the finish is intact and unbroken, it mostly stays there, on the surface, where a mop can get it. The trouble starts at the seams between boards, at worn spots where foot traffic has thinned the finish, or at any hairline crack where liquid can find a way down. Once it gets past that protective layer, it’s touching raw wood, and wood is porous. It draws the liquid in the way a paper towel draws in coffee.
What happens next depends on the wood itself. Many hardwoods, oak especially, contain natural tannins, the same compounds that give tea its color and turn a cut apple brown. Urine carries salts and, as it dries, ammonia compounds that react with those tannins in a process that’s chemically similar to how iron reacts with tannin to make old-fashioned ink. The reaction doesn’t sit on the surface. It happens inside the wood cells, which is why the mark often looks gray or black rather than yellow, and why it seems to get darker over the following days instead of fading like a surface spill would.
This also explains why these marks show up disproportionately in corners, along baseboards, and under bowls rather than in the middle of a room. Those are low-traffic spots. The finish there gets far less wear, which sounds like it should mean better protection, but it also means those areas were often finished a little thinner at installation, since the original crew knew foot traffic wouldn’t be hard on them. Add to that the fact that pets tend to return to the same spot, and you get repeated exposure to the exact same few square inches of flooring over months or years, giving the liquid many chances to find whatever small opening the finish has.
One thing worth separating early: an old, dried stain and an active, ongoing moisture problem look similar at a glance but are not the same issue. A moisture meter test exists precisely to tell them apart. The test isn’t about producing a number for its own sake, it’s a diagnostic used to determine whether the wood in and around the stain is currently holding moisture or whether what you’re looking at is discoloration left behind by something that dried out long ago. A flooring professional runs this kind of check as a first step before deciding whether sanding, board replacement, or something bigger is the right call.
The covering, or what is under it
This is the detail that surprises most people: sanding, the tool that fixes scratches, water rings, and worn finish on almost every other part of a wood floor, usually does not fix this. A sander removes a thin layer of the board’s surface. A urine stain that has fully penetrated a solid board, or worked its way through a thin surface layer on an engineered board down to the core beneath it, often goes deeper than that layer reaches. You can sand, and the mark lightens, and then the same shape reappears as you keep going, because the stain isn’t sitting on top of the wood, it’s part of it.
Reading what you’re looking at correctly means knowing which layer the problem actually belongs to.
| What you observe | What it suggests | Which layer it belongs to |
|---|---|---|
| Gray or black mark, grain still visible through it, board feels solid | Old, contained penetration stain | The flooring itself (the covering) |
| Stain plus the board feels soft, springy, or slightly cupped underfoot | Moisture has reached below the flooring layer | The subfloor, not just the covering |
| A musty smell rises when you press near the stain | Trapped moisture, possibly mold, sitting under the surface | Subfloor or framing below |
| Several boards along a straight seam are affected, not just one spot | Moisture traveled along a subfloor panel joint | Subfloor, spreading beyond the original stain site |
| The finish looks cloudy or milky white rather than dark | Finish-level clouding, a different problem entirely | Just the top coat, not the wood underneath |
The first and last rows are flooring-only problems. A contained black stain in solid wood can sometimes be reduced with wood bleach and refinished over, or the affected boards can be cut out and replaced with matching material, patched in like a graft. Cloudy white finish is the easiest case here: that’s usually just the topcoat reacting to moisture on its surface, and a refinish handles it without touching the wood color at all.
The middle rows are a different animal. Softness, cupping, or a smell means the moisture didn’t stop at the flooring. It kept going, and whatever caused it is still doing damage below the boards you can see. Sanding a cupped board without addressing what’s making it cup is a wasted afternoon; the board will just cup again once refinished, because the wood keeps absorbing and releasing moisture from below every time humidity shifts.
What to check, in order
Work from the least invasive check to the most, and stop as soon as one of them points you toward the next section of this guide instead of a flooring fix.
- Press and flex the board by hand. Firm, solid resistance rules out subfloor involvement for that spot. Give, softness, or a spongy feel rules it in and tells you the moisture reached past the covering.
- Get close and smell it. A flat, dusty, old smell suggests a dried, contained stain. A musty or sour smell, especially stronger right at the mark, suggests moisture and possibly mold are still active underneath, which rules out a simple sand-and-refinish fix.
- Check the surrounding boards, not just the marked one. A single isolated dark patch points to a repeated pet accident in one exact spot. Discoloration spreading along a seam or in a line points to moisture that traveled, which usually means a source other than the pet, like a leak running along a subfloor joint.
- Run a moisture check with a meter, or tape a small sheet of plastic over the area overnight and look for condensation underneath it the next morning. This doesn’t give you a diagnosis on its own, but it tells you whether the area is actively damp right now versus simply stained from something that happened and dried out long ago. A homeowner can do this basic version. A flooring inspector’s version is more precise but works on the same principle.
- If there’s access from below, a basement, crawlspace, or floor vent near that spot, look at the underside of the subfloor there. Staining, softness, or dampness visible from underneath confirms the problem has already crossed from the covering into the structure below it.
Everything on this list works without removing a single board. That fifth check is the natural stopping point for a homeowner doing their own diagnosis. If it shows staining or dampness on the underside of the subfloor, or if the fourth check shows the area is still holding moisture, the next reasonable step is to lift the affected boards, and that’s worth having a flooring professional do rather than guessing at it yourself.
When this stops being a flooring job
Three things mark the point where this guide stops being useful and a different specialist needs to get involved. The first is anything Structural: if the check from underneath shows a joist, beam, or support post that’s soft, sagging, or visibly damaged, that’s no longer about the floor covering at all, it’s about what holds the whole floor up, and it calls for a structural engineer or foundation specialist, not a flooring contractor.
The second is active water. A stain that keeps reappearing, or a moisture check that stays damp on repeat testing even when no pet has been near that spot in weeks, points to a leak somewhere nearby rather than an old accident. That’s a plumber’s job: tracing supply lines, drain lines, or fixture connections until the source is found and stopped. Sanding, Refinishing, or replacing boards over an active leak just means doing the job again in a year.
The third is smell paired with time. Wood that’s been wet long enough to smell musty has usually been wet long enough to start growing mold, and at that point the fix isn’t cosmetic anymore. It’s remediation, sometimes paired with subfloor replacement, and that’s a job for a general contractor or a mold remediation specialist working alongside whoever fixes the water source.
Worth keeping in mind: not every hidden water problem starts at the floor. Water traveling down through a wall from a roof leak, or dripping along a pipe run inside a wall cavity, can show up as a stain on the floor below long before anyone traces it back to its actual source. If the moisture pattern doesn’t match anything a pet could explain, checking the plumbing and roofing guides on this site for that room is a faster route to the real cause than continuing to test the floor itself.