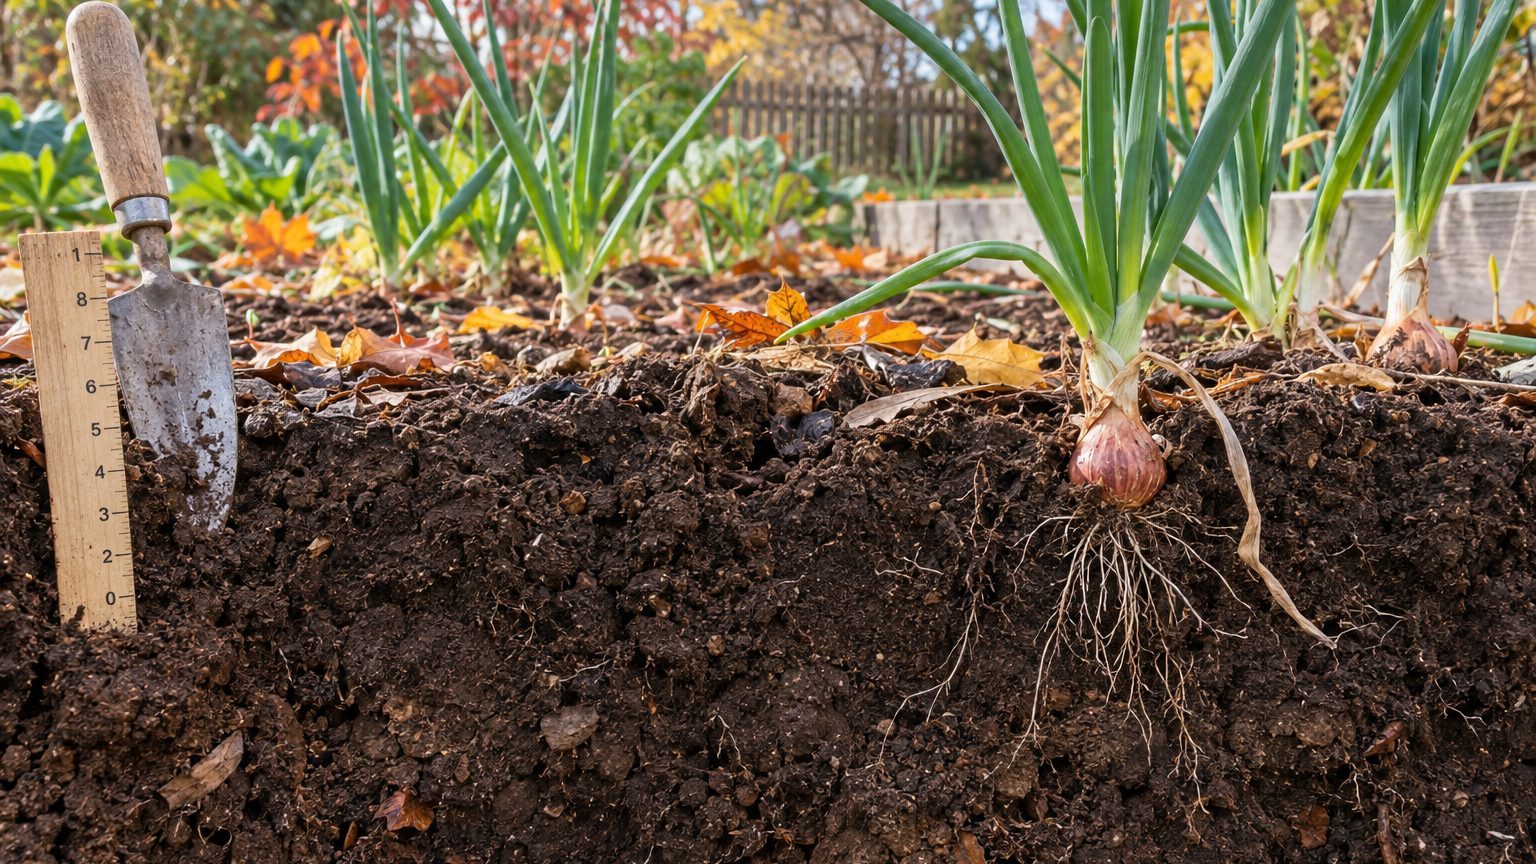

Shallots grow best in loose, well-drained loam that is rich in organic matter, with a pH between 6.0 and 7.0. They have shallow, sparse roots, and that one trait explains almost everything else about what they need. Compacted ground, soggy spots, and acidic soil hurt them faster than they hurt most garden crops.
Those roots matter more than the bulbs suggest. A shallot plant puts most of its feeding roots in the top 6 to 8 inches of soil, and they are thin compared to a tomato’s or a squash’s. They can’t punch through hardpan or go searching for water two feet down. So the top layer has to do all the work: hold moisture, drain extra water, and keep nutrients within reach.
This page covers the soil itself. For the full planting-to-harvest picture, start with Growing Shallots: One Bulb In, a Handful Out, then come back here when you’re getting a bed ready.
Texture and drainage: the two things to get right first
Gardeners talk about “good soil” as if it were one thing. For shallots it’s really two: texture (how the soil crumbles and holds together) and drainage (how fast water leaves). Fertility comes third. A mediocre bed that drains well will grow decent shallots. A fertile bed that stays wet will grow rot.
The simplest drainage check takes an afternoon. Dig a hole about 12 inches deep where you plan to plant, fill it with water, and let it drain completely. Fill it again and time it. Water that disappears at a rate of roughly 1 to 3 inches per hour is in the comfortable range. If the second fill is still standing the next morning, you have a drainage problem, and no amount of fertilizer will cover for it. Bulbs sitting in saturated soil are prone to rot, and wet conditions are also what soil-borne fungal diseases like.
The squeeze test handles texture. Grab a handful of moist (not wet) soil and squeeze it into a ball. If it falls apart the moment you open your hand, it’s sandy. If it holds a ball and stays slick and ribbon-like when you press it between your fingers, it’s heavy in clay. Soil that forms a ball and then crumbles when poked is the loam shallots like.
If your soil is heavy clay
Clay holds nutrients well but drains slowly and bakes into a crust in dry weather. Shallots in clay often sit low in the soil, with small, misshapen bulbs that have a hard time swelling against the resistance. Two fixes work reliably.
First, add organic matter. Spread 2 to 3 inches of finished compost over the bed and work it into the top 6 to 8 inches. Do this in fall if you can, so winter freezing and thawing help break up clumps. Second, build up. A raised bed 6 to 8 inches tall, filled with native soil mixed with compost, lifts the root zone above the wettest layer. In regions with soggy springs, such as the Pacific Northwest west of the Cascades, the Northeast, and much of the Upper Midwest, raised beds are often the difference between a good crop and a muddy one.
Resist the urge to mix in sand. Sand blended into clay without a huge volume can leave you with something closer to concrete. And stay off clay when it’s wet. Walking on or digging soggy clay squeezes out the air pockets, and the damage can last the whole season.
If your soil is sandy
Sand has the opposite problem. Water and nutrients drain straight past those shallow roots. Shallots in sandy ground often need more frequent watering and split feedings, because nitrogen leaches out with every heavy rain. Compost helps here too, since organic matter acts like a sponge. Add the same 2 to 3 inches, and expect to top it up each year, because sandy soils burn through organic matter faster than any other type. Think Florida, the Carolina coastal plain, or parts of the Great Lakes shoreline.
pH and nutrients: what shallots actually eat
Alliums, the onion family, are picky about acidity. Most extension guidance for onions and shallots lands on a pH of about 6.0 to 7.0, and growth tends to suffer when the soil dips below roughly 5.5. In acidic soil, the plants struggle to take up phosphorus and some other nutrients even when those nutrients are present. You see stunted tops, pale leaves, and bulbs that never size up.
That’s why a soil test beats guessing. Your state’s cooperative extension service, usually run through the land-grant university, typically offers testing for a modest fee. You mail in a sample and get back pH, organic matter, and phosphorus and potassium levels, along with recommendations in pounds per 100 square feet. Gardeners in the Northeast, the Southeast, and the Pacific Northwest, where soils lean acidic, often find they need lime. Gardeners in much of the Great Plains and the arid West often face the opposite, with alkaline soils that need sulfur or simply a lot of compost to buffer them.
Lime and sulfur work slowly. Plan on applying them months before planting, ideally in the fall for a spring bed, and retest the following year rather than adding more right away. Overcorrecting is a real risk, especially with sulfur.
Feeding without overdoing it
Shallots are moderate to fairly hungry feeders. Because the roots are short, they respond to nutrients placed right in the top few inches. A bed enriched with compost and a balanced fertilizer based on your soil test is usually plenty to start. Phosphorus supports root development, so it matters early, and soil tests often show it’s the nutrient most worth checking.
Nitrogen needs timing. Leafy growth in spring is where shallots build the factory that later feeds the bulb, so a side-dressing of nitrogen in early to mid spring, when the green tops are growing, pays off. Then stop. Heavy nitrogen once bulbs begin to form pushes more leaf, delays maturity, and produces thick-necked bulbs that cure poorly and rot in storage. A good rule is to finish feeding about four weeks before you expect to harvest, or when the tops start to lean and the bulbs swell. Follow the rate on your fertilizer label and your soil test rather than a one-size recipe, because products vary a lot in how much nitrogen they contain.
Sulfur gets a mention too. Onion-family plants use it to make the compounds behind their flavor and bite, and most soils with decent organic matter supply enough. Sulfur-deficient soils are uncommon, but they exist, especially sandy, low-organic ground. A soil test can flag it.
Preparing the bed and protecting it through the season
Bed prep for shallots is shorter than for deep-rooted crops, which is good news. Loosen the top 8 to 10 inches with a garden fork rather than a tiller if you can. Tillers are fast, but they can pulverize the structure into dust and form a compacted layer just beneath the blades. A fork lifts and fractures the soil without flipping the layers. Rake the surface level, break up large clods, and pull out stones that could push bulbs sideways.
Timing depends on your climate. In Zones 7 and warmer, many gardeners plant in fall so roots can establish over winter, and the bed should be ready about four to six weeks before the ground freezes or heavy winter rains begin. In colder regions, such as Minnesota, Maine, and Montana, planting happens in early spring as soon as the soil can be worked. Soil that’s still frozen or waterlogged isn’t ready, and rushing into it is a common mistake. Squeeze a handful. If it drips, wait.
Planting depth also ties into soil. Set the bulbs so the tips peek just above the surface, or sit about an inch below in loose ground. In heavy soil, shallower is safer because rain can pack soil down over the bulb and trap moisture around it.
Compost, manure, and what to avoid
Organic matter is the best single thing you can add, but the type counts. Finished, dark, crumbly compost is ideal. Fresh manure is a different story. It can burn tender roots, introduces pathogens, and brings along weed seeds. Fresh or decomposing organic material can also attract egg-laying flies. If you’ve ever pulled up bulbs full of white larvae, Maggots in Shallot Bulbs explains how that cycle works and why raw amendments are part of the story. If you use manure, apply it in fall and let it age at least several months before planting, or use only well-composted product.
Compost isn’t weed-free either. Poorly made compost can carry viable seeds, and shallots are poor competitors because their narrow, upright leaves cast almost no shade. A bed that’s rich and loose is also a perfect nursery for weeds, which is why Why Shallots Lose to Weeds is worth reading before you amend heavily. A 2-inch layer of straw or shredded leaves applied after the shoots are a few inches tall holds moisture and suppresses seedlings without smothering the bulbs.
Rotation protects soil as well. Avoid planting shallots, onions, garlic, leeks, or chives in the same spot more than once every three to four years. Some soil-borne diseases, white rot being the notorious one, can persist in soil for years once they establish. A bed that has grown beans, squash, or lettuce the year before is a better starting point than one that hosted garlic.
Water management rounds out the soil work. Shallots want roughly an inch of water per week during active growth, delivered evenly. Wet-dry swings can stress the plants and encourage disease, and a steady mulch layer evens things out. Then ease off as the tops yellow and fall over in early summer. Drier soil at the end helps the bulbs cure, and a sudden downpour on a maturing bed is one reason many gardeners lift their shallots a little early and finish drying them under cover.
One more detail worth knowing: soil that grew good shallots tends to stay good for them. Gardeners who add compost every year and keep their beds out of the mud often see bulb size climb over several seasons, because the structure of the top 8 inches keeps improving, and that is exactly where shallot roots live.