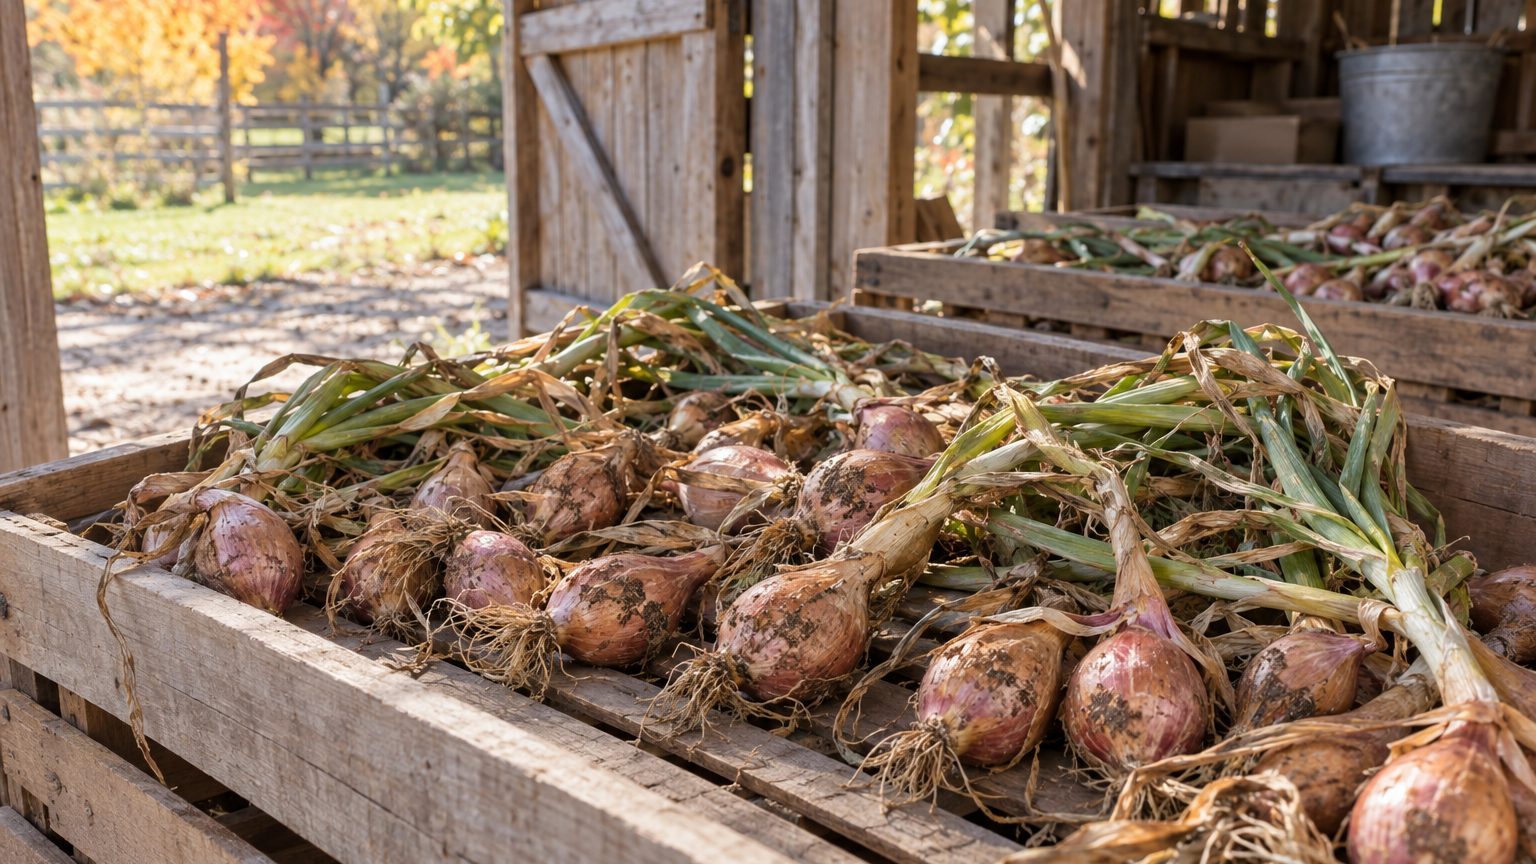

A shallot that is properly cured and then kept cool, dry, dark, and airy will hold for six to twelve months, and a good batch often lasts until the next crop is nearly ready. The curing step does most of the work. Skip it or rush it, and even a perfect basement won’t save the bulbs. Storage is mostly about not undoing what curing accomplished.
This guide covers the whole stretch from the day the tops fall over to the last bulb in the bin. If you’re still sorting out the growing side, the main guide to Growing Shallots: One Bulb In, a Handful Out covers planting and harvest timing.
Curing: where storage life is won or lost
Shallots are ready to pull when the tops yellow and flop over, which lands anywhere from late June in the South to August in northern states. Lift them with a garden fork rather than yanking, because a nicked base is an open door for rot. Shake off loose soil but don’t wash them. Water on the skins is the enemy from here on.
Spread the bulbs in a single layer on screens, wire shelves, or slatted crates, with the tops still attached. The goal is a spot that is warm, shaded, and moving air. Somewhere in the 70s to low 80s works well. A covered porch, a garage with the door cracked, or a barn aisle all do the job. Direct sun is a mistake, since it can scald the outer layers and leave bulbs with soft, cooked-looking patches.
Plan on two to three weeks. Some gardeners in dry climates are done in ten days, and in muggy ones it can stretch to four. The finish line is easy to recognize. The necks are tight and thin, with no green or moisture when you squeeze them. The outer skins are papery and rustle. The roots are wiry and dry.
Humidity is the wild card. In the Southeast, the Gulf Coast, and the Pacific Northwest in a wet September, outdoor air can be too damp to cure anything. Move the trays indoors, set a box fan on low nearby, and run a dehumidifier in the room if you have one. Airflow matters more than heat. A pile of shallots in a closed shed will mold before it dries.
Once the necks are dry, trim the tops to about an inch and clip the roots close. Rub off any loose dirt with your hands or a soft brush. Some gardeners braid the tops of long-stemmed varieties and hang them, which looks great and stores well, but only if the foliage was completely dry before braiding. Green tissue trapped in a braid is a common source of rot that starts at the neck and spreads down.
Where and how to keep them
Commercial onion storage targets roughly 32 to 40°F with moderate humidity, around 65 to 70 percent, and home gardeners can come close without special equipment. The workable range for shallots is wider. Anywhere from the mid-30s up to about 60°F will carry them through winter, with the cooler end giving the longest life. Above about 70°F, they sprout and shrivel faster.
The less obvious trouble is the middle of the range. Bulbs held in the damp 40s and low 50s can start sending up green shoots earlier than those in either a truly cold or a warm, dry spot. That’s one reason a damp root cellar isn’t always the best answer for alliums, even though it’s perfect for carrots and beets.
Good home options, in rough order of reliability:
- An unheated but frost-free basement, with bulbs in mesh bags or open crates
- A cool closet or pantry on an interior wall, away from the furnace and water heater
- An insulated garage in mild states, as long as temperatures stay above freezing
- A spare room with the vent closed and the door shut
Freezing is the line you cannot cross. Shallots that go below roughly 28 to 30°F turn glassy and mushy once they thaw. Gardeners in Minnesota, Wisconsin, Maine, Montana, and the Dakotas should be wary of unheated garages and sheds from December through February, even when the day’s highs look mild. A cheap min/max thermometer taped to the shelf tells you what the coldest night actually did.
Containers that breathe
Anything that lets air pass through works. Mesh produce bags, old onion sacks, wire baskets, paper bags with holes punched in the sides, and shallow wooden crates all do well. Old nylon stockings, with a knot between each bulb, are a classic and still work. Avoid sealed plastic bins and zip bags, which hold in moisture and turn a tidy batch into a smelly one by January.
Depth matters too. Two or three layers in a crate is fine, but a deep heap compresses the lower bulbs and traps heat in the middle. A shallow container with room around the edges beats a big one packed full.
Keep them away from potatoes and apples. Potatoes give off moisture that onions absorb, and apples release ethylene gas, which can encourage sprouting in alliums. Neighbors in a shared root cellar are fine as long as there’s real distance and air movement between the bins.
Sorting, checking, and using them in the right order
Before anything goes into storage, sort the harvest into three piles. The first is the keepers: firm, medium to large bulbs with thin dry necks and unbroken skins. The second is the use-it-soon pile: anything bruised, nicked by the fork, or with a thick, fleshy neck that never fully dried. Thick necks are the classic early failure, because moisture sits in the center and rot begins there. The third is the planting stock, which is a separate decision covered below.
Eat the second pile first, within a few weeks. It’s a good excuse to roast a tray, or to make a quick batch of shallot confit for the fridge.
Check the main supply every three to four weeks. It takes five minutes. Pick up the bags, squeeze a few bulbs, and sniff. A soft spot or a sour smell means pull that bulb out right away, because one rotting shallot will spoil its neighbors faster than most people expect. Check, too, for bulbs starting to sprout. A green tip at the top isn’t a disaster. The bulb will go soft and hollow sooner, but you can pull the shoot and use it like a chive, and cook the bulb within a week or two.
If your supply is large, put the bulbs you want to last longest in the coldest, driest part of your storage and keep a small working bowl in the kitchen. Opening and closing a bag every day lets in humid air and slowly shortens the life of everything inside it.
When the stash gets ahead of you
Sometimes storage runs out of road in late winter, or a particular batch won’t cure well. You have options that save the harvest instead of the compost bin.
Freezing works for cooked uses. Peel, slice or chop, spread the pieces on a tray, freeze until firm, then bag them. They lose their crunch, so save them for sauces, soups, and sautés rather than raw vinaigrettes. Sautéing first and freezing the softened shallots in ice cube trays gives you ready-made flavor bases.
Dehydrating is the other route. Thin slices dry well in a dehydrator at around 125°F and keep for a year in a sealed jar. Pickling in a simple vinegar brine is quick and gives you something to put on tacos and salads, and it keeps in the refrigerator for a couple of months.
Holding bulbs back for the next planting
Shallots multiply, so a portion of the harvest can become next year’s crop. Choose the sound, mid-sized bulbs, roughly an inch to an inch and a half across, since smaller bulbs often give more reliably formed clusters than oversized ones. Store them separately from the eating stock, labeled by variety, in the same cool, dry conditions. The full approach, including how many to set aside, is in Keeping Back Sets for Next Year.
Where winters are mild, that planting stock goes back in the ground in fall. In colder regions, some gardeners hold bulbs through winter and set them out as soon as the soil can be worked. If that’s your plan, Planting Shallots in Spring Instead explains how timing and harvest dates shift, which also changes your curing window. A spring-planted crop tends to mature later, so your curing weather in late summer or early fall may be cooler and damper than a midsummer harvest would face.
One rule holds for all planting stock. Never save bulbs that show any soft spot, mold, or basal rot, even if they look fine on top. Disease travels with the bulb into the bed, and it’s much easier to prevent than to dig out later.
A last detail from the commercial side: onion growers often cure and store bulbs in mesh bags or bins with forced air, and a simple fan running a few hours a day in a home basement copies that principle cheaply. Gardeners who add one tend to see fewer soft bulbs by midwinter than those relying on still air alone.