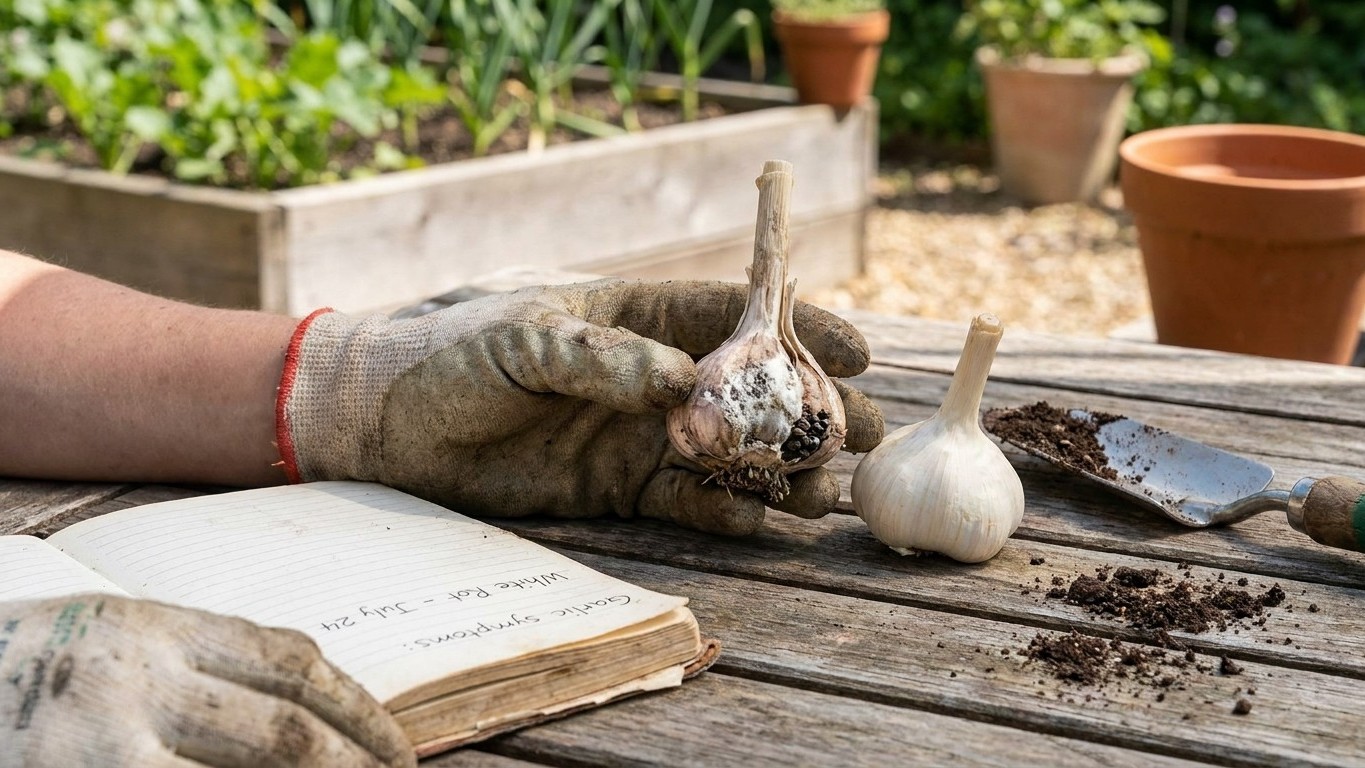

Garlic doesn’t collapse overnight, and it rarely fails in a way you’d miss if you’re actually looking. Most of the diseases that wreck a garlic crop announce themselves first as a change in leaf color, a soft neck, a mushy base, or a smell that wasn’t there the week before. The single most useful habit is checking the basal plate and root zone of every bulb before you plant it, and again before it goes into storage, because that’s where the fungi and bacteria that ruin garlic actually live.
Why this matters for garlic
Garlic occupies a bed for nine months from clove to harvest. A pathogen that gets into the soil or into a seed clove at planting can sit quietly through winter and early spring, then show up as stunted, yellowing shoots in late spring or as a rotten bulb the day you lift it. By the time you see the damage, the decision that caused it was made months earlier.
The cost isn’t just one season. Several of the worst garlic diseases, garlic White rot in particular, leave behind resting structures in the soil that can make a bed unsafe for alliums for years afterward, and soil-borne threats like garlic Southern blight can be just as persistent once established. A grower who plants infected seed garlic into a clean bed doesn’t just lose that year’s crop, they can lose the bed. That’s why reading symptoms correctly, and reading them early, matters more with garlic than with a fast crop you can replant in the same season if something goes wrong. The window to catch most of these problems runs from the moment you select seed cloves through the first few weeks of spring growth, well before any visible failure at harvest.
When to do it
Symptom-watching on garlic isn’t tied to a date on the calendar. It’s tied to growth stage. The first checkpoint is at seed selection and planting, when every clove should be inspected and split by hand rather than pre-broken, since a soft or discolored clove at this stage is often the first visible sign of trouble. The second checkpoint comes as shoots emerge and green up in spring: this is when foliar diseases like garlic Rust and early leaf yellowing from root or basal rot become visible above ground, even though the infection usually started the previous fall.
The third checkpoint is at curing and storage, weeks after the bulbs are lifted. Garlic Botrytis neck and bulb rot, soft rot, garlic Fusarium basal rot, garlic Pink root, and viral issues like garlic Garlic mosaic, and garlic Blue mold rot often don’t show themselves until bulbs have been curing for a while, which is why a bulb that looked perfectly sound at harvest can turn soft and moldy in the braid a month later.
Regional sources don’t agree on how long to scout before assuming a plant is clean, and that disagreement is real, not an oversight. Cool, wet regions see soil-borne fungal problems develop and show symptoms on a different timeline than warm, dry regions where bacterial rots move faster once conditions turn humid. Rather than chase a single timeline, treat the three checkpoints, seed selection, spring green-up, and curing, as the moments that matter regardless of climate, and check your state extension service for the disease pressures specific to your growing season.
How to do it
Reading garlic disease symptoms starts before the clove ever touches soil. Buy seed garlic from a supplier who inspects for disease, not from a grocery store bulb, and reject any clove that feels soft, shows discoloration at the base, or has a fungal smell. Never plant a clove you wouldn’t be willing to eat. That single rule catches a surprising share of problems before they start.
At planting
Once cloves pass inspection, planting depth and spacing affect how disease spreads later. Garlic set too shallow or crowded holds moisture against the neck and base longer after rain, which favors the fungi behind neck rot and basal rot. The specifics on depth and spacing are covered in full on the planting guide, but the disease-relevant point is airflow: cloves spaced tightly with poor drainage are the ones that show basal rot first.
Through the season
Watering practice matters as much as planting depth. Garlic that sits in waterlogged soil, especially in the weeks before harvest, is far more prone to basal and neck rots, since these fungi need moisture to establish and spread through the bulb. The watering guide covers when to cut off irrigation before harvest, and that cutoff date is one of the most effective disease-prevention tools a garlic grower has, because it lets the bulb skins dry and toughen before the fungi that cause storage rot get a foothold.
Rotation and sanitation
Crop rotation is the other pillar. Garlic and other alliums, onions, leeks, shallots, should not go back into the same bed for several years running, because pathogens like the one behind white rot persist in soil far longer than a single season’s fallow period can fix. Because the exact rotation interval and disease pressure varies by region and soil type, check with your state extension service for local guidance rather than relying on a blanket number. In the meantime:
- Pull and destroy any plant showing stunted growth or yellow, dying leaves as soon as you spot it, rather than leaving it to spread spores.
- Clean tools between beds if you’ve handled diseased plants, since some pathogens travel on soil clinging to a trowel.
- Cure bulbs in a well-ventilated, dry space out of direct sun, since poor curing airflow is what turns a minor neck infection into full storage rot.
- Label and isolate any seed garlic saved from a bed that showed disease symptoms, and don’t replant it.
What goes wrong
Most garlic disease failures come down to a handful of repeat offenders, and each one leaves a different signature if you know where to look. The mistake almost never announces itself the day it happens, which is exactly why naming the specific tells matters more than a general warning to “watch for problems.”
| Disease | Favors | When it becomes visible | The tell |
|---|---|---|---|
| White rot | Cool, moist soil | Spring growth or at harvest | White fungal mat and black sclerotia at the base |
| Fusarium basal rot | Warm soil, stressed plants | Mid-to-late season or storage | Brown, sunken rot at the base plate |
| Botrytis neck rot | Humid curing conditions | Weeks into storage | Gray, fuzzy mold at the neck |
| Rust | Humid air, dense planting | Foliage stage, spring to early summer | Orange pustules on leaf surface |
| Bacterial soft rot | Wounded tissue, wet conditions | Storage, sometimes within weeks | Slimy, foul-smelling patches |
White rot

This is the one growers fear most, because the fungus responsible produces sclerotia that survive in soil for years. Leaves yellow and die from the tip down, and pulling the bulb reveals white, cottony growth studded with tiny black specks at the base. There is no cure once it’s in a bed, only avoidance.
Fusarium basal rot

Warm soil and any stress on the plant, drought, heat, poor drainage, sets this one up. The base plate turns brown and mushy, sometimes with a faint pink cast to the fungal growth. It often finishes its damage in storage, so a bulb that looked fine at harvest can be a total loss a month later.
Neck rot and soft rot
Both show up after harvest, not before, which is why curing conditions matter as much as anything done in the ground. A soft, gray neck that develops fuzzy mold points to botrytis. A slimy, foul patch anywhere on the bulb points to bacterial soft rot, usually starting at a wound or bruise from harvest handling.
How this changes across the country
Disease pressure on garlic tracks climate closely, and a grower in a cold, wet region deals with a different mix of problems than one in a warm, dry one. In regions with cool, damp springs and heavy clay soils, common across much of the Pacific Northwest and parts of the upper Midwest, white rot and other soil fungi that thrive in moisture find ideal conditions, and drainage becomes the single biggest lever a grower has against them.
In warmer, drier growing regions, common through much of the Southeast and the Southwest, fusarium basal rot and bacterial rots tend to dominate instead, since these organisms favor heat stress and humid storage conditions over cold, wet soil. The practical difference is where a grower puts their effort: cold-climate growers lean hardest on rotation and drainage before planting, while warm-climate growers lean hardest on curing conditions and prompt, careful harvest handling to avoid the wounds that let bacteria in.
Because disease pressure, typical planting windows, and the specific pathogens active in a given area all vary by state, the most reliable next step for any grower is checking with their state’s cooperative extension service, which tracks regional garlic disease reports and can flag an active outbreak in a given growing season before it reaches your own beds. General growing background, including how the crop is typically handled from clove to harvest, is covered on the growing garlic guide.
Common questions
Can I still eat garlic that has rust spots on the leaves?

Yes, rust affects the leaves and can reduce bulb size if it’s severe, but it doesn’t make the bulb itself unsafe to eat. Pull and discard badly infected leaves to slow spread to healthy plants nearby.
My garlic looked fine at harvest but went soft in storage, what happened?
This is almost always neck rot or bacterial soft rot, both of which often stay invisible until weeks into curing. Check your curing space for adequate airflow and make sure bulbs went in dry, since damp curing conditions are the most common trigger.
Is it safe to Plant Garlic from my grocery store bulbs?
It’s risky. Grocery store garlic is rarely inspected for the diseases covered here, and some grocery garlic is even treated to prevent sprouting, which can affect germination. Certified seed garlic from a dedicated supplier is a safer bet for avoiding an infected start.
How do I know if it’s white rot or just normal root dieback?
Normal root dieback looks dry and brown, without any white, fuzzy growth. White rot shows a distinctly cottony, white fungal mat at the base with small black sclerotia visible if you look closely, often best seen against the wet root tissue right after pulling the bulb.